Server administrator - Configuration and logging
The Configuration and logging pane of Server administrator allows you to configure logging, e-mailing, and other various settings of the memoQ server.
Some settings need remote desktop: To modify the server addresses and the licensing mode, you need to open memoQ on the server computer itself. To do that, use Remote Desktop to log on to the server computer, and make the changes through that. You may need to restart the memoQ server service after that. To learn more, read the Help pages for the memoQ server deployment tool.
Requires memoQ project manager: You need the project manager edition of memoQ to manage a memoQ server or a memoQ cloud.
You need to be an administrator: You may manage the server only if you are a member of the Administrators group on the memoQ server.
How to get here
- At the very top of the memoQ window - in the Quick Access toolbar
 -, click the Server Administrator (cogwheel in a cloud)
  icon. The Server Administrator window opens, with the Connection pane.
Or: On the Project ribbon, click Server Administrator.
- Under Category, click Configuration and logging. The Configuration and logging pane appears.
Type or choose the address of the memoQ server, and click the Select button.
You may need to log in to the memoQ server: If you have not used the server before, the Log in to server window opens. Type your user name and password for that server, and click OK.
What can you do?
To do this, use the Configuration and logging tab.
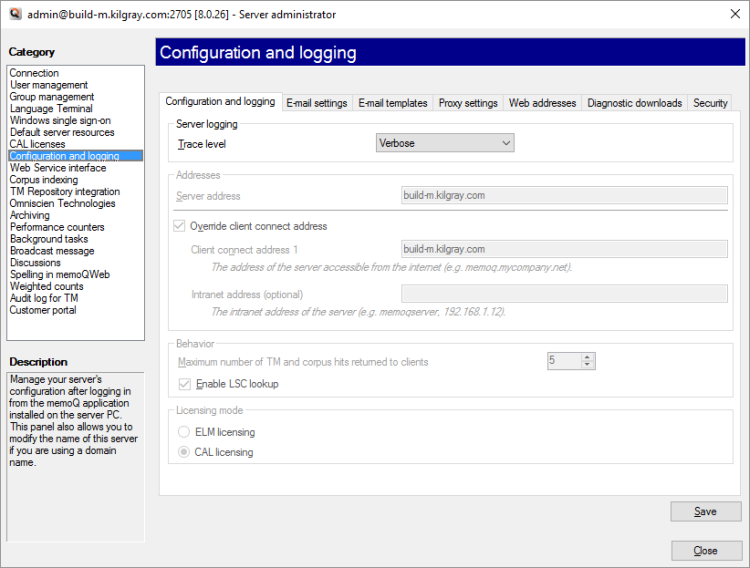
In the Trace level drop-down box, choose how detailed the server logs will be. The logging levels are:
- Verbose: All actions of the server (all client connections and queries) will be listed in the log file.
- Info: All major actions - except for queries and updates - will be listed in the log file.
- Warning: Only problems (warnings and errors) will be listed in the log file. Warnings are minor problems that do not prevent the server from operating.
- Error: Only errors will be listed in the log file. Errors are serious problems that make the server or at least one of the published resources unavailable.
- Off: The server will not log anything.
To do this, connect to the memoQ server computer through Remote Desktop, and run memoQ on the server computer itself.
Requires remote desktop: To change the addresses, connect to the memoQ server through remote desktop, and make the change from a copy of memoQ that is running on the server computer.
Use the Configuration and logging tab. Fill in the boxes under Addresses.
Normally, memoQ server takes the address for the server from the computer name in Windows settings.
If you set up another address for memoQ server - for example, you set up an internet address like memoq.company.com -, you need to fill in the Client connect address 1 box. If the server is outside the network of your organization, this is all you need.
If the server is inside the network of your organization, it may have a different external address and an internal address. In this case, you may need to fill in the Intranet address (optional) box, too.
- Server address: This box contains the IP address or the name of the server. You cannot write in here, this is always taken from Windows settings.
- Override client connect address: Check this check box if you need to use a different address. Be careful: If you enter the wrong address, the server may become unreachable for remote users.
- Client connect address 1: Type or paste the internet address of the server. From the internet - for external users -, memoQ server will be available through this address.
- Intranet address (optional): If the server computer is inside a corporate network - and not in a public hosting center or a cloud provider -, you may need to use a different address for internal access. Type or paste this address here.
You must fill in the address fields if you need the server to distribute CAL or ELM licenses. To learn more: See Help about the CAL licenses or the ELM licenses pane of Server Administrator.
To ease the load on the memoQ server, you can limit the number of matches the server returns from each translation memory.
Requires remote desktop: To change the maximum number of matches, connect to the memoQ server through remote desktop, and make the change from a copy of memoQ that is running on the server computer.
Normally, memoQ server will not return more than 5 matches from a translation memory. To change this, set the number in the Maximum number of TM and corpus hits returned to clients box.
Normally, the memoQ server will run automatic concordance (LSC - longest substring concordance) on each translation memory. If you are experiencing delays, you can turn this off: Clear the Enable LSC lookup check box.
This is where you can change the licensing mode of memoQ server - if you log in to the server through Remote Desktop, and install the memoQ desktop program on it.
Use the Deployment tool instead: To change the licensing mode, log on to the memoQ server computer through Remote Desktop. Start the Deployment tool. Click Advanced, and choose Configure server. In the Configure server window, click Address. Choose the licensing mode there. To learn more: See Help about the Deployment tool.
memoQ server can lend licenses to translators, reviewers, and project managers. To do this, the server must have a license pool, a finite set of licenses, from which it can give licenses - and take them back when necessary.
There are two ways to lend licenses to users: CAL and ELM.
- CAL (Concurrent Access Licensing): A user takes a license when they start memoQ. The license is automatically returned to the license pool when the user closes memoQ. It is possible that two users take the same license during a day, if they work in very different time zones. To use CAL licensing, users must be online at all times. For the owner of a memoQ server, CAL licensing is more economic than ELM, but CAL does not allow users to work offline.
To start using a CAL license, a user needs to check out an online project that gives them a license, or they need to use memoQ activation to request one. - ELM (Enterprise License Management): A user takes a license when they check out an online project that gives them a license, or when they use memoQ activation to request one. The license does not return to the license pool when the user closes memoQ. An ELM license is truly lent to the user for several days. memoQ will check the validity of a license once a day, but if there is no response, it can go on working for three days. For the owner of a memoQ server, ELM is less economic than CAL, but it allows users to work offline for several days.
One memoQ server is either all CAL or all ELM: You cannot mix CAL and ELM licenses on one memoQ server. Either all licenses lent are ELM, or all of them are CAL. You can switch between both licensing modes. To do it, log on to the memoQ server through Remote Desktop, and change this in a copy of memoQ running on the server itself. The setting is available in Server Administrator, on the Configuration and logging pane. The server needs to be restarted for the change to take effect.
Before it can send e-mail notifications, memoQ server needs to connect to an e-mail service.
To do this, click the E-mail settings tab.
No need for this on a memoQ cloud: A memoQ cloud is automatically configured to send e-mail. You do not have to set it up.
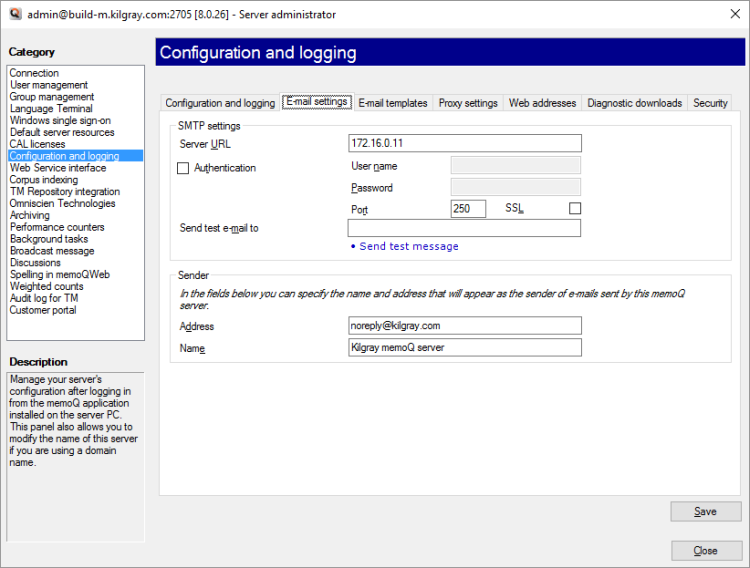
You need to fill in every box on this tab. They are the details of the e-mail service (or the e-mail server) that your organization uses to send e-mail. If you do not know these details, contact the IT specialists of your organization.
- Server URL: The address of a mail server (SMTP server).
- Authentication: Check this check box if the e-mail server requires a user name and a password to send e-mail. Most servers do. Fill in the User name and Password boxes, too.
- Port: Type the number of the TCP port where the e-mail server is listening. If the e-mail traffic is not encrypted, the standard port number is 25. In case of encrypted traffic, the port number is 465. Check this with the IT specialists of your organization.
- SSL: Check this check box to encrypt e-mail traffic. When you check this check box, the port number in the Port box will automatically change to 465.
- Send test e-mail to: Type or paste an e-mail address. This is where the memoQ server will send a test e-mail.
To test the e-mail service, click Send test message. Then check the e-mail of the address you entered in the Send test e-mail to box.
To finish setting up the e-mail service, type an address and a name that will appear as the sender of the e-mails.
In the Address box, use an e-mail address like noreply@organization.com - unless you plan to monitor the responses to these e-mails. If you do plan to monitor the e-mails, use a project management or an issue management system.
In the Name box, type or paste a friendly name that recipients will see as the sender.
memoQ server can send several different types of e-mail notifications. You can change the text and the contents of these notifications, so that they match your organization better.
To do this, click the E-mail templates tab.
To change the language of e-mail templates: E-mail templates are translated into 6 languages: Chinese, French, German, Hungarian, Japanese, and Spanish. To change the language, you need to log in to the memoQ server computer through remote access. To learn more, see this Help Center article: Changing the language of the notification mails sent by the memoQ server.
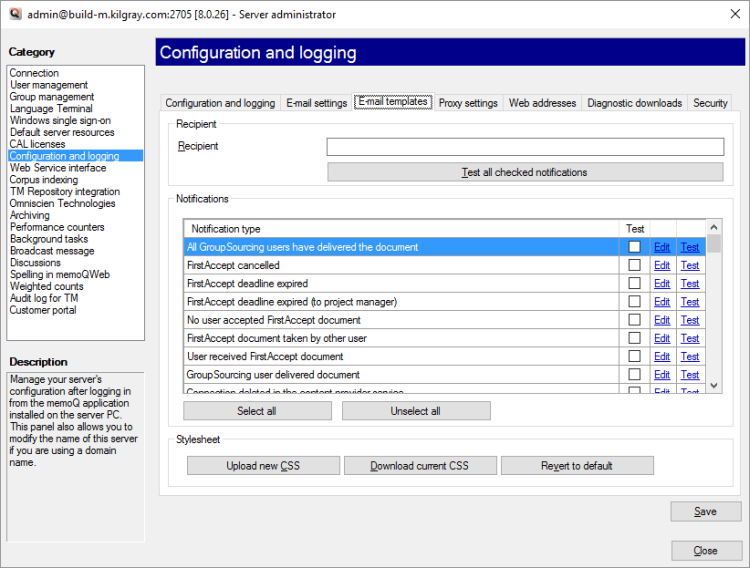
To change a notification: Under Notifications, find the notification type. In the same row, click Edit. A new window opens where you can edit the contents of the template. When you finish, click OK. To test the changes: Type or paste an e-mail address in the Recipient box. In the row of the notification type, click Test.
To test several notifications at once: Check the check boxes for all notifications that you want to test. Type or paste an e-mail address in the Recipient box. In the row of the notification type, click Test.
To change the formatting of the e-mails: memoQ server sends e-mails in the HTML format, and uses CSS style sheets to format them. To change the formatting: Click Download current CSS to save the current style sheet on your computer. Open the CSS file, make changes. Click Upload new CSS, and select the modified CSS file. Careful: You need to be familiar with CSS to be able to change the formatting. You may need to leave it to HTML specialists.
To save the changes: Click Save. If you click away from this tab, or you click Close, memoQ will ask whether you want to save or discard the changes.
memoQ server needs to connect to the internet to check in with the central activation server - for example, to refresh the credential for issuing ELM or CAL licenses.
To set up a proxy service, click the Proxy settings tab.
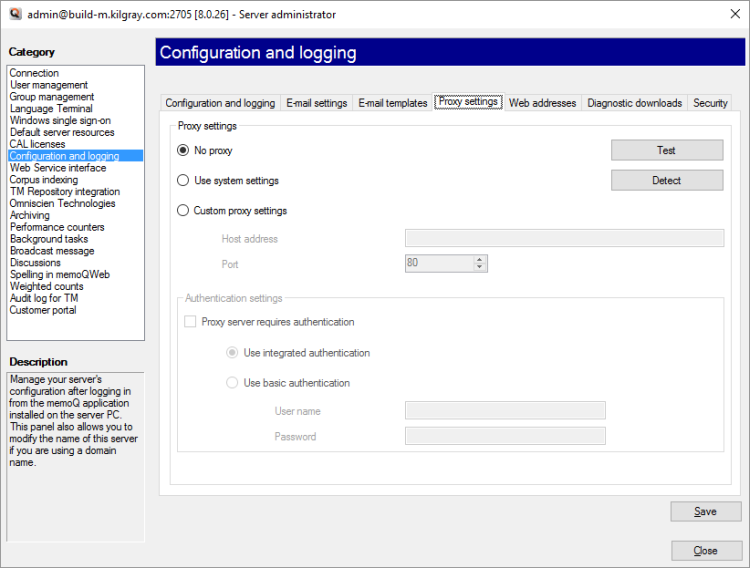
Choose whether or not you need a proxy server - and if you do, where the settings come from:
- No proxy: This is the default option. memoQ will attempt to contact memoQ Zrt.'s activation server directly over the Internet (which will fail if your network uses a proxy server to access the Web).
- Use system settings: Choose this option to use the settings of your network's proxy server for memoQ. Click the Detect button to detect the proxy settings for your setup.
- Custom proxy settings: Choose this option to enter custom proxy settings. Enter the host address in the text field. Choose a port from the drop-down list.
Note: You will need to obtain these details from IT specialists of your organization.
To test the proxy settings, click Test.
Under Authentication settings, set up the following:
- Proxy server requires authentication: Check this check box to allow authentication, then use the radio buttons below to choose the type of authentication:
- Use integrated authentication: Choose this option to use the integrated authentication from the system. memoQ will use your user name and password to access the proxy server.
- Use basic authentication: Choose this option to enter a user name and password to use a basic authentication for the proxy server. Note that this method is less secure than integrated authentication.
To save the changes: Click Save. If you click away from this tab, or you click Close, memoQ will ask whether you want to save or discard the changes.
If the memoQweb module is there on the memoQ server - so that users can connect to it from their web browsers -, you need to enter the web address of the service on the Web addresses tab.
If Customer Portal is installed - so that your customers can send in work directly -, you also need to enter the web address of this service on the Web addresses tab.
You need to do this, so that memoQ server can call back to memoQweb and to the Customer Portal when necessary.
- Enter the full web address for memoQWeb (legacy) in the memoQWeb (legacy) web address box.
- Enter the full web address for the Customer Portal in the Customer Portal web address box.
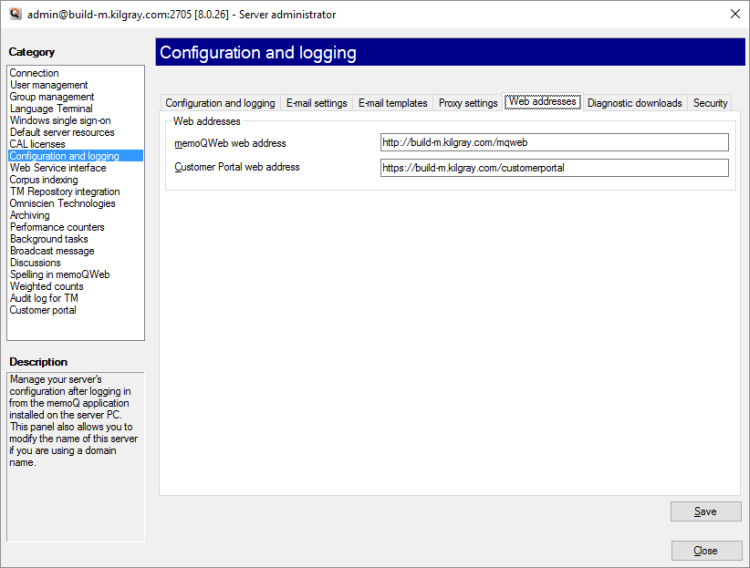
Then you can continue setting up Customer Portal in memoQweb.
To do this, click the Security tab.
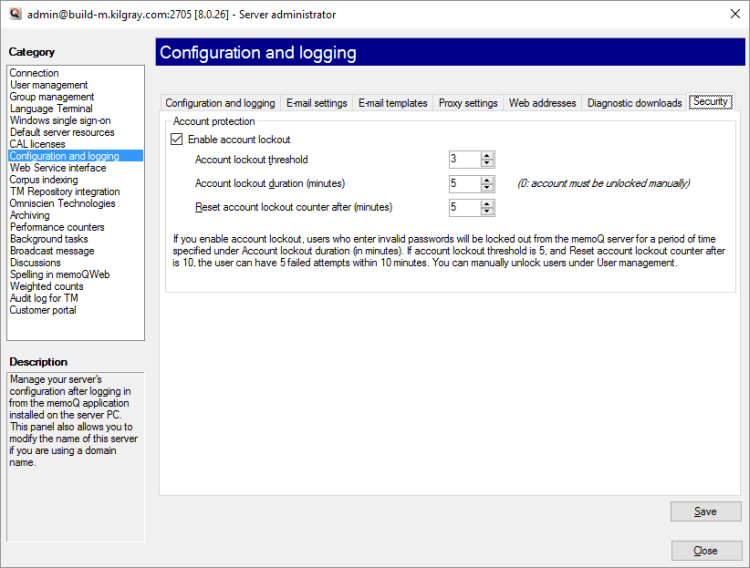
Under Account protection section, check the Enable account lockout check box. Normally, this is turned off. This will restrict invalid login attempts. Use the following options:
- Account lockout threshold: Locks the account after 3 invalid login attempts. 3 is the minimum and default value, you can set it higher in the drop-down list.
- Account lockout duration (minutes): Locks the account for a certain period, where 0 means that the administrator must enable the account manually.
- Reset account lockout counter after (minutes): Enter a value for invalid password attempts which should happen within this time frame; after that, the counter for invalid attempts is reset.
When account lockout is turned on, memoQ keeps a count of unsuccessful login attempts. If the Account lockout threshold is reached - normally, when a user tries to log in more than 3 times -, the user will be locked out for a period of time. If the user does not try again for a time, the counting starts over.
Administrators will not be locked out: The lockout does not affect members of the Administrators group. Their accounts are never locked.
If any accounts are locked, they are listed at the bottom of the window.
To save the changes: Click Save. If you click away from this tab, or you click Close, memoQ will ask whether you want to save or discard the changes.
To do this, click the Usage data tab.
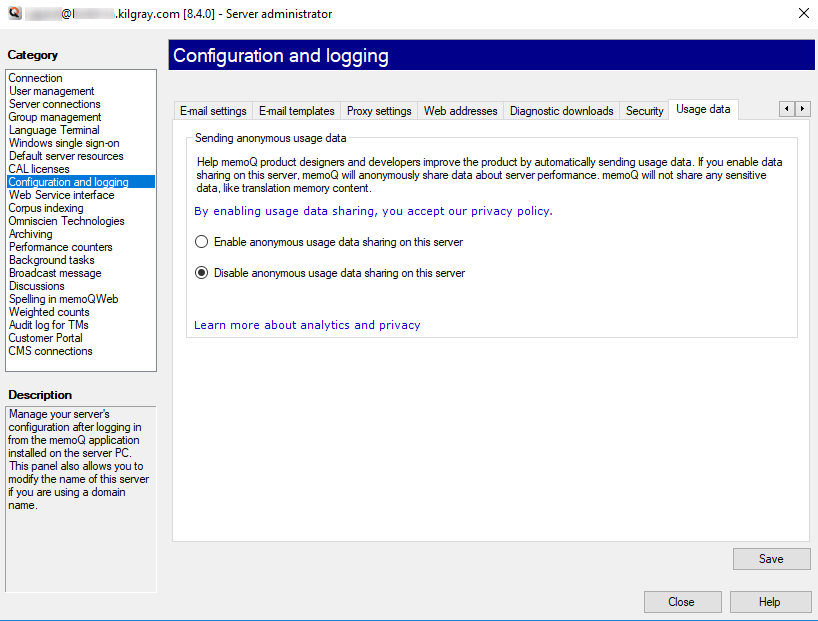
Learn about what data you would share with us and how we use those data:
- To read memoQ's general privacy policy: Click the privacy policy link.
- To learn more about the Customer Insights Program: Click the Learn more about analytics and privacy link.
Allow or forbid sending us anonymous data about how you use memoQ.
If you allow usage data sharing on the server, an SQLite database called telemetrydatastore.db will be created in the %PROGRAMDATA%\MemoQ Server folder. This stores collected data for 30 days.
- To share anonymous usage data with memoQ's designers and developers: Choose the Enable anonymous usage data sharing radio button.
- To not share any usage data: Choose the Disable anonymous usage data sharing radio button.
Diagnostic downloads? This tab is reserved for memoQ support. When a memoQ support specialist logs on to your server, they can download diagnostic information. This helps memoQ developers pinpoint problems in the server.
When you finish
To return to memoQ: Click Close.
Or, choose another category to manage:
- Connection (choose this to manage a different server)
- User management
- Server connections
- Group management
- Language Terminal
- Windows single sign-on
- Default server resources
- CAL licenses
- ELM licenses
- Configuration and logging
- Web service interface
- Corpus indexing
- Omniscien Technologies
- Archiving
- Performance counters
- Storage
- Background tasks
- Broadcast message
- Discussions
- Spelling in memoQWeb (legacy)
- Weighted counts
- Audit log for TMs
- Customer Portal
- CMS connections