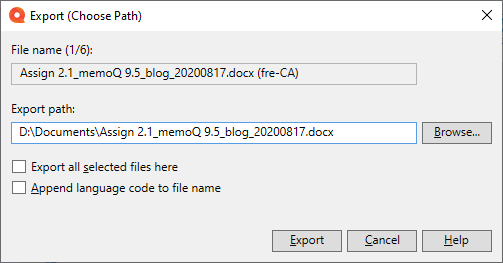
Export (Choose Path)
When exporting two or more documents to custom locations, you do not need to choose the export location separately for each document.
How to get here
- In memoQ, open a project.
- In the Project home - Translations or memoQ online project - Translations window, select two or more documents.
- In the Online project ribbon's Document section, click the down arrow under the Export button.
- In the menu, click Export (Choose Path).
What can you do?
Choose export folders
To export all files to the same folder:
- Select the Export all selected files here checkbox.
- Click the Browse button, browse to the folder you need, and click the Select folder button.
- Click the Export button.
To choose folders for each document separately:
- Clear the Export all selected files here checkbox.
- Click the Browse button, browse to the folder you need, change the file name as needed, and click the Save button.
- Click the Export button.
- Repeat steps 2 and 3 as needed.
-
To export the remaining files to the same folder: Select the Export all selected files here checkbox. The number of remaining files appears on the Export button:

- Click the Browse button, browse to the folder you need, and click the Select folder button.
- Click the Export button.
Save the exported documents with their target language codes
To do this: Select the Append language code to file name checkbox.
When you export files from a project with two or more target languages, checking the Export all selected files here checkbox automatically checks this option – to make sure that, for example, you do not overwrite a document's Spanish translation with the Japanese one.
When you finish
To export the files and return to the Translations window: Click the Export button.
To return to the Translations window without exporting: Click the Cancel button.