Automated segment locking - settings
When there's a change in a project, memoQ can automatically lock or unlock a lot of segments at once - in one document or across the entire project. This works in projects that you create from project templates.
For example, you can set up a project template to lock segments that are confirmed by a reviewer, and then return the document to the translator. Or, memoQ can automatically lock all segments that are pre-translated.
After you set this up in the project template, memoQ will lock segments in all projects that you create from that project template.
Here are some situations when you would automatically lock or unlock segments:
- Translate repetitions across the project first, and then lock the repetitions. Then pass on the documents to translators. (If the repetitions were translated and confirmed by a translator, you can lock Translator confirmed segments, too.)
- After a document is reviewed, you can lock the segments that are confirmed by the reviewer. For example, the reviewer 2 would fix and correct some segments, but reject others. The translator must look at the rejected segments, but must not touch the rest. Before you return the document to the translator, you must lock Reviewer 2 confirmed segments.
- When a translation is updated, usually a lot of segments are locked. But if the reviewer should work on the entire text, not just on the newly translated segments, locked segments must be unlocked. In this case, you must unlock all segments after the translator delivers her work.
Do not use the Lock segments command after pre-translation: Use Pre-translate instead, and set up segment locking there. Pre-translate can automatically lock segments in more detail: No need to use the Lock segments command separately.
How to get here
- Open the Resource Console
 .
.To set up a template for online projects or resources: Choose your memoQ TMS at the top of Resource console, then click Select
 .
. - On the left, click Project templates
 .
. - Select the template you want to edit.
- Under the list, click Edit.
-
Click the Project automation tab if you don't see it at first.
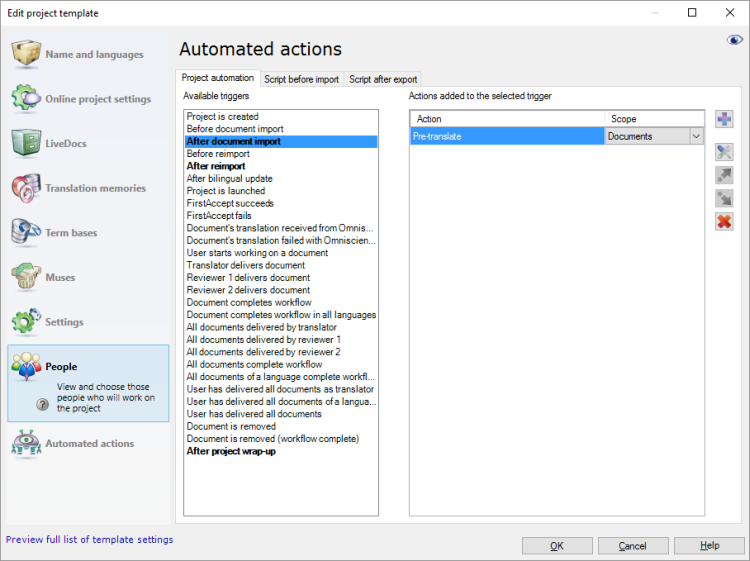
-
Choose one of the Available triggers and click the Add new action
 icon next to the Actions added to the selected trigger column.
 -
From the list in the Select actions you want to add to the trigger dialog, select Lock segments.
-
Under the list, click Add.
The Automated segment locking - settings window appears.
If you can't add this action because it's already there: Under Actions added to the selected trigger, click Lock segments. Next to the list, click the Settings ![]() button. The Automated segment locking - settings window appears.
button. The Automated segment locking - settings window appears.
What can you do?
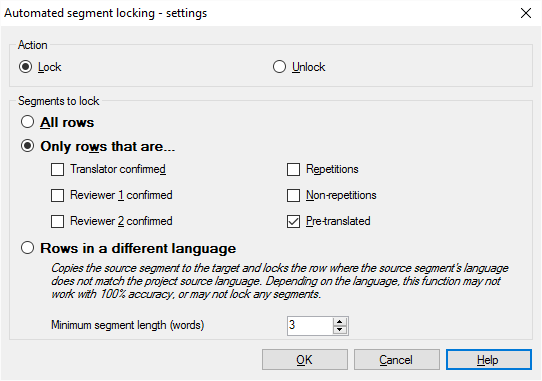
This is the easiest way: The command locks all segments in the document or in the entire project.
- Click the Lock radio button.
- Click the All rows radio button.
Use this when you don't want translators or reviewers to change certain segments. You can also count statistics without the locked segments: This helps to have a more accurate estimate of the actual work.
- Click the Lock radio button.
- Click Only rows that are
- Check one or more of these checkboxes:
- Translator confirmed: This locks all segments that were confirmed by someone in the Translator role. For example, you would use this when the source document is updated in the middle of the project, and you want to make sure that translators work on new and changed segments only. In this case, run Lock segments after the document is X-Translated. Use this together with the Reviewer 1 confirmed and Reviewer 2 confirmed checkboxes.
- Reviewer 1 confirmed: This locks all segments that were confirmed by someone in the Reviewer 1 role. For example, you would use this when a reviewer confirmed some segments, but rejected others. The translator must look at the rejected segments, but she must not change the confirmed ones. In this case, run Lock segments when the document is returned to a translator. This makes sense in online projects only.
- Reviewer 2 confirmed: This locks all segments that were confirmed by someone in the Reviewer 2 role. For example, you would use this when a reviewer confirmed some segments, but rejected others. The translator must look at the rejected segments, but she must not change the confirmed ones. In this case, run Lock segments when the document is returned to a translator. This makes sense in online projects only.
- Repetitions: This locks all segments that are marked as repetitions. This means repetitions within the document, not across the project. (You need a view to get repetitions all over the project.) For example, you would use this if you want to translate the repetitions separately. In this case, run Lock segments after the repetitions are translated - or before the document is assigned to a translator to work on non-repeated segments.
- Non-repetitions: This locks all segments that are not marked as repetitions. This means they aren't repeated within the document, but they may be repeated across the project. (You need a view to get repetitions all over the project.) For example, you would use this if you want to translate the repetitions separately. In this case, run Lock segments before the repetitions are translated: That is, before the document is assigned to a translator to work on repeated segments.
- Pre-translated: This locks all segments that were pre-translated. Use this option only if you receive a document that was pre-translated elsewhere, and contains exact (100%) or context (101%, 102%) matches only. Do not use this option if you want to pre-translate and then lock segments. In that case, use Pre-translate instead, because Pre-translate can automatically lock segments, too. Make sure you set up automatic segment locking under Pre-translate settings.
memoQ can detect the language of text. It uses statistics for detecting the language, so it may not always be accurate.
More specifically, memoQ can spot if part of the text is not in the source language of the project, or it's in a different language than the rest of the text.
If you translate a document from English, but parts of it are in German, you won't want to translate the German parts.
memoQ can lock segments that are in different language. In this case, run Lock segments after the document is imported.
- Click the Unlock radio button.
- Make the choice: It can be All segments, confirmed/repeated/pre-translated segments, or Rows in a different language. Click one of the radio buttons.
Most of the time, you need to unlock all segments, so that the entire text can be reviewed. For example, if the translator just updated a translation, but you want to review the earlier translations, too, you could run Lock Segments (that is, Unlock segments) after the translator delivers a document.
When you finish
To add the action to the project template: Click OK.
No segments will be locked when you click OK: To get the segments locked automatically in an ongoing project: Create a project from this project template, and start working on it.
To return to the Edit project template window, and not add an action to the project template: Click Cancel.