|
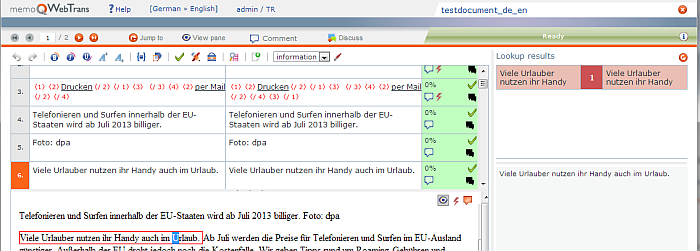
In the translation editor, you can see a translation grid with the segments to be translated and a translation results list with the translation matches.
In the upper section, you see the source and target language of the document as well as your login name and your user role for this document. Next to your login name and role, you see the document name you are currently working on.
The second section is the navigation bar, where you can control the following:
•Page navigation: If the document is longer than 20 segments by default, memoQWebTrans splits it up into pages. You can jump between these pages using the buttons on the left: you can jump to the first, the previous, the next, and the last page, or you can enter the number of the page you need, and press Enter. •Jump to: Allows you to enter the number of a segment, and displays the page where that segment is, with the segment highlighted. •View pane: Turns the View pane on and off. •Comment: Allows you to add a comment to the document. •Discuss: Allows you to view discussions about the document, or start a new discussion. Discussions might not be available: memoQWeb will not show the discussion icons if the discussions are disabled on the entire server, or you are member of a group that is excluded from discussions. If you believe you should be able to view or start discussions, contact your project manager or server administrator.
•Deliver: Once you finish working on the document, click this icon to deliver it to your project manager or your client.
The third line is the toolbar that contains various buttons that allow you to manipulate text.

Translation preview
In the navigation bar, click the View pane icon:

The closed eye icon will become an open eye icon, i.e. the preview is now enabled for the document. You can switch on and switch off the preview in clicking the View pane icon again.
When the preview is switched on, the translation grid gets divided vertically and the lower part displays the View pane.
Note: The preview is refreshed when you go to the next segment.
|
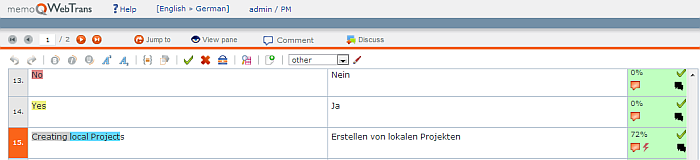
Navigation in the translation grid
The translation grid only shows 20, 50, or 100 segments at a time, as configured under your profile. Longer documents are split up into pages. On the left side of the navigation bar, you can see which page you are on, and how many pages there are in the document.
Use the arrow buttons to page in the document: use the first button to go to the first page of the document, the second to move back one page, the third to move forward one page, and the fourth to go to the end of the document. You can also enter the number of the page you want to go to, and press Enter or Tab.
Use the Jump to button to invoke the Jump to row dialog, and select segments that you want to skip.
Use the Deliver button when you are ready with the translation to deliver the document.
As you work on the web translation interface, the software logs certain actions and indicates potential errors. Use the i button to display the information.
Use the shortcuts that you are familiar with from memoQ.
For example press:
•Ctrl+Shift+S to copy source to target. •Ctrl+Enter to confirm a segment to the working TM. •Ctrl+E to enter a term to a term base. •Ctrl+K to open the Concordance window. See the memoQ Help for further default shortcuts.
|
Jump to row
The web translation interface allows you to jump to specific segments when you are working on a document. In the Jump to row dialog, you can set the properties of segments you want to skip when moving up or down.
The web translation interface allows you to jump to specific segments when you are working on a document. In the Jump to row dialog, you can set the properties of segments you want to skip when moving up or down.
The Jump to row window opens.
|
Concordance
The Concordance dialog allows you to find entries in the translation memory or LiveDocs corpus that contain specific words or sequences of words directly from the translation document. Using this feature, you can easily look for the context of source-language or target-language words. Concordancing involves finding all entries which contain the expression you are looking for and presenting them in a way that you can easily see the context in which they appear. Besides the sequence of words, you can also search for parts of words, or segments that contain all the words you specified.
If you invoke the dialog with text selected in the source segment, the Text: field will automatically be filled in with the selected text, and the results with the default settings will automatically appear.
Note: If you press Ctrl+K with text selected in the target segment, the WebTrans module will look up the selected text on the target side of the translation memories, and it will look for hits in the project's target language from LiveDocs corpora in the project. (LiveDocs corpora are multilingual, and they do not use a designated source language – until they are used in a project.) Target concordancing is only available for reversible translation memories, but there is no way to see if a translation memory is reversible. If you don't get results, please talk to your project manager.
|
Highlight text
While editing a document in the translation grid, select the word or expression which you want to highlight. Then choose from the category drop-down list in the toolbar the category for the highlighted word or expression. You can choose from: Information, Error, Warning, Other.
To apply your category, click the icon next to the category drop-down list. icon next to the category drop-down list.
•When you highlight a word or expression, and then choose Error from the category drop-down list, the word is marked in red. •When you highlight a word or expression, and then choose Warning from the category drop-down list, the word is marked in yellow. •When you highlight a word or expression, and then choose Other from the category drop-down list, the word is marked in grey. •When you highlight a word or expression, and then choose Information from the category drop-down list, the word is marked in green. After you highlighted a word or expression in the source or target cell, the segment gets a comment. Click the bubble icon to open the comment:
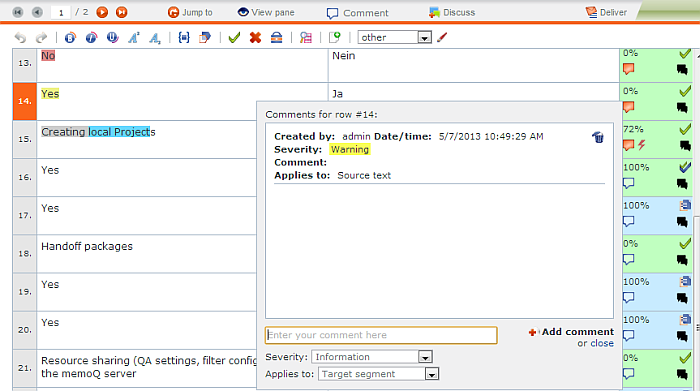
Depending on the selected category, the severity in the comment is accordingly. If you highlighted a word or expression with the category Warning, the severity level will also be Warning. If you highlighted in the source cell, then the Applies to is pre-filled with Source text.
You can also leave another comment. Enter your comment in the comment field, choose the Severity and Applies to from the below drop-down lists, then click Add comment.
|
Find and replace
The Find and replace dialog allows you to search for words or expressions in the currently opened translation document. If the content is editable, you can also replace specific text sections with different ones.
You can invoke the Find and replace dialog in clicking the  icon in the toolbar. The Find and replace window opens. icon in the toolbar. The Find and replace window opens.
|
Edit source text
It might be necessary to correct the source segment, e.g. there is typo in a word.
Place the mouse in the source segment. You can invoke the Edit source in clicking the  icon in the toolbar. icon in the toolbar.
The source segment becomes editable. All source segments are by default in read-only mode. Edit the source segment. The background color of this source segment changes to green for the editing. When you go to the next segment, and leave the source segment that you just edited, this source segment becomes read-only again
Note: You cannot edit segments that are locked, not in your slice (if you work in a sliced document) and proofread segments (segments with the double confirmed marks) when you are not in the Reviewer 2 role. If a segment has such a status, the Edit source icon is disabled.
When you edit a source segment, you can do the following:
•edit bold / italic/ underline formatting •edit superscript / subscript •use the Clipboard to insert, copy or paste content •undo / redo When you edit a source segment, you cannot do the following:
•inserting all formatting tags •copying the next tag sequence If you want to revert a change you made to a source segment, place your mouse in this source segment. Click the Revert source icon ( ) to revert the source to the original, before you started to make changes. ) to revert the source to the original, before you started to make changes.
Note: When you edit a source segment, the segment status changes to Edited.
|
Split and join segments
It might be necessary to join or split a segment, for instance when a segmentation rule did not segment properly or when the text flow requires a joining of segments. When the split and join operation is enabled for the online project you are working on, you can join and split segments in memoQWebTrans as well.
Place the mouse in the source or target segment which you want to join. Select at least 2 rows, then click the Join segments icon ( ) in the toolbar. The 2 segments are now joined to 1 segment. ) in the toolbar. The 2 segments are now joined to 1 segment.
Note: You cannot join segments which have the following status: Locked, Not in my slice if you work in a sliced document.
There are 2 ways to select rows:
oUsing the mouse: Click in a source or target segment and drag the mouse over the boundary of the current row. After a certain threshold, the current row and the neighboring row are both selected. oUsing the keyboard: Press any row below (Shift + cursor down) or a row above” (Shift + cursor up) on your keyboard. It selects both, the current row and the neighboring row. Place the mouse in the source segment at the position where you want to split the segment into 2 segments. Click the Split segments icon ( ) in the toolbar. The segment is now split into 2 segments. ) in the toolbar. The segment is now split into 2 segments.
Note: You cannot split segments which have the following status: Locked, Not in your slice if you work in a sliced document.
Note: When you join or split a segment, you cannot undo this operation.
|
Lock or unlock segments
It might be necessary to lock or unlock multiple segments in multiple documents, based on the status of the segments. You can automatically lock confirmed, proofread, or pre-translated segments in a memoQ project which then also appear as locked in memoQWebTrans. Locking segments means that the translator or reviewer cannot touch a locked segment. One scenario for this could be that the project manager creates a view of repetitions and locks all other occurrences for this segment.
Locked segments are also skipped from auto-propagation. The project manager can include or exclude locked segments from statistics. But you can also unlock previously locked segments.
Place the mouse in the source segment. The segment number turns orange. Then click the lock/unlock icon ( ) in the toolbar to lock a segment, or press Ctrl+Shift+L. Press Ctrl+Shift+L again to unlock a segment, or click the lock/unlock icon again. ) in the toolbar to lock a segment, or press Ctrl+Shift+L. Press Ctrl+Shift+L again to unlock a segment, or click the lock/unlock icon again.
|
Commenting segments
In memoQWebTrans, you can add comments to documents, rows (source-target segment pairs), and segment cells.
No commenting if you are excluded: If you are member of a group that was excluded from commenting, you will not be able to see or add comments. If you cannot see the commenting options in memoQWebTrans, ask your project manager or system administrator about this.
You can add a comment and start a discussion on document or on segment level. Click the comments icon ( ) to invoke the Manage comments dialog in: ) to invoke the Manage comments dialog in:
•the document list Note: When you click the Comments for document icon, the title of the dialog window is Comments for [Document name]. When you added a comment, the white bubble turns into a red one.
•the translation editor: 
Click the Comment icon to enter a comment or the Discuss icon to start a discussion for the document.
•or in a row: 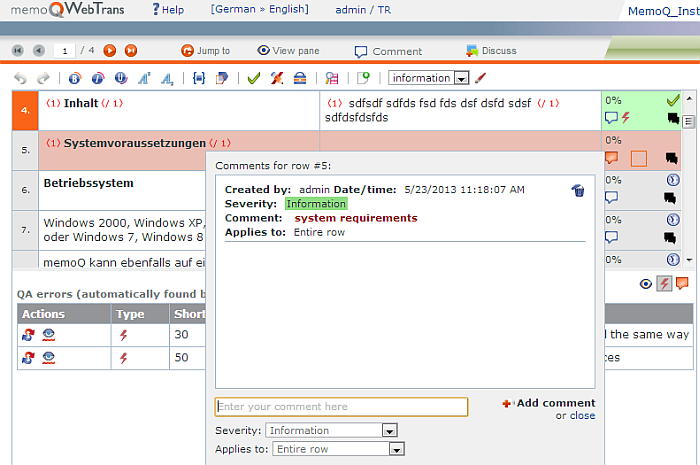
You can enter a comment for the entire row, the source or the target cell. Choose where the comment applies to: Entire row, source or target. Indicate the category for your comment: Information, Error, Warning or Other.
•The comments are listed in descending order sorted by date. •Each comment is color-coded based on the category. •Always the last 20 comments for the document are shown. •You can delete a comment in selecting a comment, then click the Delete icon. If you cannot delete a comment, you may not have the necessary permission for doing this. Click the Add comment link to add another comment. Click the Cancel link to leave the dialog.
|
Confirm several rows at once
Sometimes you want to confirm multiple rows at once. This might also become essential for delivering your document. To deliver a document, all segments need to be confirmed.
Use the mouse or the keyboard to select multiple rows:
oUsing the mouse: Click in a source or target segment and drag the mouse over the boundary of the current row. After a certain threshold, the current row and the neighboring row are both selected. The first selected row becomes the active row. oUsing the keyboard: Press any row below (Shift + cursor down) or a row above” (Shift + cursor up) on your keyboard. It selects both, the current row and the neighboring row. The last selected row becomes the active row. Note: Anyone who has the permission to open a document also has the permission to select and confirm multiple rows.
Note: You can only confirm multiple rows of the same page at once.
The result of the confirming multiple rows operation is displayed in the Feedback box: If successful, a message is shown with the number of confirmed rows. If not all selected rows were confirmed, a message is shown with the number of confirmed and skipped rows.
Rows that are locked or not in your slice are skipped automatically from the confirm operation.
When you are in the Translator or Reviewer 1 role, and you confirm segments, these rows get the single green check mark. When you are in the Reviewer 2 role, and you confirm segments, these rows get the double green check mark.
|
Work with formatting
To keep formatting simple and consistent throughout file formats, the WebTrans interface applies three types of formatting:
•interpreted formatting, which includes bold, italic, and underline, •uninterpreted formatting tags where the formatting remains hidden for the user, •inline tags where you see information relating to the formatting, but not the format itself. If you are unsure about tags, just insert all of them into the appropriate place in the target segment, in the same order as they were in the original, by pressing F9 as many times as the number of formatting tags.
Interpreted formatting
Select any text in the document and press Ctrl+B to apply bold, Ctrl+I to apply italic and Ctrl+U to apply underline typeface - just like in Microsoft Word. Interpreted formatting can be applied anywhere in the text, even if it wasn't there in the source.
Uninterpreted formatting tags
If you see numbers in purple in the source text, you need to enter the same formatting into the target. Uninterpreted formatting tags indicate a change in the formatting.
When the source segment contains formatting other then the three basic types, bold, italics and underlined, memoQ does not display it in the source text. Instead, it identifies parts of the original document that are formatted in the same way, and every time this uniform formatting changes it puts a placeholder, a tag, into the text. However, they do not only appear when formatting changes. memoQ also displays them to represent inline images, or certain types of whitespace (notably, line breaks and tabulators).
The name uninterpreted formatting tag refers to the fact that once the document is imported into memoQ, the actual meaning of the tags (precisely what type of formatting change they stand for) is ignored until the document is exported. Tags ( ) etc. are displayed in the translation grid, and you need to insert the same tags into the translated text where you think the change of formatting is appropriate. ) etc. are displayed in the translation grid, and you need to insert the same tags into the translated text where you think the change of formatting is appropriate.
You can insert them by placing your cursor to the appropriate position in the target cell, and pressing F9. You can also press F9 while typing the translation. Please note that you cannot change the order of the tags:pressing F9 will always insert the next tag.
Make sure that you inserted all source document tags into the target document before delivering the document.
Inline tags
XML and XML-like documents are special because by their very nature their content is structured through the use of tags. To import them, memoQ makes a distinction between two types of tags: structural and inline. Structural tags determine which sections of an XML document contain translatable content, while inline tags represent addition markup that can appear inside segments.
If you see purple numbers like  in the source text, they represent inline tags. As a rule it's best to insert inline tags into the target text in the same order as they were in the original, but you can also change their order if you understand XML syntax. in the source text, they represent inline tags. As a rule it's best to insert inline tags into the target text in the same order as they were in the original, but you can also change their order if you understand XML syntax.
You can insert them by placing your cursor to the appropriate position in the target cell, and pressing F9. You can also press F9 while typing the translation. If you need to change the order of the tags, use copy-paste.
|
Use Linguistic Quality Assurance (LQA)
LQA stands for Linguistic Quality Assurance and is a light resource in memoQ. The LQA process is a manual one, performed by the reviewer. With this feature, the reviewer can document the translation quality in detail (e.g. accuracy, omission, etc.) and he can categorize the errors as major, medium or minor. You can also define a pass/fail criteria.
The project manager assigns an LQA model to the project. Depending on the selected model (LISA, J2450, memoQ model or another one), the LQA error categories, subcategories and severity level can vary.
When you are in the role to review a translated document, you can use the LQA models to mark and/or correct errors in the document. When you then send the document back to the translator in the workflow, he can see the lists of errors you marked in the document. He can also reject your correction.
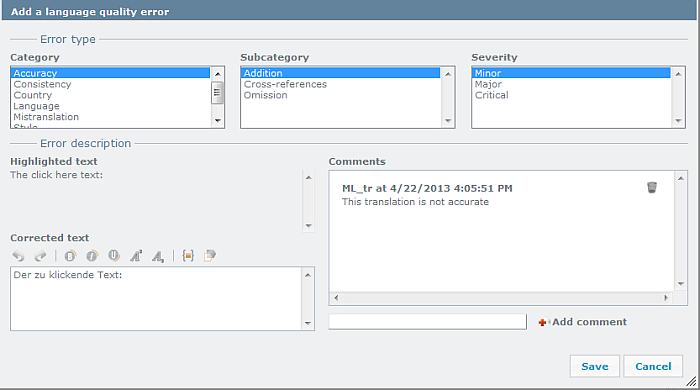
The simplest way to indicate an error is to set the segment status to Rejected: click the Rejected icon in the toolbar, or press Shift+Enter. The Add a language quality error dialog appears where you can enter the error type:
When you are in the reviewer role:
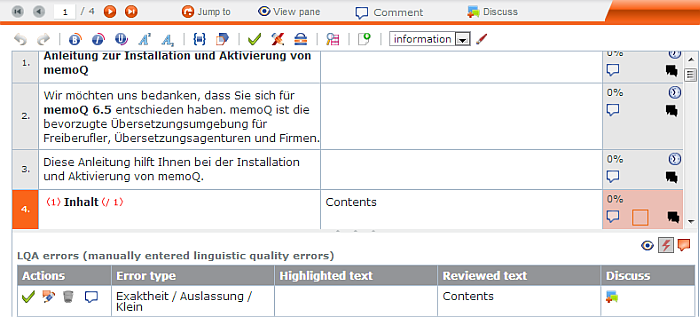
1.In the Error type section, the error types are displayed according to the LQA model which was selected for your project. The Subcategory and Severity lists are shown accordingly. Choose which error type your error is and add its severity. 2.In the Error description section, you have the following options: •The Highlighted text box shows you the text you highlighted in the translation grid. •The Corrected text box shows you the corrected text. You can enter here your corrected version of this segment. •The Comments text box: When you entered a comment in the Enter new comment box, and you re-open the segment, the previous comment is shown here. • Enter your comment in the field next to the Add comment button. Then click the Add button to add the comment to the error. 3.Click Save to save your error indication and to close the error type dialog. Click Cancel to discard your error type categorization. 4.In the translation grid, the segment now gets a red mark ( ). ). 5.When you press Shift+Enter again, the error type dialog appears again. 6.When you add an LQA error, and you switch to the QA errors view in the View pane, the LQA errors are shown. 7.Go through the document and perform the LQA.
When you are in the translator role:
You need to go through the whole document segment by segment to verify the rejected segments.
In the View pane, switch to the QA error view: click the  icon. Here are all your LQA and QA warnings displayed: icon. Here are all your LQA and QA warnings displayed:
See also:
•View pane > LQA preview |
Modify a LQA error
The reviewer usually enters an LQA error. The document will then most likely be passed back to the translator to accept, correct or delete the LQA error. You as reviewer can add a comment to an error or modify an error. The translator can comment back and start a discussion.
Note: You can perform actions for LQA errors when you have the Update permission for the translation document.
When you as the reviewer entered an LQA error, you can modify the error. In the View pane, click the QA error icon to switch to the QA/LQA error view. Go to the segment that has the LQA error. In the View pane, click the View/dispute icon ( ) to invoke the View/Dispute LQA error dialog: ) to invoke the View/Dispute LQA error dialog:

Make changes to the LQA error. You can change the category, the related subcategory and its severity level. You can also change the text in the Corrected text field. Add a comment, maybe why you changed the LQA error category.
Note: You can also convert a QA error/warning into an LQA error. Click the convert to LQA error icon ( ) in the QA error section of the View pane. The Add a language quality error dialog appears. Enter the error categories, and click Save. You have turned a QA error into an LQA error. ) in the QA error section of the View pane. The Add a language quality error dialog appears. Enter the error categories, and click Save. You have turned a QA error into an LQA error.
Click Save to save the changes to the LQA error. Click Close to leave the dialog without making changes.
|
Dispute a LQA error
The reviewer usually enters an LQA error. The document will then most likely be passed back to you as the translator to accept, correct or delete the LQA error. The reviewer can add a comment to an error or modify an error. You as the translator can comment back and start a discussion, but you can not modify an error.
When you as the translator need to check the entered LQA errors, you can not modify the error, but you can discuss the error. In the View pane, click the QA error icon to switch to the QA/LQA error view. Go to the segment that has an LQA error. In the View pane, click the View/dispute icon () to invoke the View/Dispute LQA error dialog:
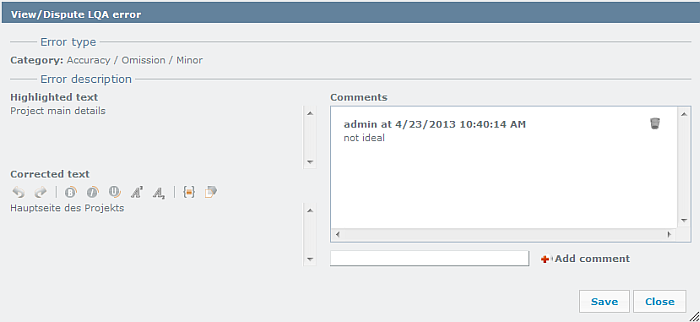
In the Error type section, the category, the subcategory and the severity is shown.
In the Error description section, you see the highlighted text and the corrected text.
In the Comments text box, you may find a comment from the reviewer for this LQA error. You can comment back. Enter your comment in the field below, and click Add comment to add the comment. Click Save to save your comment.
|
Use QA
QA stands for Quality Assurance. It is the process of checking your translations for correct terminology use, consistency, punctuation, typography, numbers and certain Tag checks. memoQ has a built-in QA module. The QA in memoQWebTrans shows errors and warnings for each segment: missing tags, wrong numbers, punctuation, etc.
memoQWebTrans does not perform a QA check, however, you get warnings and errors for a row displayed. When a document contains a QA error or warning, a QA error icon is shown next to the status info (a flash icon for a warning, a triangle for an error):
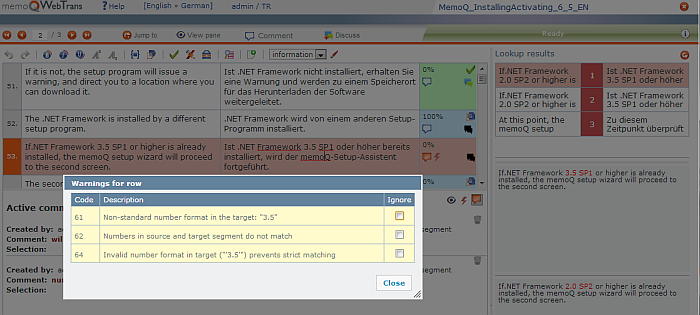
When an orange flash is shown next to the status info, double click on the flash icon. The Warnings for row dialog appears:

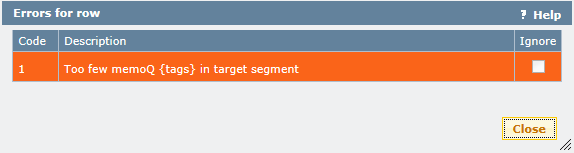
When a red exclamation mark is shown next to the status info, double click on the exclamation mark icon. The Errors for row dialog appears:
In the Code column, an error code number is displayed. In the Description column, you get a description of the detected error or warning. You need to resolve them. If they are false positives, you can check the Ignore check box in the Ignore column. The orange flash for a warning will turn into grey in the corresponding segment. This means that you are aware of the warning and that you are declared it as false positive.
When you translate, and you forget to adjust or to insert a number for instance, and then you confirm the segment. This will bring up the error/warning icon next to the segment status of this segment:

Note: You can suppress warnings, but you must resolve errors. If you do not resolve errors, you cannot deliver your document since it may result in not being able to export the document again in its original format.
|
Superscript and subscript
When you translate a document, you may want to insert superscript or subscript formatting. There are 2 new toolbar buttons for subscript and superscript.
You can insert superscript and subscript in clicking the icons in the toolbar.
Click the icons in the toolbar and insert superscript and subscript formatting:

Note: There are no keyboard shortcuts to insert subscript and superscript.
|
Deal with conflicts and errors
The WebTrans interface works on memoQ server projects with desktop documents. In this scenario, updating translations happens semi-connected: if you are using the WebTrans interface, every segment you change is written into the document when you press Ctrl+Enter. However, if you are using the memoQ interface, you might go offline and work for a while without being connected to the internet. Also, a translator and a reviewer can work simultaneously.
If two simultaneous changes happen to the segment, it's called a conflict. One needs to win.
The memoQ interface has a very fine-tuned conflict resolution logic, whereas the WebTrans interface uses a simplified approach to conflict resolution: if users in the translator and reviewer 1 roles change segments, the last version wins. If the user in the reviewer 2 role changes a segment, that overrides the segment change of the translator or the reviewer 1 role. If review 2 is logged in twice, the last version wins.
Conflicts occur if two people edit the same segment. Segments do not need to be edited simultaneously. Both the WebTrans and the memoQ application interfaces do not update segments immediately - a reload or a synchronization might be necessary before your changes are written into the document and other people's changes are visible to you.
Conflicts do not occur regularly, but in case they do, if the Reviewer 2 updates a segment before you finalize it, it might happen that you lose the translation of one segment. The WebTrans interface will warn you that the segment has been edited, and change the segment to the Reviewer's version. Your changes will override changes made by a translator or a reviewer 1.
Dealing with errors
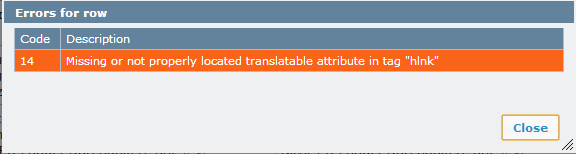
When there are formatting tag errors in a segment, you can double-click the exclamation mark in the status cell. The Errors dialog appears, and lists all formatting tag errors that occur in the segment.
In the translation editor, if there is a formatting tag error in a segment, an exclamation mark appears in the status cell:
Double-click the red exclamation mark to display the Errors for row dialog.
There is no Ignore check box next for an error. You can ignore warnings, but you must resolve errors.
|
|