Log in to a server (dialog)
When you connect to a memoQ server for the first time, you need to log in to it.
If you're a translator, this usually happens when you check out your first project for a new client - or when you start working with memoQ on a new computer.
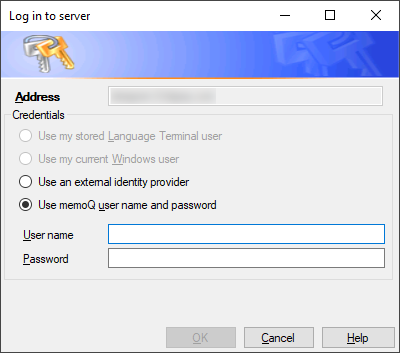
When memoQ needs to connect to a memoQ server, it opens the Log in to server window.
Normally, you have a user name and a password that you can type here. But if you work inside an organization (for example, at the language department of a larger company), you may be able to use the same name and password that you use for Windows. (That is called single sign-on.)
How to get here
You usually log in to a server when you check out your first project from it.
- Open memoQ.
- On the Project ribbon, click Check Out From Server. The Check out online project window opens.
- In the Server URL box, type or paste the address of the server. Click Select.
If this is the first time you connect to the server from that computer, the Log in to server window appears.
If you received a project connection file in e-mail: Double-click the file in the e-mail. memoQ opens, and the Check out online project and Log in to server windows automatically appear.
The Log in to server window will open whenever you choose a new server anywhere in memoQ:
- Open the Resource console. At the top, in the Server URL box, type or paste the address of the new server. Next to it, click Select.
- Open a project. In Project home, choose Translation memories or Term bases or Livedocs. On the Translation Memories or Term Bases or LiveDocs ribbon, in the memoQ Server section, type or paste the address of the new server, and click the Select
 icon.
icon.If you are running memoQ project manager, you can go to these places, too:
- At the top of the Dashboard (the opening screen of memoQ), type or paste the address of the new server in the box right below the Dashboard tab. Then click the Select
 icon.
icon. - Open the Manage projects window. At the top, type or paste the address of the new server. Then click the Select
 icon.
icon. - Start the Publish project wizard. On the first screen, in the Server URL box, type or paste the address of the new server. Then click Select.
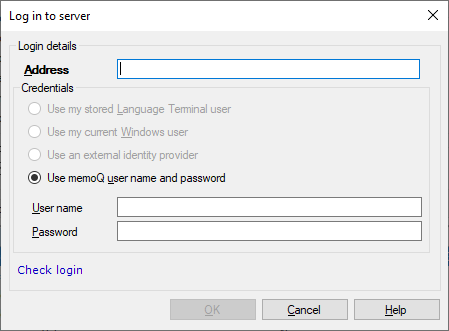
You must also log in when you are getting a license from a server, but that will look different: If you need to use a mobile (ELM or CAL) license, and you click to connect to a new ELM or CAL server in the Activation window or in the Activation wizard, a different login dialog appears. You cannot choose from existing servers in this dialog: you always need to type or paste an address, and specify a user name and a password.

What can you do?
In the simplest case, memoQ server has a list of users who can access it. Every user has a user name and a password. If you are one of these users, type your user name and password in the boxes under below the Use memoQ user name and password radio button.
Note: If the memoQ server is not connected to Language Terminal or to a Windows domain, this will be the default setting: You do not need to click the radio button.
If you are adding an ELM server from the Activation window or the Activation wizard, you always need to type the address of the server. In this case, you must use a user name and a password that exists on the server: memoQ server will not accept a Language Terminal account, an external ID provider account, or a Windows user here.

If you are member of Language Terminal, and you saved your Language Terminal account in memoQ, and the memoQ server is also connected to Language Terminal, you can log on with your Language Terminal account.
Always use your Language Terminal account if you are an administrator or project manager, and you work with online projects that you track on Language Terminal.

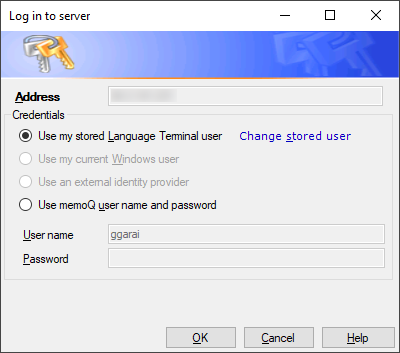
Click the Use my stored Language Terminal user radio button, and click OK. memoQ will try to access the memoQ server using your existing Language Terminal account.
The memoQ server may or may not grant you access: it depends on the Language Terminal profile of the server's owner. If your Language Terminal account is listed among their vendors or their organizational members, you will be allowed in. Otherwise memoQ server will not recognize you.
Only one Language Terminal account: When you log in to a memoQ server, you always need to use the one Language Terminal account that you saved in memoQ. If you need to use a different account, you must change it for the whole of memoQ. You can do it in the Log in to server dialog, by clicking Change stored user. This will start the Language Terminal account wizard.
The memoQ server might be part of a Windows domain. This usually happens if you work with memoQ you in a large company, and your computer is also inside the company network.
If this is the case, the only place you need to log in to is your computer. Once you are at your Windows desktop, you should be able to log in to the company's memoQ server, too.
The Log in to server window has a Use my current Windows user radio button. If the server is connected to the company's Windows domain, this radio button is available.
To log in with your Windows user, click the Use my current Windows user radio button, and click OK. If your Windows user is allowed to access the memoQ server, the login will be successful.
Your computer must also be in the domain: If your office computer is not connected to the same domain (domain forest) as the memoQ server, you need to type the user name and password that you have for that domain (domain forest).
Not all Windows users are allowed: When an administrator connects memoQ server to the company network, she can choose one or more groups whose members are allowed in. If you are not a member of one of these groups, the memoQ server will not recognize you.
If the memoQ server uses OIDC-based single sign-on (SSO), you can log in to the server with your Azure AD or Okta account.
- Choose the Use an external identity provider option, and click OK.
- Your web browser opens. If the server is connected to two or more ID providers, you need to choose one.
- On the ID provider's login page, log in with the user name and password you have in that service.
-
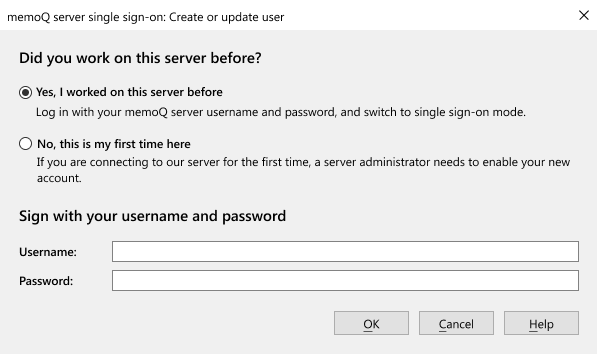
If this is the first time you log in to the memoQ server using SSO, another window opens:

- If you never worked on this server, choose the option No, this is my first time here, and click OK. Then tell your memoQ server admin or your project manager that you need their help to log in.
- If you worked on this server before, enter your username and password, then click OK. memoQ server connects your ID provider account to your memoQ server user, and logs you in.
From now, you need to use your OIDC username and password to log in to this server - your memoQ username and password will not work.
Only for the first time: When you log in to a memoQ server, memoQ saves your user name and password. Next time you connect to the same memoQ server, it will be automatic - unless you are using OIDC. memoQ server does not store login data of other systems: You will still need to enter your OIDC username and password every time you log in to the memoQ server.
To change the user name or password you use: On the Project ribbon, click Manage logins. The Manage Logins window opens. Click the server you need to connect to. Click Forget stored login for the selected server. Click Close.
When you finish
To log on to the server, and continue: Click OK.
To return to the place you come from, and forget about the server: Click Cancel.
If the memoQ server does not allow you in, or you click Cancel: memoQ may ask for the password once again. This depends on the situation. If you do not choose a different server (or My Computer) after this, the server's address will become red in the server selector box.
To change your mind: If, for any reason, you cannot or would not log in to the server after all, make sure you connect to a different server. Or, choose My Computer in the server selector box. Otherwise, memoQ will open the Log in to server window again and again.