Dashboard
memoQ starts with the Dashboard. Anything you do in memoQ, you begin at the Dashboard.
This is the project management dashboard: You see this Help page because you come from the project manager edition of memoQ. If you need the page about the translator's version, click here.
Here are some of the things you can do:
- Start jobs - on your computer or online
- Prepare jobs on your computer, and then take them online
- Track and manage ongoing jobs - on your computer and online
- Work on documents from local and online jobs
- Continue working on documents in ongoing jobs
- Clean up and delete jobs
- Back up and restore jobs
- Open Resource console to manage resources - translation memories, LiveDocs corpora, project templates etc.
- Change how memoQ behaves through Options
- Control a memoQ cloud or a memoQ server through the Server Administrator
- See and manage your licenses on the my memoQ page
Most of the Dashboard is about dealing with projects.
To start a job in memoQ, you need to create a project. A project is a workspace that has four things:
- The source documents that need to be translated
- The language resources that help translators: translation memories, LiveDocs corpora, term bases, Muses
- Settings and other data that give further help or define how memoQ behaves: Segmentation rules, auto-translation rules, quality assurance settings etc.
- A list of people working on the project, and the information on who does what. This is available only in projects where several people work.
A project has progress - there is always a percentage that shows how much of the project is completed.
A project has reports - detailed information on how much needs to be translated, how much was translated, what kinds matches were used etc.
A project can be on your computer: That is called a local project.
Or, a project can be on a memoQ cloud or on a memoQ server: That is called an online project.
If you're a project manager, you can distribute work:
How to get here
In Windows, start memoQ. If you have a license for the project management edition, this dashboard appears.
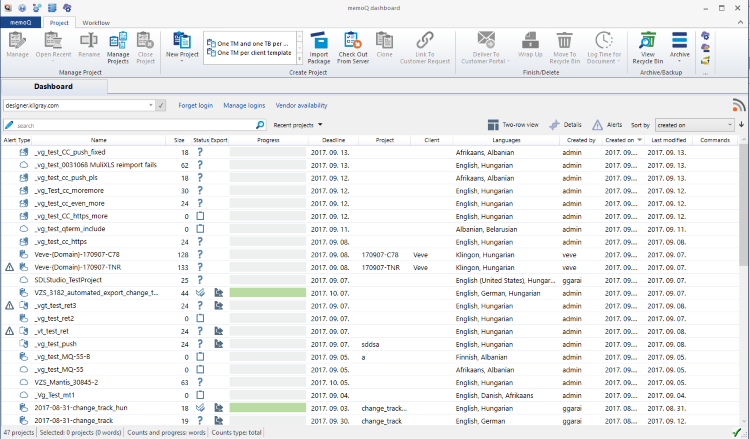
What can you do?
The memoQ Dashboard has a lot of information about the jobs you need to manage.
At first, you see a list of projects from your computer or from an online location.
To find your projects better, or to learn more about them:
- Understand the list of projects: Here is all there is to know about it.
- Get the details about a project. Turn on the Details pane: Click the Details
 icon and see what information you can get there.
 - Be alerted about urgent tasks. You can get alerts about online projects. Open the online location where you manage jobs. The online location can be a memoQ server or a memoQ cloud. Click the Alerts
 icon and learn how you can deal with the Alerts pane.
 - Narrow down the list of projects: Search keywords or set up complex filters.
To start a job in memoQ, you need to create a project. This is how you create a project on your computer:
- In the drop-down box right below the Dashboard tab, choose My Computer. Then click the tick mark
 next to the box. The drop-down box is called the location box.
 - On the Project ribbon, click New Project. The Create new project from template wizard starts.
Or: Click the name of a template next to the New Project icon. The Create new project from template wizard starts. It will automatically use the template you clicked.
To create a project without a template: On the Project ribbon, click the arrow under the New project icon. Choose New Project. The new memoQ project wizard starts.
To start a job in memoQ, you need to create a project. This is how you create a project on your computer:
- In the box right below the Dashboard tab, type the address (URL) of a memoQ server or a memoQ cloud. Then click the tick mark
 next to the box. This is the place where the online project will be.
- The address of a memoQ server looks like this: memoq.company.com
- The address of a memoQ cloud looks like this: https://lonestar.memoq.com/workyourteams
If you used that server or subscription before, you can choose the address from the drop-down box. In that case, there's no need to type or paste the address.
The drop-down box is called the location box.
- If this is the first time you connect to the server or the subscription: The Log in to server window appears. Type your user name and password. Click OK. When you're connected, memoQ lists the projects from the server.
Must be project manager or administrator: To create a project on a memoQ server or a memoQ cloud, you must be member of the Project managers or the Administrators group on the server.
- On the Project ribbon, click the arrow under the New Project icon. Choose New Online Project From Template. The Create new project from template wizard starts. The title bar of the wizard shows the address of the server where the project is created.
To create an online project without a template: On the Project ribbon, click the arrow under the New project icon. Choose New Online Project. The new memoQ project wizard starts.
There are some things that you can do in local projects only. Even if you want to run the job online, you may need to prepare it on your computer. When this is done, you need to take it online: publish it on a memoQ server or in a memoQ cloud.
- Create a local project.
- Import documents and choose resources (translation memories, LiveDocs corpora etc.)
- Prepare the documents in the local project. Edit them if necessary. Return to the Dashboard when you're done.
- In the drop-down box right below the Dashboard tab, choose My Computer. Then click the tick mark
 next to the box. The drop-down box is called the location box.
 - Find and select your local project.
To find the project easier: Above the project list, type part of the name or description of the project in the Search box. memoQ narrows the list to projects that have your input in their names.
- On the Project ribbon, click Publish On Server. The Publish project wizard starts.
If your organization tracks their projects on Language Terminal, you probably have an administrative (or a project manager's) account for the organization's Language Terminal profile.
Your organization's Language Terminal profile has a list of administrators, project managers, internal vendors (translators and reviewers who are members of the organization), and external vendors (translators and reviewers who are independent professionals). When your memoQ server - where you set up online projects - is connected to this Language Terminal profile, these people can all log in to both memoQ server and to this Language Terminal profile. (Except for external vendors.)
You need to save your Language Terminal user name and password in memoQ - before you can manage users and projects that are connected to Language Terminal.
- Open the memoQ menu: At the top left, click the memoQ tab. The My memoQ page appears.
- On the My memoQ page, click My Language Terminal account.
- The Language Terminal account wizard starts. Enter your user name and password for Language Terminal, then click Next. If memoQ reports that it could log in to Language Terminal, click Finish.

When you assign work to translators and reviewers, it is important to know when they are available. With some help from Language Terminal, you can track this, too.
Click Vendor availability. The Availability calendar window opens. It will show the upcoming days, and for each day, it will show how busy are project managers and internal vendors.
For a project manager, it's important to see if there is anything to do with a project or another, especially if it's urgent.
The Dashboard has a list of ongoing projects. Normally, each row corresponds to a separate project. This gives a quick overview of what's going on on your computer or on a server.
This is always almost the same, no matter where the projects come from. When you look at the projects from your computer, you see roughly the same details as from a server.
![]() : Translation hasn't started
: Translation hasn't started
![]() : Project is empty;
: Project is empty;
![]() : Translation or review is in progress;
: Translation or review is in progress;
![]() : Translation completed by the translator (all segments are confirmed by the translator);
: Translation completed by the translator (all segments are confirmed by the translator);
![]() : Translation is confirmed by the Reviewer 1;
: Translation is confirmed by the Reviewer 1;
![]() : All documents in the project are reviewed by the Reviewer 2.
: All documents in the project are reviewed by the Reviewer 2.
![]() : All work has finished on the project, it's wrapped up.
: All work has finished on the project, it's wrapped up.
And if a project is in progress, there is a progress bar next to the status icon. It indicates how far the project has progressed. If you move the mouse pointer over the progress bar, you'll see the progress in numbers, too:

To see more details about each project: Above the project list, click the Two-row view ![]() icon. memoQ lists every project in two rows instead of one. You may need a larger screen for this.
icon. memoQ lists every project in two rows instead of one. You may need a larger screen for this.
Or: You can have extensive details about the selected project. To see that: Above the project list, click the Details ![]() icon. The Details pane appears on the right.
icon. The Details pane appears on the right.
This still doesn't give you an immediate overview of urgent tasks. For that, you need alerts.
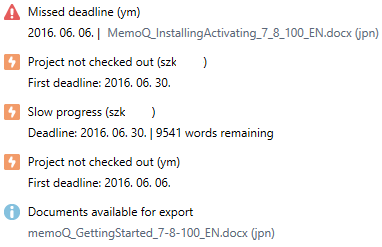
Above the project list, click the Alerts ![]() icon. On the right side of the memoQ window, the Alerts pane appears. It lists events that happened in various projects, so that you can check if you need to do anything about those:
icon. On the right side of the memoQ window, the Alerts pane appears. It lists events that happened in various projects, so that you can check if you need to do anything about those:
To translate or edit documents in a project, you need to open the project. As a project manager, probably you won't be translating the document. Project managers usually do the following:
- Pre-translate segments. Lock them if necessary.
- Check if the documents were imported correctly.
- Join and split segments.
- In the drop-down box right below the Dashboard tab, choose My Computer. Then click the tick mark
 next to the box. The drop-down box is called the location box.
 - Find the project in the list, and double-click its name. The project workspace opens with Project home.
Right-click is better: To open a project, you can right-click its name, and then choose Open from the menu.
- In Project home, choose Translations.
- Double-click the document you want to edit.
Or: Right-click the name of the document, and choose Open for Translation.
You need to do all this locally. But then how can you edit documents in online projects?
To edit documents in an online project, you need to check out the project first. When you check out a project from a server, memoQ makes a copy of the documents on your computer. The local copy is also called the 'checkout' of the online project. When you edit documents in the checkout of an online project, memoQ changes them locally. The changes are saved - synchronized - to the server in a separate step, but memoQ does that automatically.
To check out an online project:
- On the Project ribbon, click Check Out From Server. The Check out online project window appears.
- In the Server URL box at the top, type the address (URL) of a memoQ server or a memoQ cloud. Then click Select. This is where the online project will be checked out from.
- The address of a memoQ server looks like this: memoq.company.com
- The address of a memoQ cloud looks like this: https://lonestar.memoq.com/workyourteams
If you used that server or subscription before, you can choose the address from the drop-down box. In that case, there's no need to type or paste the address.
- If this is the first time you connect to the server or the subscription: The Log in to server window appears. Type your user name and password. Click OK. When you're connected, memoQ lists the projects from the server.
Must be project manager or administrator: You can check out a project and edit documents in them if you're a translator, and you were assigned documents in the project. But to make sure that every document is checked out, you must be member of the Project managers or the Administrators group on the server.
- Click the name of the project you need to check out.
To find the project easier: Above the project list, type part of the name or description of the project in the Search box. memoQ narrows the list to projects that have your input in their names.
- Next to the project name, click Check out project.
memoQ checks out the project, and creates the copy - the checkout - on your computer.
On the Dashboard, the checkout of the online project appears on the list of local projects. You'll see the checkout if you choose My Computer in the location box. (After choosing a location in that box, always click the tick mark ![]() next to the box.)
next to the box.)
- To edit the documents, open the checkout of the online project. You'll get the same Project home as with local projects. memoQ knows it's a checkout and synchronizes the changes to the server automatically.
When you stop working for the day, just close the project in memoQ. All your edits and changes are saved automatically.
To continue working the next day, simply open the project again. memoQ will even remember the document you were editing. What's more, memoQ will take you back to the segment where you left off the last time.
You can edit documents in a local project or in a checkout of an online projects. You get a list of both if you choose My computer in the location box below the Dashboard tab.
To learn how to open and check out projects: See the previous section on this page.
You can archive an online project if you do not expect more work on it. On the Dashboard, you can do this when you are working with the online projects on a memoQ server.
When you archive an online project, memoQ server will create a copy of the project in a single archive file. The extension of the file is .mqarch.
- Normally, the archive file is saved on the memoQ server itself, in a pre-set folder. (The server's administrator can set this folder in the Deployment tool.)
- The archived project is removed from the list of projects.
- You can view the archived projects, and restore the online projects from them if necessary.
- You can also save the archived copy to your own computer.
Automatic archives: memoQ server can archive projects automatically after they are wrapped up, or after all work is done on them. To set this up, open Server administrator, and choose Archiving.
The archive contains everything - documents, resources (translation memories etc.), user and assignment information, settings. These are all restored when you restore an archive on the server. This helps you rebuild the project and the resources if the server was reinstalled, or when you need to move to a new server.
memoQ will not do one thing: When restoring an online project, the record on Language Terminal will not be created again, and the connection will not be restored even if the Language Terminal record is still there.
Do not mix this with backups: You back up local projects - you archive online projects. In addition, the administrator can make a backup of the entire memoQ server from the memoQ server Deployment tool - but again, that is not the same as archiving projects.
To archive an online project:
- On the Dashboard, connect to the memoQ server where the online projects are. You may need to log in to the server.
- Select one project or a few projects.
- On the Project ribbon, click Archive. From the menu, choose Archive Selected Projects.
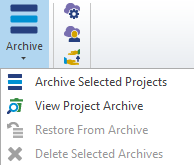
- The memoQ archive projects wizard starts. Choose where the archive will be saved (on the server, or on your computer). If the project is connected to Language Terminal, you must tell memoQ what to do with the project record on Language Terminal.
To learn more: See Help about the memoQ archive projects wizard.
- memoQ will create the archive in the background. The Task tracker opens automatically: you can follow the process there.
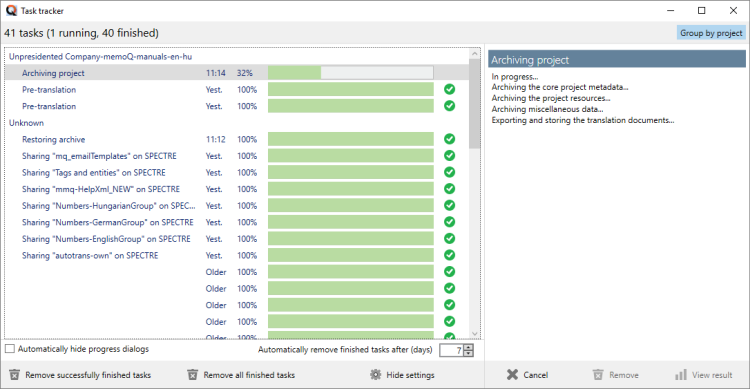
- The project will disappear from the list of online projects. Maybe not immediately: To refresh the list, click the Select
 icon next to the server address box.
To view the list of archived projects, and restore a project from there:
- On the Dashboard, connect to the memoQ server where the projects are. You may need to log in to the server.
- On the Project ribbon, click Archive. From the menu, choose View Project Archive.
- The list of archived projects appears on the Dashboard:

- To restore the online project from an archive: Right-click the name of the archive. From the menu, choose Restore From Archive.
- memoQ will ask if you really want to do this. Click Yes.
- The restore will happen in the background. The Task tracker opens automatically: you can follow the process there.
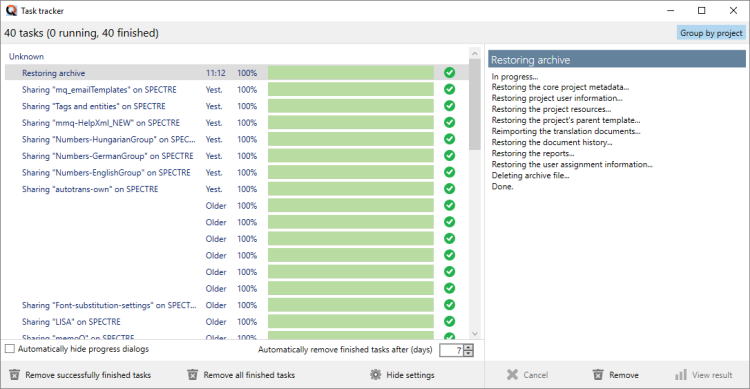
- To return to the list of online projects: Switch back to the Dashboard. On the Project ribbon, click Archive. From the menu, choose View Project Archive. The list of online projects returns, with the restored project on it.
To restore an archive that was not saved to the server but to your computer:
- In Windows - in a File Explorer window - open the folder where the archive is:

- Double-click the name of the archive file. memoQ asks where to restore the project:

- In the Server URL drop-down box, choose a server that you used to connect to. Or, type or paste a new server address. Click the Select
 icon.
icon.You may need to specify a new server address if the server was reinstalled or moved. You may need to log in to the server.
- Click OK. memoQ will restore the project to the server in the background. You can follow the process in the Task tracker window.
Every now and then, you may want to clean up the project list - on your computer or on the server of your organization.
There are projects that you created for experimenting. Other projects may be old and no longer interesting.
To remove these projects from the list: Move them to the Recycle Bin. Your computer has a Recycle Bin, and every server has a Recycle Bin.
To move one or more projects to the Recycle Bin: Select the projects you want to remove. On the Project ribbon, click Move To Recycle Bin.
Or: Right-click the selected projects. From the menu, choose Move To Recycle Bin.
After you move a project to the Recycle bin, it still occupies storage space on your computer or on the server. If the server is a memoQ cloud, you should keep this in mind.
To review and clear the contents of the Recycle bin:
- On the Project ribbon, click View Recycle Bin. The list of projects changes: instead of the active projects, you'll see the contents of the Recycle bin.
The search bar above the list becomes green: This is how you know you're viewing the Recycle bin.
- To delete one project from the Recycle bin: Right-click the name of the project. Choose Delete.
Caution: If you delete a project from the Recycle bin, you can't restore it.
You may have moved a project to the Recycle Bin by accident. Or, you may realize later that you need a document or two from a project that's already in the Recycle Bin.
To access the contents of a project that's in the Recycle Bin, you must restore the project.
- On the Project ribbon, click View Recycle Bin. The list of projects changes: instead of the active projects, you'll see the contents of the Recycle bin.
- Find the project you want to restore. Right-click the name of the project. Choose Restore.
To find the project easier: Above the project list, type part of the name or description of the project in the Search box. memoQ narrows the list to projects that have your input in their names.
The restored project appears on the list of active projects again.
You can back up and restore local projects. To back up project contents from a server, you need to use the deployment tool directly on the server.
Caution: You can't back up checkouts of online projects, either.
To back up one or more projects from your computer:
- In the drop-down box right below the Dashboard tab, choose My Computer. Then click the tick mark
 next to the box. The drop-down box is called the location box.
 - In the list of projects, select the projects to back up. (Click the name of the first project. Press and hold down Ctrl, and click the rest of the projects.)
- On the Project ribbon, click Back Up. A Save As window appears. Find a folder for the backup file, give it a name, and then click Save.
Note: memoQ saves everything from the project in a single file. This backup file will have the *.mqbkf (memoQ backup file) extension. The backup file contains the documents, settings, and resources (translation memories, term bases, LiveDocs corpora, and Muses) in the project.
Important: memoQ includes a binary copy of all files in the backup package. Your project will look the same when you restore it, but you cannot use this file in other translation tools or different versions of memoQ.
- Copy the .mqbkf file to removable storage (a USB drive or an external hard disk). If there are no confidentiality concerns, you can also save the backup file to cloud storage (Dropbox, OneDrive, Google Drive etc.). Store the backup copy away from your computer.
When you need to restore the projects on your computer (because you have a new computer, or the entire system was reinstalled), follow the steps below.
- Save the *.mqbkf file to a folder that you will be able to access from memoQ.
- Start memoQ.
Back up and restore in the same version: You can't restore a backup in a newer version of memoQ if it was made in an earlier version. If you plan to upgrade your copy, first install the original version, then restore your projects. After this, you can upgrade your copy to the newest version. When you start the newest version for the first time, it will convert all resources that were restored. When you open the restored projects for the first time, memoQ will upgrade the projects too.
- In the drop-down box right below the Dashboard tab, choose My Computer. Then click the tick mark
 next to the box. The drop-down box is called the location box.
 - On the Project ribbon, click Restore. The memoQ restore from backup wizard starts.
- In the first wizard screen, click the ellipsis
 button. An Open window appears. Find and select the *.mqbkf file.
The path and name of the *.mqbkf file appears in the Choose file box. After you select the package to restore, click Next.
- memoQ reads the package, and displays the next screen.
At the top, choose the folder where the restored projects will be created. At the bottom, choose which projects to restore from the package. (If the package contains multiple projects, you do not have to restore all of them.)
Note: If you already have a copy of a project on your computer, you can choose to update it. To do this, click the Add link next to the name of the project. The link will change to Update. In this case, memoQ does not create a new project. Instead, it replaces the existing project with the new contents.
Important: If you update a project from the backup package, all changes made since the backup will be lost. memoQ also overwrites all existing translation memories, term bases, or LiveDocs corpora in the project.
After you make your choices on this wizard page, click Next.
- memoQ displays the Ready to restore screen. You can still click Back, and change your choices. You can even select another .mqbkf file. To perform the restore, click Finish. memoQ restores the selected projects from the package.
You may be working on a server as a user who's member of the Project Managers group. If you are also an administrator, you may have another user account. That account could be member of the Administrators group. For example: as an administrator, you can open the Server Administrator, and change the settings of the server.
- In the location box right below the Dashboard tab, type the address (URL) of a memoQ server or a memoQ cloud. Then click the tick mark
 next to the box. When you're connected, memoQ lists the projects from the server.
 - Next to the location box, click Forget login.
- Click the tick mark
 again.
 - The Log in to server window appears. Type the new user name and password you want to use. Click OK. When you're connected, memoQ lists the projects from the server again.
When there is an update for your copy of memoQ, a warning appears at the top of the Dashboard:

An update usually contains improvements to the program. Occasionally, there are new features, too.
To install the update: Click the Close and update memoQ now link.
Don't install an update when you're in the middle of something. When you click the link, memoQ closes. You can't use the program while the update downloads and installs.
To download the update while using memoQ: Open our Downloads page in your browser. Find your version in the list. Click its Download button, then click the Download link for memoQ translator pro. When the download is ready, you still need to close memoQ before you install the update manually.
To see the release notes: Open our Downloads page in your browser. Find your version in the list, and click its Read more link.
Manage resources - translation memories, LiveDocs corpora, project templates, and more: On the Quick Access Toolbar (in the top left corner of the memoQ window), click the Resource Console ![]() icon. The Resource Console appears.
icon. The Resource Console appears.
Change how memoQ behaves: On the Quick Access Toolbar (in the top left corner of the memoQ window), click the Options ![]() icon. The Options window appears.
icon. The Options window appears.
Manage and configure a memoQ cloud or a memoQ server: On the Quick Access Toolbar (in the top left corner of the memoQ window), click the Server Administrator ![]() icon. The Server Administrator appears.
icon. The Server Administrator appears.
See and manage your licenses: In the top left corner of the memoQ window, click the blue memoQ ![]() tab. The My memoQ page opens, with detailed information on the version and license of your copy of memoQ.
tab. The My memoQ page opens, with detailed information on the version and license of your copy of memoQ.
Switch windows: You can open several online projects for management. Each online project opens in a separate window. To switch between them and the Dashboard, press and hold down Alt, and press Tab a few times until you get to the window you want. Or: On the Windows taskbar, click the memoQ icon, and then click the window you want to switch to.