

Getting started - CMS connections for WordPress
WordPress is one of the most popular content management system (CMS) that is used to run websites.
memoQ TMS can receive translation jobs directly from WordPress sites that have the WPML plugin installed.
This topic describes how to set up both memoQ TMS and the WordPress site to send translation jobs. It also contains instructions to send a translation job from WordPress.
The CMS API can handle any file format supported by memoQ TMS: our customers can build software components to connect memoQ TMS to their own CMSs.
Set up the CMS API
Before you do this, make sure that memoQ TMS is installed and running.
If you run your own memoQ TMS:
- Log in to the memoQ TMS server computer through Remote Desktop.
-
Open the memoQ TMS deployment tool. In the memoQ TMS section, click Advanced. From the menu, choose Configure server.
-
Click the CMS API tab. Select the Enable CMS API checkbox. Set up encryption. To learn more, see Help about the Configure server window.
If you are using a public cloud deployment of memoQ TMS: Contact memoQ sales to request a license. The memoQ team will activate the CMS API for you.
Create a connection for the WordPress site
-
On your computer, start memoQ (with a project manager license).
-
Open Server Administrator, and connect to your memoQ TMS. Make sure you log in as an administrator (a memoQ TMS user who is member of the Administrators group).
-
On the left, click CMS connections. The CMS connections pane appears.
-
Add a new CMS connection. You need to add these details:
-
a name for the connection
-
a connection key that the WordPress site can use to send jobs to memoQ TMS
-
name and e-mail address of your client (the owner of the WordPress site)
-
a project manager who will be in charge of the jobs sent from this WordPress site (that is, a memoQ TMS user who is member of the Project managers group)
To learn more: See Help about the CMS connections pane and the Add new CMS connection window.
Your client needs the connection information. To send it:
-
On the CMS connections page, select the CMS connection.
-
Click Copy client configuration information to the Clipboard.
-
Open a text document, and paste the contents of the clipboard in it.
-
Send the document to the owner of the WordPress site (your client) with the instructions below.
To process jobs automatically: Set up a workflow in the CMS Dashboard
To start working on a translation job from a WordPress site, you need to create an online project from it. You can do it manually, but it can also be automatic.
memoQ TMS can create an online project from a job automatically if the CMS dashboard contains a workflow that matches the job.
A workflow matches a translation job if it comes from a connection that is specified in the workflow, and its language combination is compatible with the languages in the workflow. This means that the source language of the job must be one of the source languages specified in the workflow. In addition, all target languages in the job must be listed in the workflow as well.
To create a workflow:
-
Open the CMS dashboard, and click the Workflows tab.
-
Under the Automated workflows list, click Add new workflow.
-
Fill in the fields under Workflow details: Type a name for the new workflow.
-
Choose its Source language.
-
Add Target language(s) as needed.
-
Choose the Project template you want to use.
If you don't have a template for this purpose. you need to create one before you create the workflow.
-
To view information about the selected project template: click the links under Project template.
-
Naming patterns and hints shows how the project resources are named, and gives tips about how you should set them.
-
Review the template settings opens the Template overview window.
-
Select a Project manager for the projects created with this workflow.
To learn more: See Help about the Workflows tab of the CMS Dashboard.
Set up WordPress
This is something your client will do. The description is here so that you have the whole picture, and you will also be able to assist your client if necessary.
To set up the connection, you need the WPML plugin on your WordPress site.
-
Open the admin page of the WordPress site (open https://web-address/wp-admin). Sign in as an administrator of the WordPress site.
-
In the menu on the left, point to WPML, and click Translation management. The Translation management page opens.
-
On the Translation management page, click the Manage Translators & Services tab.
-
Under Translation Services, open Translation Management System, and enter "memoQ" in the Search field.
-
Click Activate. The page reloads, and the memoQ service moves up to the Active service heading, just under Translation Services.
-
Next to the memoQ logo, click Authenticate. In the window that appears, paste first the Connection key, then the memoQ TMS CMS Connector address. Before you do this, you need to get these details from memoQ TMS (see the Create a connection for the WordPress site section above). Click Submit.
If it’s the first time you are installing and setting up WPML, you can add a connection to memoQ from the WPML setup wizard. The authentication process is similar to the one above.
Send a translation job from the WordPress site
This is something your client will do. The description is here so that you have the whole picture, and you will also be able to assist your client if necessary.
-
Open the admin page of the WordPress site (open https://web-address/wp-admin). Sign in as an administrator of the WordPress site.
-
In the menu on the left, point to WPML, and click Translation management. The Translation management page opens.
-
On the Translation Dashboard's Translate content tab, expand the sections to find Posts, Pages, and other content types.
-
Select the checkbox of each item you want to translate.
-
Scroll to Step 2 (or click Translate your content), and choose Assign translator service from the dropdown for each target language you want the pages translated into. To set this for all your target languages, use the top dropdown.
-
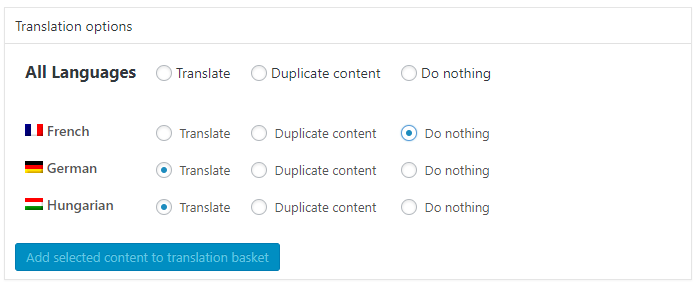
If you do not want to translate the page into a target language, you may either copy the source text to that target language (choose Duplicate), or leave the page empty in that target language (click Do nothing). For example, if the selected page should not be translated into French, the selector at the bottom will look like this:
-
At the bottom of the page, review or change Batch name (that will be the name of the translation job in memoQ).
-
Click the button at the bottom. Depending on your choices, its text can be Translate content or Translate and duplicate.
Receive a job and create an online project from it
After the job is sent from WordPress, it will appear on the CMS dashboard, on the Jobs tab.
Select the jobs, or some files from a job, and click Import to project.
To learn more: See Help about the Jobs tab of the CMS dashboard.
Or, you can simply start creating an online project from a template. Choose CMS (Content management system), and choose the job there. To learn more: See Help about the New online project from template wizard.
Or, you can import a job into an existing online project. Open the project for management. On the Online project ribbon, click Add CMS jobs. To learn more: See Help about the memoQ online project window and the Add CMS jobs window.