New memoQ project wizard
Individual translators create their own projects. This wizard leads you through the steps of setting up a project on your own computer. You will be able to add source documents, translation memories, and term bases. To add more resources and change settings, use the Project home workspace, after you create the project.
Use templates instead: This is the old way to start a project. Create the project from a template instead, it takes less time. To learn more, see Help about creating a project from template.
How to get here
- Start memoQ. On the Project ribbon, click the New Project label below the icon. (If you click the icon, memoQ will create a project from a template.)
- In the menu, click New Project.
What can you do?
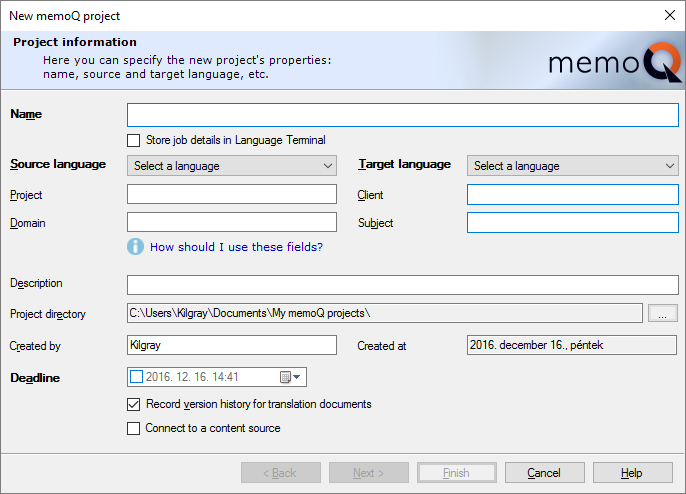
Fill in the following details:
-
Name: Enter the name of the project. This is required. The name must be unique on your computer. Later, you can rename the project from the Dashboard if it is necessary.
-
Source language: Choose the source language for the project. This is required.
-
Target language: Choose the target language for the project.
-
Project: This is the name of the larger project. Use the name that your client uses. Within the scope of a Project, think of a memoQ project as a 'job'. Under the umbrella of the same Project, there can be several memoQ projects.
-
Client: The name of the client. If you work as a translator or in a translation company, this is usually the name of the end client.
-
Domain: The name of the topic or the genre of the source documents. To indicate the subject field, use the Subject box instead.
-
Subject: The name of the subject field.
-
Project directory: Shows the full name of the folder where the project will be stored. To change it, click theBrowse
 button.
 -
Created by: Shows the user who created the project. At first, memoQ will take this name from Windows.
-
Created at: Shows the date when the project is created. memoQ takes it from Windows.
-
Record version history for translation documents checkbox: Check this to track the history of documents and the segments in the project. Whenever a change is made to a segment, memoQ records the earlier version, so that you can view the changes, or even to revert to an earlier version. In addition, you can tag your project at a specific time, so that memoQ can always show how the project looked like at the time it was tagged.
-
Connect to a content source checkbox: Select this checkbox if you need to watch a content source (such as a file folder on your own computer or on another computer), instead of adding files manually. You need the memoQ content connector to use this. It's recommended to use with online projects only.
You need to enter the Project name, the Source language and the Target language. The rest is optional.
To proceed to the next screen: Click Next.
To create an empty project: Click Finish. memoQ will create an empty project, and close the wizard.
Add source documents to the project here.
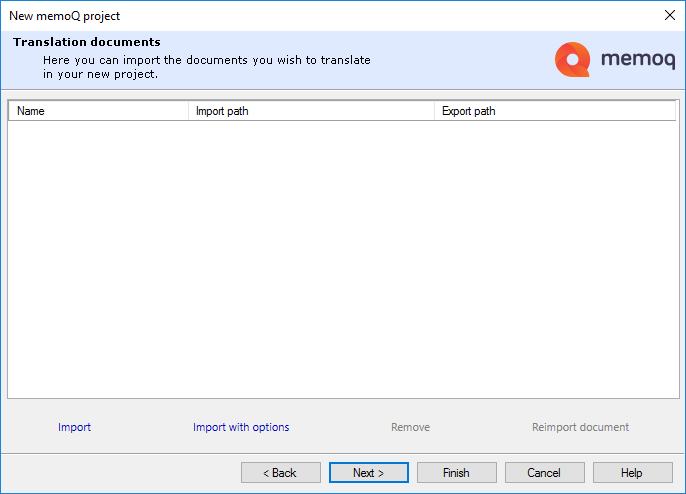
To import documents: Drag files to the empty space. Or, use the Import or Import with options commands.
- Import: An Open window appears where you can find the documents to translate.
- Import with options: With this command, you can fine-tune the import after you choose the documents. After the Open window, the Document import options window opens where you can customize the import.
If you add files by mistake, you can remove them: Select the documents you need to remove, and click Remove.
If a document changes while you are setting up a project, or you need to import a document with different settings: click Reimport document.
To proceed to the next screen: Click Next.
To create the project immediately: Click Finish. memoQ will create the project without translation memories or term bases.
Create, register, or import translation memories to use in the current project.
You can also manage and maintain translation memories, but this is not the recommended place for that. Instead, use the Translation memories pane of the Resource console or Project home.
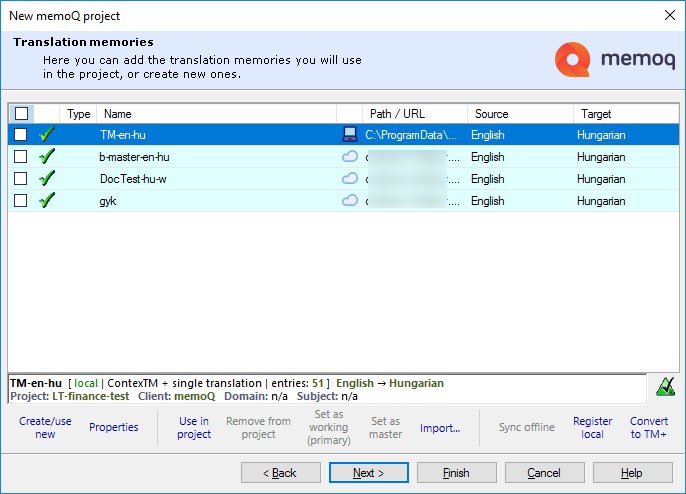
This wizard page gives you a list of translation memories, similar to the Translation memories pane in Project home.
- To use a translation memory in the project: Check its checkbox in the first column.
- To create a new translation memory and use it in the project: Click Create/use new. The New translation memory window opens.
- To import a TMX or a table file into the selected translation memory: Click Import from TMX/CSV. To learn more, see Help about the Translation memory TMX import settings or the Translation memory CSV import settings window.
- If the selected translation memory is a local copy of an online translation memory from a memoQ TMS, you can click Synchronize offline. memoQ will download changes from the memoQ TMS. However, you will not use this command very much: you will use online translation memories mostly in online projects.
- To view and change main details and custom fields of the selected translation memory: Click Properties. The Translation memory properties window opens.
- If a translation memory exists on your computer, but you cannot see it in the list: Click Register local. An Open window appears. Find the folder of the translation memory, and select the .mtm file in it. Click OK. memoQ will add the translation memory to the list - if it is compatible with your version of memoQ, and it is not corrupted.
You need to choose a working and a master translation memory: Do it in the Translation memories pane of Project home. To learn more, see Help about Project home.
To proceed to the next screen: Click Next.
To create the project immediately: Click Finish. memoQ will create the project without term bases.
Create, register, or import term bases to use in the current project.
You can also manage and maintain term bases, but this is not the recommended place for that. Instead, use the Term bases pane of the Resource console or Project home.
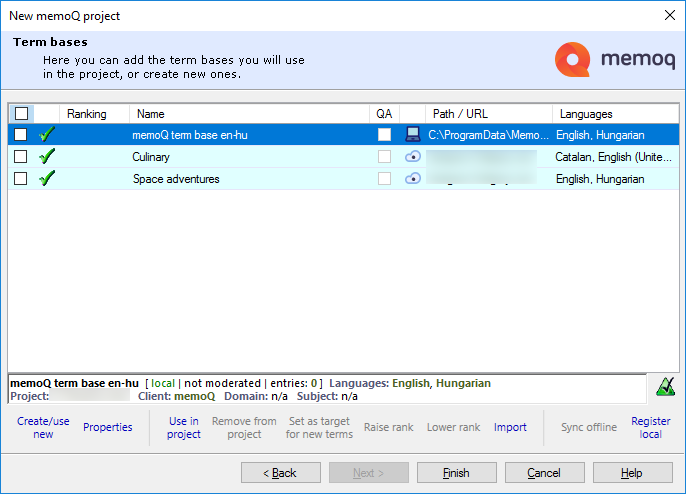
This wizard page gives you a list of term bases, similar to the Term bases pane in Project home.
- To use a term base in the project: Check its checkbox in the first column.
- To create a new term base and use it in the project: Click Create/use new. The New term base window opens.
- To import a file (Excel most of the time) into the selected term base: Click Import. To learn more, see Help about the Term base Excel import settings window.
- If the selected term base is a local copy of an online term base from a memoQ TMS, you can click Synchronize offline. memoQ will download changes from the memoQ TMS. However, you will not use this command very much: you will use online term bases mostly in online projects.
- To view and change main details and custom fields of the selected term base: Click Properties. The Term base properties window opens.
- If a term base exists on your computer, but you cannot see it in the list: Click Register local. An Open window appears. Find the folder of the term base, and select the .mtb file in it. Click OK. memoQ will add the term base to the list - if it is compatible with your version of memoQ, and it is not corrupted.
- You need to choose a term base where memoQ adds all new terms by default: Select the term base. Click Set as target for new terms.
- If there are two or more term bases, you may need to set up a ranking among them. When terms are found in several term bases, memoQ will list them in the order of their rank. For example, a match from a rank 1 term base will appear before a match from a rank 4 term base. To change the rank of a term base: Select it, then click Raise rank or Lower rank.
To create the project immediately: Click Finish. memoQ will create the project.
When you finish
To create the project, and open it in Project home: Click Finish.
To change other settings in previous pages: Click Back.
To return to the Dashboard, and not create the project: Click Cancel.