

ICR tool for reviewers
Reviewers can check and approve translations directly on the web interface, without needing to install or use a translation tool.
How to get here
Your customer can give you access to your review task in one of these ways:
-
An email with a link: You receive an email with a subject such as New project assigned to you or New documents assigned to you. In the email, find the In-country review links for assigned documents section and select the link for the document you want to review.
-
A direct web address: Your customer sends you the URL of your review task. Open the address in a web browser.
The link should look like this: https://memoq.mycompany.com/memoqweb/icr/projects/project-id/docs/document-id.
-
Directly from memoQ TMS: If you know the URL of the site where you need to work, open it in a web browser.
Then you can sign in with the username and password provided by your customer.
What can you do?
As a reviewer, you work in the ICR editor.
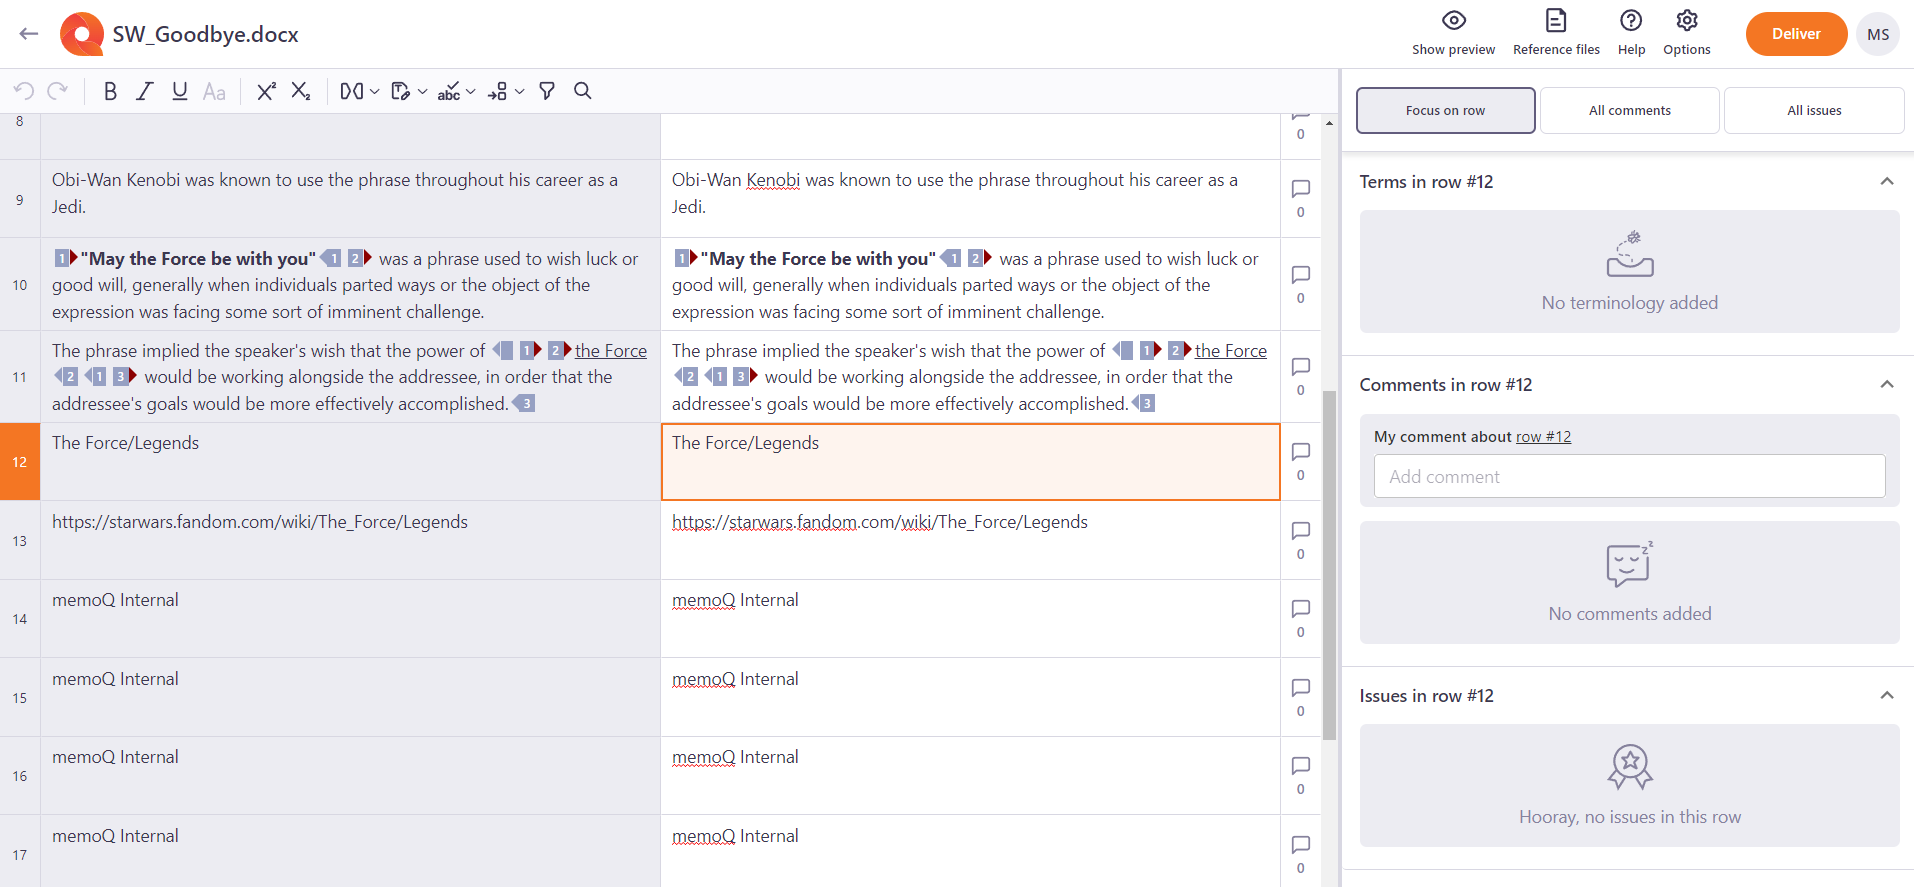
Here you can:
 Check your review tasks
You can check all the review tasks assigned to you on the My tasks page.
You can get there in one of these ways:
Navigate faster with Quick actions
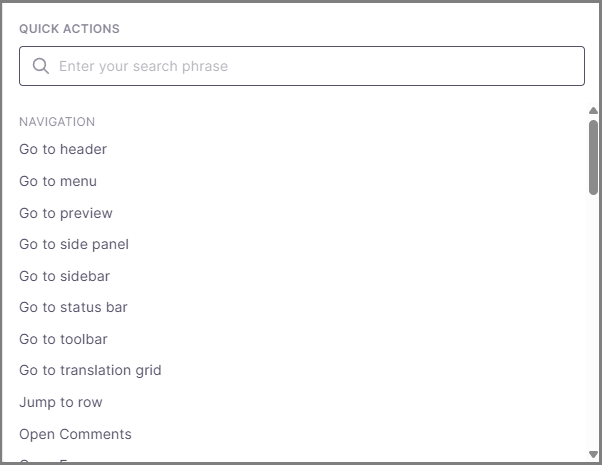
Quick actions helps you find the features and functions you need without navigating through the interface. You can open it from the Help menu or press Ctrl + Shift + X.
A pop-up window opens:
How does it work?
-
Start typing in the search field to find what you need. Matching options appear as you type and are sorted alphabetically. If a feature has a keyboard shortcut, it appears next to it.
-
Select an option to go directly to it. You can also use Tab to move through the results and press Enter to select a feature you want to go to.
-
Depending on what you select, Quick actions can take you directly to a specific area of the interface, open a panel, or bring an already open panel to the front. Features that aren't currently available are grayed out.
-
To close Quick actions, press Esc or click outside the window.
Get instructions, help, and reference files
-
Need to check a reference file? Click Reference files
 on the right side of the screen. A panel opens showing you the list of reference materials that your PM uploaded to the project. You can download them from here.
 -
To find additional instructions, click Help, and choose from:
-
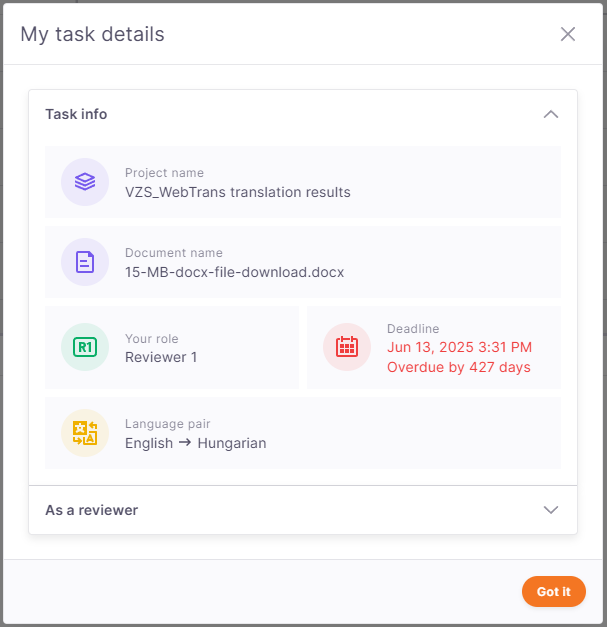
My task details - a pop-up window appears showing all the task information you need (project name, document name, your role, deadline, and language pair), and what you can do as a reviewer.
-
Open tutorial - opens a brief walkthrough that introduces the basic ICR functions.
-
Documentation - this documentation page opens, providing more information and guidance.
-
Keyboard shortcuts - a pop-up window appears with the essential shortcuts you can use when working in ICR. To open it you can also press Ctrl + F1.
-
Quick actions - a pop-up window appear and helps you get to the features and functions you need faster, without having to navigate through the tool.
-
-
If you want to change you ICR's display, go to the Tools tab and select Settings.
Here you can:
-
Click Change display language in your profile. ICR redirects to your memoQweb profile.
-
Choose your preferred appearance mode: System (default), Light, or Dark.
-
Work on your review
-
To format text: Use Bold, Italic, Underline, Toggle case, Superscript, or Subscript options. It's also possible to Undo or Redo your changes.
You can also access these formatting options by clicking the Format tab and selecting Text from the top menu.
Depending on your file type, some formatting options won't be available. They're grayed out in the menu and won't be included in the exported file.
-
Under Tag format
 you can switch between short, medium, and long tags. Their default look is configured by the PM.
You can find these options under the View tab as well.
-
Click Copy next tag sequence
 to insert the tags from the source side into the target side.
You can also find tag-related options under the Edit tab.
-
Click Track changes
 to see the changes made in your review. Use the dropdown list above the source text to switch between all changes, only your changes, or the final changes. Your project manager sets the default look.
 -
Click Check spelling
 to check spelling and get suggestions. This option is switched on by default.
To check grammar, you need the memoQ TMS desktop app.
When the Check spelling setting is turned on, ICR underlines the suspect words and phrases:

Right-click the red underline to view available options. If you want to keep the word as it is, you can simply ignore the underline. To ignore all suggestions for that word, click Skip all.
If you want to use a specific translation, select it from the list. ICR uses this translation whenever the same word appears again.
To turn off spell check, use the slider under the Check spelling icon or go to Tools and select the same option there.
If you can't see red underlines, there are two options: Either all words are spelled correctly (congrats!), or the spell checker isn't configured for your target language. If you think you should see red underlines, contact your project manager.
-
Use the Jump to row field at the end of the toolbar to quickly move to a specific row. Enter the row number and press Enter to go there. The selected row number can’t be higher than the number of rows in the document.
If the row you're looking for isn’t available because it’s hidden or a filter is applied, ICR shows a warning message and redirect you to the next available row.
If you move away from the row you’re working on, use the Ctrl + Alt+ G shortcut to jump back to the active segment. You know you're back in the active segment when you can see a blinking cursor.
Panels such as Find and replace, Filter, and Track changes are closed by default. You can open them by selecting their icon in the toolbar. When you’re done, close the panel to make more space for the translation grid, which is especially useful on smaller or lower-resolution screens.
-
Find and replace
 text in the source or target language.
Here you can:
-
In the Find what field: Enter the text you are looking for.
If text is selected in the grid, it automatically appears in the Find what field. Press Enter to search and highlight all matching results in orange.
-
From the dropdown below the Find what field, select where you want to search - in the source or target text.
-
Use the match type dropdown to define how ICR should look for your text:
-
Any match: Find segments containing any part of your search text. This option is set as default.
-
Words match: Find segments containing all the words you entered.
-
Entire segment: Find segments exactly matching your text.
-
-
Use the Case-sensitive checkbox to decide if your search should distinguish between uppercase (capital) and lowercase (small) letters.
-
Jump between the results by clicking the Find next and Find previous buttons.
-
To replace selected text, type the new text into the Replace with field and click the Replace button.
To replace all matches at once, click the Replace all button. It becomes available when:
-
You filled in the Find what field.
-
You selected at least the Target text option from the dropdown.
To undo a replacement, press Ctrl + Z.
If your project manager gives you comment-only access, you can add comments but can’t edit the text in either the source or target segment. If you have both editing and commenting permissions, you can edit target segments, but not source segments.
-
-
-
Click Filter
 to filter for specific text or wording. You can find this option under the Edit tab as well.
You can filter by source or target text - insert the word or text you want to find in one of the filtering fields and click Apply filter. All the results are highlighted in orange.
To quickly filter selected text in the translation grid, go to the Edit tab and click Filter, or use the Ctrl+Shift+F shortcut. The Filter panel opens with a filter based on the text you selected.
If you haven’t selected any text and the Filter panel is closed, clicking Filter opens the panel and places your cursor in the filter field. The source or target search field is automatically selected based on the active segment.
You can also decide how you want to filter for text:
-
Any match: any part of the text can contain the search term. Example: Filtering for "table" returns segments containing "tables", but not "tabloid".
-
Words match: this option means that your search term must match whole words in the text. Example: Filtering for "table" returns segments containing "table", but not "tables".
-
Entire segment: this means memoQ only returns segments that fully match your search term. Example: Filtering for "table" returns only segments whose full text is "table".
-
If needed, turn on the Match exact word order option to find words in the exact sequence you typed them.
When this is off, memoQ finds the same words in any order within the segment. This option isn't available when you select the Entire segment option from the dropdown.
-
Case-sensitive: uppercase and lowercase letters need to be exactly as in the search term. Example: Filtering for "table" returns segments containing "table", but not "Table".
To confirm, click Apply filter.
To clear the text field and filter for another phrase, click the Clear filters button. memoQ reloads the full document and automatically brings the active row back into view, so you can continue working exactly where you left off.
-
-
Need more advanced filtering options?
Click Show filtering options next to Apply filter button to use more specific filters and display only the rows that match your criteria. You can also combine multiple filters to narrow down the results.
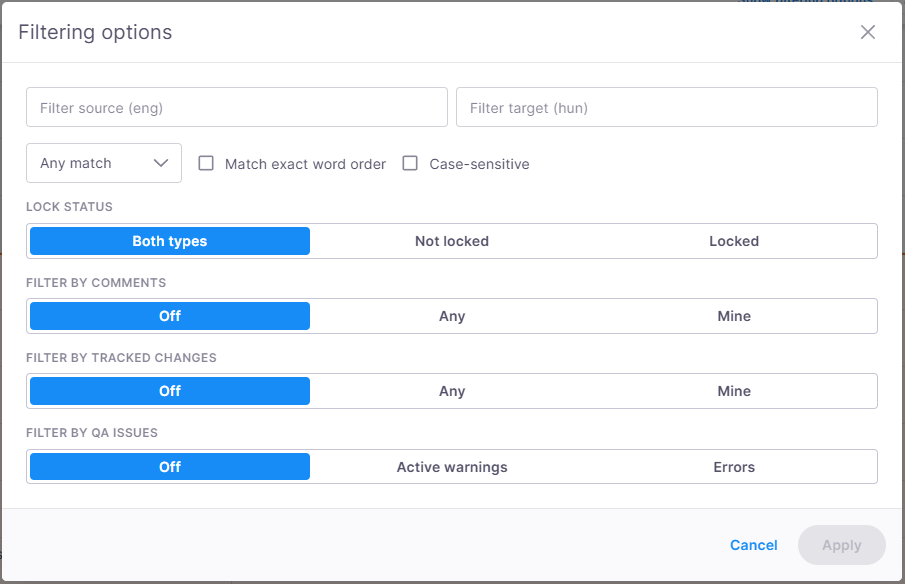
Here you can:
-
Start with the Filter source or Filter target field and enter the text you want to find in source or target text. You can also see the language of your source or target text here.
-
Refine the search. To do that:
-
Select Any match, Words match, Entire segment from the dropdown below the Filter source text to decide how the text should be matched.
-
Choose Match exact search phrase to find text in the exact order you entered.
-
Switch on the Case-sensitive checkbox to match uppercase and lowercase letters exactly.
-
-
Use Lock status to display - locked segments, the ones that aren't locked, or both types (default).
-
Filter by comments to display - any existing comments, rows showing only your comments, or don't filter by comments at all. By default, this option is set to Off.
-
Use Filter by tracked changes to show any rows with tracked changes, only the ones with your tracked changes, or don't filter by tracked changes at all. By default, this option is set to Off.
-
Filter by QA issues to get information about active warnings, errors, or don't filter by QA issues at all. By default, this option is set to Off.
When you're done, click Apply to apply all the filters and update the translation grid.
-
You can also hide locked rows not to include them in the search. Hidden rows are marked with the lock  icon.
icon.
Focus on a selected row
Click the Focus on row  icon in the side panel and then the row you want to check. ICR shows all the important information about the selected row.
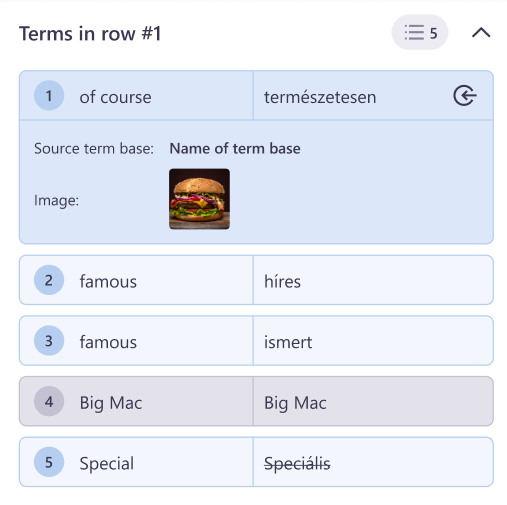
Here you can check:
-
Terms - all the terms and non-translatables in this specific row. These come from the term bases and non-translatable lists that your PM selected for this review task.
Under the selected term, you can find its metadata.
-
"Regular" terms are highlighted in blue in the translation editor and in the term list.
-
Non-translatables are highlighted in gray.
-
Forbidden terms are crossed out. You can't use them in the review or insert them as regular terms.
To insert a term into the segment, you can:
-
Press Ctrl and the number of the term you want to use (from 1 to 9). You don’t have to select a specific word or phrase.
OR
-
Double-click the term's row.
-
-
Comments - the list shows all the comments added to this row. In the translation editor, the commented text is highlighted in green.
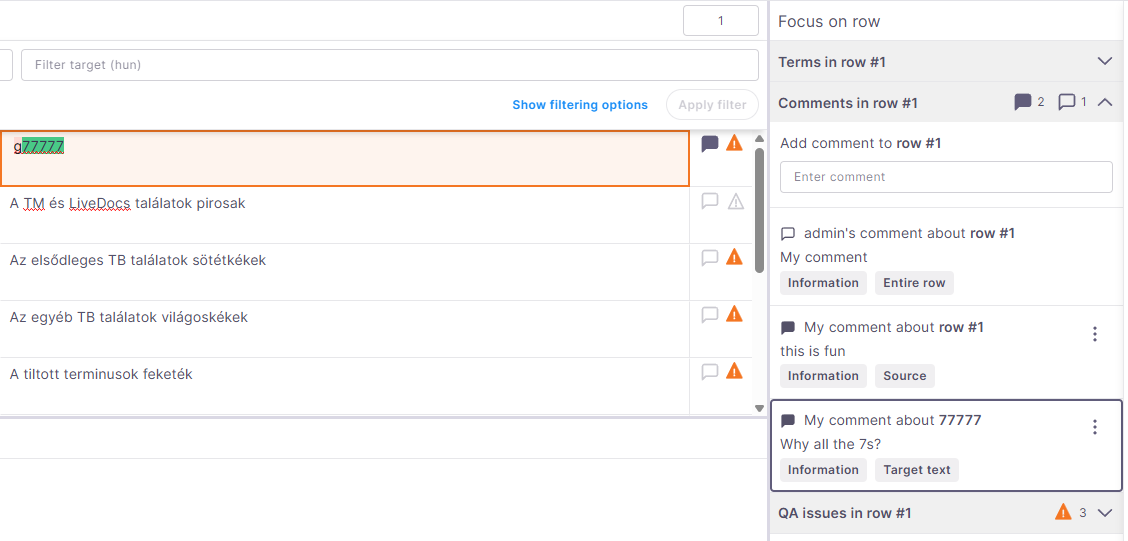
You can easily check who added the comment by looking at the comment icons:
 - no comments added yet
 - comments added by other users
 - your comments
In the Comments section you can:
-
Add a comment about a whole row - click its Add/view comment
icon. -
Add a comment about a part of the row - hover over the text and use the Add comment tooltip or select the text and click the Add/view comment
icon assigned to this row. A comment field appears with information about the content you want to comment on. -
Add comments to already commented rows. The comments list shows how many comments you and others added to each row (your comments are in darker green).
You can also click the Add/view comment
icon. The ICR tool will open comments added to the row you are checking. The number under the icon shows the number of comments for the selected row. -
Edit comment - you can edit only your own comments. To get here click the More options
 icon.
icon. -
Delete comment - you can delete only your own comments. To get here click the More options
icon.
-
-
Issues - the QA warnings and errors mentioned for the selected row.
Here you can check:
Edit content, view, and add comments
Depending on your permissions, you can either edit and comment on your review project or add comments only. Your project manager sets your permissions.
To check your permissions, go to Help and click My review task details. Then look under the As a reviewer section.
In the translation editor, you can identify which rows you can edit by their color - editable rows appear in white, while rows you can't edit are gray.
To view comments added to the document, click the Comments icon. The list shows all the comments added to the document. In the translation editor, commented text is highlighted in green.
Here you can:
-
Filter comments - click Change under the Active filters section.
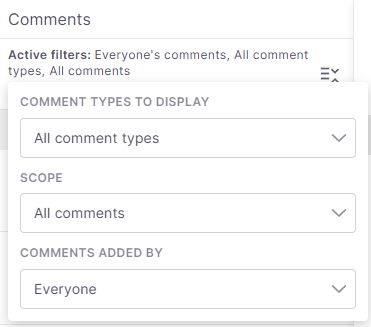
Here you can select the types of comments you want to display (all types, information, warning, error, other), the comment scope (all comments, entire row, source, target, source text, target text), and who added them (everyone, me, others).
-
Add a comment about a whole row - click its Add/view comment
icon. -
Add a comment about a part of the row - hover over the text and use the Add comment tooltip or select the text and click the Add/view comment
icon assigned to this row. A comment field appears with information about the content you want to comment on. -
Add comments to already commented rows. The comments list shows how many comments you and others added to each row (your comments are in darker green).
You can also click the Add/view comment
icon. The ICR tool open comments added to the row you are checking. The number under the icon shows the number of comments for the selected row. -
Edit or delete a comment. To do that, click the More options
icon in the top-right corner of the comment. You can only edit or delete your own comments.To check all the comments, you can also click the Comments
icon on the right-side panel.
Check the QA issues tab for warnings and errors
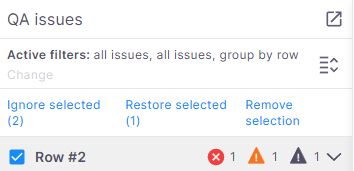
The QA issues tab shows all the QA warnings and errors added to the document. It helps you catch errors or inconsistencies in your review.
To start your review, click QA issues  in the right side panel.
Here you can:
-
Check Active filters at the top of the QA issues side panel. They show your current view settings.
-
Filter and group QA issues - click Change under the Active filters list and decide how you want to see issues added to the document.
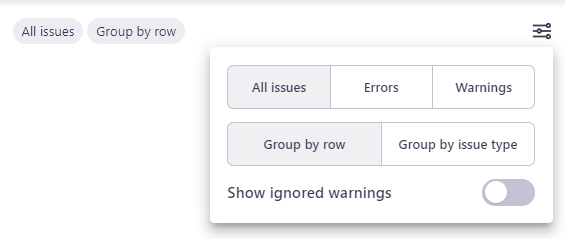
Here you can decide how you want to display them:
-
Issues to show - All issues, only Errors, or only Warnings.
-
Warnings to show - All warnings, only Active ones, or Ignored (only available if you decided you want to show All issues or Warnings).
-
Group issues and warning by:
-
Row - display all issues identified for a specific row in one card. This option is set as default.
-
Category - display dropdowns with identified issues like consistency, numbers, or punctuation and whitespace.
To save your new settings, click anywhere outside the panel.
-
-
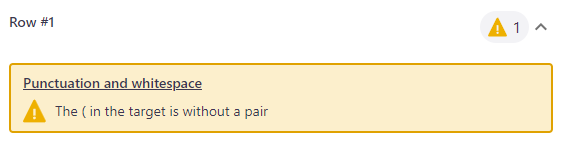
During your work, ICR can display:
Active warnings marked in yellow 
If you decide to group
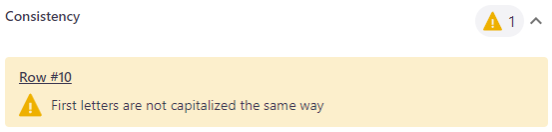
If you decide to group by category, in the top-left corner of the card, ICR shows you the identified issue type, then the row number, and its description. For example, there’s an issue with consistency in row number 1 and 3.
To ignore a single warning, click the Ignore  icon on its card.
To ignore all warnings of the same type, click Ignore this warning type  .
.
To make your warning active again and take it into consideration, click Restore  . The icon changes color back to yellow, and the field will be marked as an active warning.
Ignored warnings marked in gray 
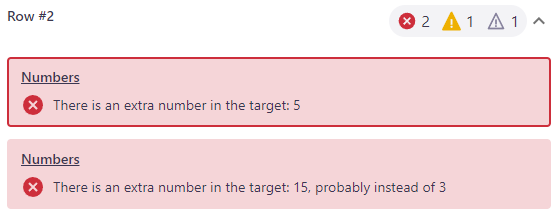
If you decide to group by row, in the top-left corner of the card, ICR shows you the row number, then the issue type and its description. For example, in row 1, there's a formatting issue that was ignored.
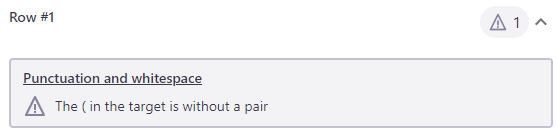
If you decide to group by category, in the top-left corner of the card, ICR shows you the identified issue type, then the row number, and its description. For example, there’s an issue with formatting in row number 1.
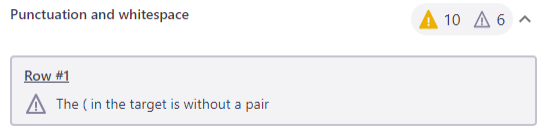
To make your warning visible again and take it into consideration during your work, hover over its field and click the Restore icon in the top-right corner of the field. The field and its icon will change color to yellow, and will be marked as an active warning.
Errors marked in red 
You can't ignore errors. It's possible to deliver a review with errors only if the PM decided it's OK during the configuration process.
If you decide to group
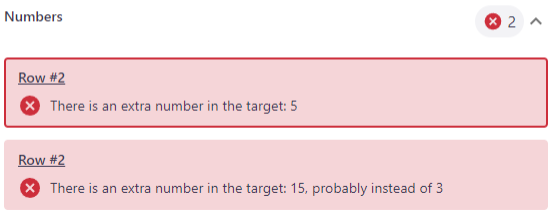
If you decide to group by category, in the top-left corner of the card, ICR shows you the identified issue type, then the row number, and its description. For example, you can have problems with numbering in row number 7.
Work with views
-
What’s a view?
It’s a collection of rows taken from one or more documents. The rows in a view keep all their original content and stay linked to their original documents, so when you edit a target segment, the change is also made in the original document.
ICR displays the view name in the header, while the active document name is shown in the status bar. If the active row belongs to a slice, its row range is included in the document name.
For example: Document name (start row number – end row number)
If the document name is too long to fit, hover over it to see the full name.
-
What's a slice?
It's a part of a document that you work on separately from the rest of the document. For example, if a document is too large for one person to handle, it can be divided into smaller parts, called slices, and each part can be assigned to a different person.
What helps when working with views?
-
QA issues and comments
The QA Issues panel shows all QA issues relevant to the documents in the view, so you can review and manage them in one place.
The Comments panel works in the same way and shows all comments relevant to the documents in the view. Comments belonging to documents are hidden when you work in a view.
-
The preview pane shows the document that belongs to the row you're currently working on. This lets you see your translation in context.
The preview always follows the active row. When you move between rows that belong to different documents, the preview briefly loads the new document.
-
Reference files
The Reference files panel gives you access to the files and other project resources relevant to the documents in your view, so you can work with them without switching between documents.
Some options that apply to individual documents aren't available when working in a view. For example, My task details, Deliver, banners, onboarding, and role information are hidden.
Formatting options are based on the type of document that the active row belongs to, so you can use the formatting tools that are relevant to the content you're currently working on.
Preview your work
You can use the Preview pane at any time to see a real-time view of your document.
To work with your preview options, click the View tab and then choose Preview.
Here you can:
-
Move preview to the top of the page or back to the bottom.
-
Hide preview if you don't need it at the moment. You can also press Ctrl+P or click the Hide preview
 icon in the bottom-right corner of the screen.
Don’t worry, you can bring your hidden preview back at any time. To do that press Ctrl+P again or click the Show preview
 icon in the bottom-right corner of the screen.
If you're using dark mode and want your preview to match it, under the Tools tab, click Settings. Then, all you need to do is make sure the Match preview to dark mode checkbox is selected.
Check your progress in the status bar
The status bar at the bottom of the window gives you quick access to information about your current work - the save status, your location in the document, and details about the active segment.

Here you can:
-
Check the save status - this icon shows whether your latest changes have been saved.
-
Check the Rows section to see where are you in the document.
ICR displays your current position like this Rows: X/Y
-
X is the active row.
-
Y is the total number of rows in the document, even if you're viewing filtered results.

-
-
Check your cursor position and segment length:
-
Pos shows the current position of the cursor within the segment.
-
Length shows the number of characters and tags in both source and target segments. For example: 86+ 0/81 + 0
This means that the source segment contains 86 characters and 0 tags, and the target segment contains 81 characters and 0 tags.
You can hover over this field to see the character and tag counts for the source and target segments separately.
-
 means that all your changes are saved.
When you finish
Deliver your review:
-
In the top-right corner, click the Deliver button. A confirmation window opens.
-
Confirm that you've reviewed each segment and made the necessary changes.
-
Then, click the Deliver button.
Sometimes, you can't deliver your review because the project settings require all errors to be resolved before delivery. When this happens, ICR redirects you to the translation grid so you can review and address the issues.