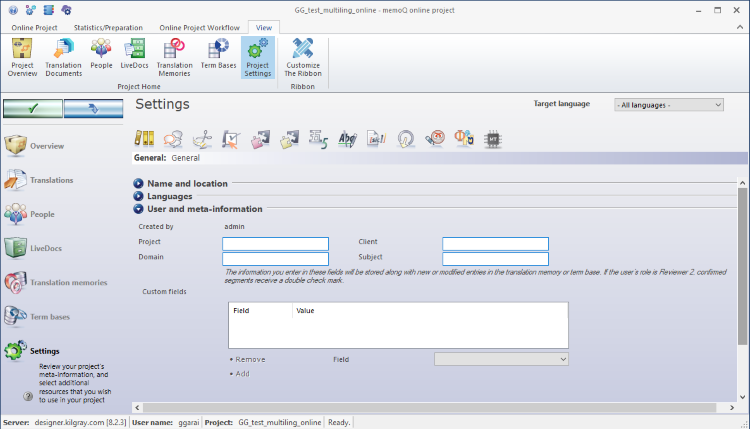
memoQ online project - Settings
A memoQ project has many settings and resources other than LiveDocs corpora, translation memories, or term bases.
In the Settings pane of the memoQ online project window, you can view and change these settings.
Requires memoQ project manager: You need the project manager edition of memoQ to manage online projects.
You need to be a project manager or an administrator: You may manage online projects only if you are a member of the Project managers or Administrators group on the memoQ TMS – or if you have the Project manager role in the project.
How to get here
First, open an online project for management:
- On the project management dashboard, find the project you need to manage. Use the search bar if needed.
- Double-click the project name, or click it, and on the Project ribbon, click Manage
 . A new memoQ online project window opens.
 - On the left, click the Settings icon. The Settings pane appears, with the General tab.

What can you do?
Choose a tab to view or change general options, communication settings, or various resources in the project. To choose a tab, click an icon at the top.
|
|
General: View or change the languages, main details and other options of the project. |
|
|
Communication: memoQ TMS sends e-mails to participants when something changes in the project. You can choose which e-mails are sent. You can also allow the users to get in touch through chat and discussions. |
|
|
Content source connection: In a content-connected online project, memoQ TMS picks up new and changed documents from a content connector. You can choose what happens when there is a change in the content source. |
|
|
Segmentation rules: Choose or create a segmentation rule set for the project. |
|
|
QA settings: Choose or create a quality assurance profile for the project. |
|
|
TM settings: Choose or create a TM settings profile for the project. |
|
|
LiveDocs settings: Choose or create a LiveDocs settings profile for the project. |
|
|
Auto-translation rules: Choose or create auto-translation rule sets for the project. You can choose auto-translation rules separately for each target language. |
|
|
Ignore lists: Choose ignore lists to use with the spell checker in the online project. |
|
|
Non-translatable lists: Choose or create non-translatable lists for the project. |
|
|
Export path rules: Choose or create export path rules used in the project. You can choose one rule set for individual files, and one rule set for folders. Rules for folders work for documents you import through the Import folder structure command. |
|
|
LQA models: Choose or change an LQA model for the project. |
|
|
Font substitution: Choose or change a font substitution profile for the project. |
|
|
MT settings: Choose or change the MT settings for the project. |
When you finish
To make changes to the documents, resources, or settings or the project, or to see reports, choose another pane:
- Overview
- Translations
- Finances (the project must be connected to Language Terminal)
- People
- Packages
- LiveDocs
- Translation memories
- Term bases
- Muses
- History
- Reports
- Files
Or, to return to Project home or to the Dashboard: Close the memoQ online project window. Before that, make sure you save your changes.
When you make changes to an online project, the changes will happen on memoQ TMS, not on your computer. It is possible that several users make changes to the project at the same time.
Some changes are not saved automatically. When there are changes you need to save, the green tick mark icon at the top left will become orange:
![]()
To save changes to the online project, click this button.
To get the changes that others made to the online project, click this button:
![]()
Make sure you save your changes before you click this.
Switch windows: You can open several online projects for management. Each online project opens in a separate window. To switch between them and the Dashboard or Project home (if you have a local project open): press and hold down Alt, and press Tab a few times until you get to the window you want. Or: On the Windows taskbar, click the memoQ icon, and then click the window you want to switch to.