Import term base (existing)
You can import data into a new term base or into an existing one.
Wichtig: When you import files into an existing term base, all contents are recreated: the old term base contents (data, languages, structure) are all discarded and created again from the imported file's data. The GUID remains so that the term base can still be accessed by existing projects. Starred entries are not preserved. Cross-references between entries of a term base are deleted on recreation.
Importing into an existing term base is useful when you regularly need to manually fill a Qterm term base with contents of a term base. The formats you can use are XLSX, CSV, TBX or MultiTerm.
Hinweis: When you import Excel or CSV files, their content is added to the earlier content of the term base. TBX and MultiTerm files, however, overwrite the earlier content - just like you were importing into a new term base.
Navigation
- Öffnen Sie memoQweb in einem Webbrowser. Melden Sie sich als Administrator, Projekt-Manager, Terminologe oder externer Benutzer an.
- Klicken Sie auf die Registerkarte Qterm. Die Seite Qterm - Home wird angezeigt.
- In the list, find the term base you want to import.
- Klicken Sie in der Zeile für die Termdatenbank auf der linken Seite in der Spalte Vorgänge auf das Symbol Import
 . Der Assistent Termdatenbank importieren wird angezeigt.
Möglichkeiten
Page 1 - Select file(s) to be imported

Click Datei auswählen and browse to the file to upload. You can choose an XLS, XLSX, CSV, or TXT file, zipped or unzipped.
- To go to Page 2: In the upper right corner, click Weiter.
- To close the wizard and return to the Pos1 screen without importing a term base: In the upper right corner, click Abbrechen.
Page 2 - File properties

- Choose a Layout. To learn about the options, click their help
 icons.
 -
The Vorschau section appears:
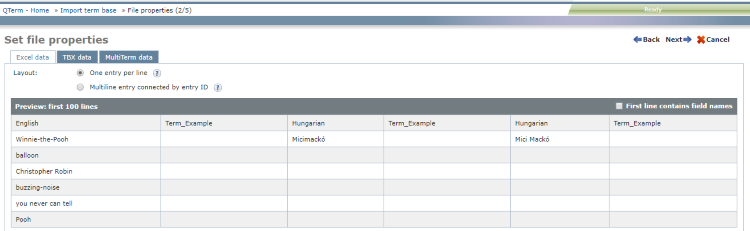
- If the imported file has column headers in the first row, check the Erste Zeile beinhaltet Feldnamen check box.
- To return to Page 1: In the upper right corner, click Back.
- To go to Page 2: In the upper right corner, click Weiter.
- To close the wizard and return to the Pos1 screen without importing a term base: In the upper right corner, click Abbrechen.
Page 3 - Define mappings between file columns and term base metadata
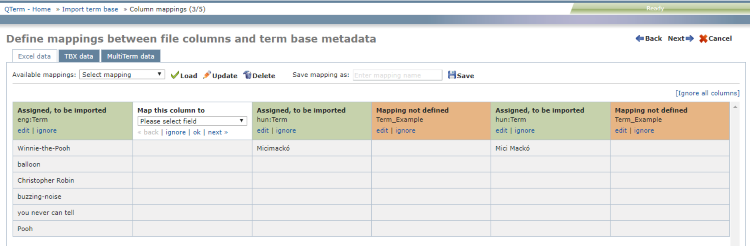
The column headers are color-coded:
- Green means Qterm could automatically map this column to a term base field. If it is correct, you do not need to touch it.
- If the automatic mapping is incorrect: Klicken Sie auf bearbeiten. The column header becomes white (see below).
- To leave the field out of the import: Klicken Sie auf ignorieren. The column header becomes gray.
- Orange means Qterm could not automatically map this column to a term base field. You need tell Qterm how to map it.
- To specify mapping: Klicken Sie auf bearbeiten. The column header becomes white (see below).
- To leave the field out of the import: Klicken Sie auf ignorieren. The column header becomes gray.
- White means you are telling Qterm how to map this column.
- If the automatic mapping is incorrect: Under Bitte wählen Sie ein Feld aus, choose a field, then click OK.
- To leave the field out of the import: Klicken Sie auf ignorieren. The column header becomes gray.
- To jump to the previous unmapped (orange) field: click zurück.
- To jump to the next unmapped (orange) field: click weiter.
- Gray means you told Qterm to ignore this column. It will not be imported into the term base.
Select a mapping from the Verfügbare Zuordnungen dropdown and click Laden, or go through the columns and make sure each is either green or gray.
To change the mapping you selected: Klicken Sie auf Update.
To delete the mapping you selected: Klicken Sie auf Löschen.
To save the current mapping: Enter a name in the Zuordnung speichern als field, and click Save.
- To return to Page 2: In the upper right corner, click Back.
- To go to Page 4: In the upper right corner, click Weiter.
- To close the wizard and return to the Pos1 screen without importing a term base: In the upper right corner, click Abbrechen.
Page 4 - Import options

By default, term base entries are added as new entries to the term base. To update your term base entries instead, check the Aktualisieren basierend auf der Eintrags-ID check box.
To set default values for optional metadata which have no default values in the term base definition and in the imported file, check the Standardwert für fehlende optionale Felder festlegen check box. The optional fields are listed in three sections: Eintrag, Sprache, and Benennung.
- To return to Page 3: In the upper right corner, click Back.
- To go to Page 5: In the upper right corner, click Weiter.
- To close the wizard and return to the Pos1 screen without importing into the term base: In the upper right corner, click Abbrechen.
Page 5 - Import summary
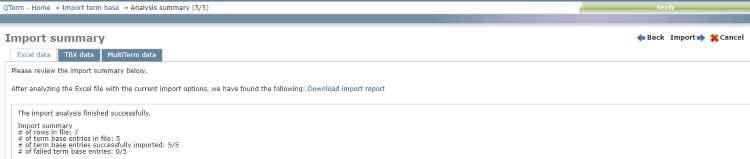
This page shows the result of the import analysis.
- To return to Page 4: In the upper right corner, click Back.
- To close the wizard and return to the Pos1 screen without importing a term base: In the upper right corner, click Abbrechen.
- To import the term base data: In the upper right corner, click Import starten.
Page 1 - Select file(s) to be imported
- Choose Importart: You can import term bases as a single TBX file or as TBX+XCS, zipped or unzipped. An XCS is a skeleton file that contains structural information for the TBX.
- Click Datei auswählen and browse to the file to upload. If you chose ZIP-Datei hochladen above, select a ZIP file that has either a TBX and an XCS file, or a single TBX file inside.
- If the imported term base contains picklists, you can make your Qterm term base more easily readable if you check the Unterstriche mit Leerzeichen in Auswahllisten ersetzen check box.
- If the TBX file was created using SDL MultiTerm, check the MultiTerm TBX-Vorlage? check box.
- To return to Page 1: In the upper right corner, click Back.
- To close the wizard and return to the Pos1 screen without importing a term base: In the upper right corner, click Abbrechen.
- To import the term base data: In the upper right corner, click Import starten.

-
Klicken Sie auf die Registerkarte MultiTerm-Daten.
Importing MultiTerm data into an existing term base deletes earlier entries. The term base will contain only what you import.
- Choose Importart: You can import term bases as a pair of XDT+XML files, zipped or unzipped.
- Click Datei auswählen and browse to the file(s) to upload. If you chose ZIP-Datei hochladen above, select a ZIP file that has an XDT and an XML file inside.
- If the MultiTerm export file has spaces in its field names, check the Leerzeichen in Feldnamen als Unterstrich importieren check box.
-
To pick up additional picklist values from metadata during import: Aktivieren Sie das Kontrollkästchen Automatisch die Auswahllistenwerte erweitern.
Sometimes, value sets of MultiTerm picklists are defined in more than one place - not only in the term base definition. Metadata for entries, languages, or terms can contain possible picklist values. Qterm can find these values during the import, and add them to the value set. If you do not check this check box, Qterm ignores such values.
- To map the fields in your MultiTerm export file to this Qterm term base’s built-in fields: Klicken Sie auf die Schaltfläche Felder zuordnen.
Das Fenster Termdatenbank-Zuordnung wird angezeigt.
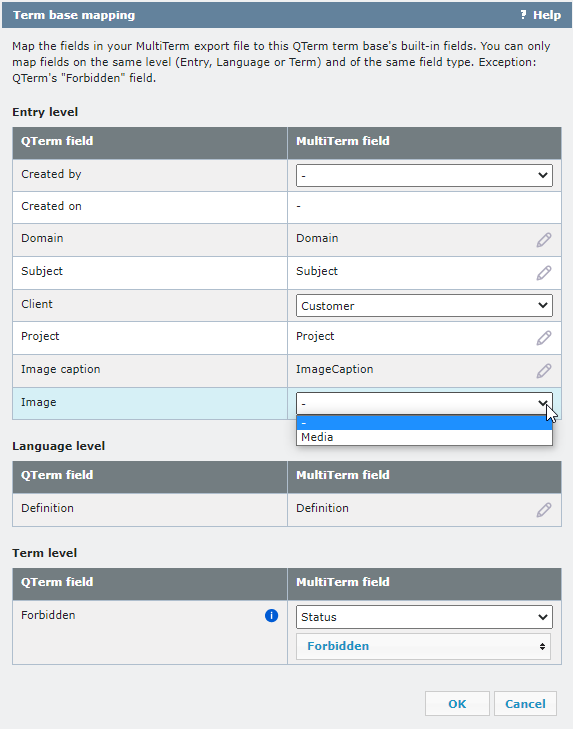
To change MultiTerm fields and values: Click the Bearbeiten
 icon, and choose a new field or value from the dropdowns.
You can only map fields on the same level (Entry, Language, or Term) and of the same field type.
If there are forbidden terms in the MultiTerm term base, always use the settings in the image above: map Qterm's Verboten field to the Status picklist's Forbidden value.
To apply the changes, click OK. To discard the changes, click Abbrechen.
- To return to Page 1: In the upper right corner, click Back..
- To close the wizard and return to the Pos1 screen without importing a term base: In the upper right corner, click Abbrechen.
- To import the term base data: In the upper right corner, click Import starten..
Abschließende Schritte
Qterm generates a term base import report. If there are any errors, you can click the link on that page to download the report.
Klicken Sie auf Schließen. Der Bildschirm Termdatenbanken öffnet sich.