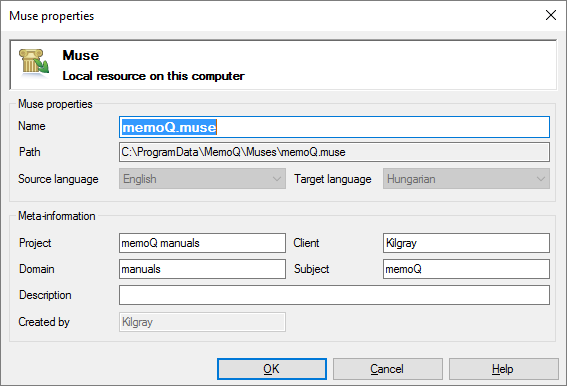
In the Muse properties window, you can change some of the details of an existing Muse.
You can change the name and the descriptive details of the Muse. You cannot change the languages of the Muse.
You cannot train or retrain a Muse here: Use the Train Muse window instead.
To learn more about setting up Muses: See Help about the Create Muse window.
How to get here
- Open a project. In Project home, choose Muses.
From an online project: In memoQ online project, choose Muses.
From the Resource console: Open the Resource console. Choose Muses. In the Server URL box, choose My Computer (for local Muses), or a server name (for online Muses).
- Right-click the name of the Muse you need to change. From the menu, choose Properties.
The Muse properties window opens.

What can you do?
 Change the name and the description of the Muse. Review and change main details
You do not need to change all of the details. Make necessary changes only.
- Under Muse properties, edit the name in the Name box. The name must be unique on your computer - or on the server where you're creating it.
- Edit in the Project, Client, Domain, and Subject boxes. Use these fields as follows:
- Project - This is the name of the larger project. Use the name that your client uses. Within the scope of a Project, think of a memoQ project as a 'job'. Under the umbrella of the same Project, there can be several memoQ projects.
- Client - The name of the client. If you work as a translator or in a translation company, this is usually the name of the end client.
- Domain - The name of the topic or the genre of the source documents. To indicate the subject field, use the Subject box instead.
- Subject - The name of the subject field.
- Optionally, edit a description in the Description field.
Fill in as many details as you can: Later, you can search for these details when you try to find a specific term base. The more details you fill in, the easier it will be to find the term base.
 See the Muse's languages and location
- Check the languages in the Source language and the Target language boxes.
- Check the folder of a local Muse (or the server of an online Muse) in the Path box.
To open a local Muse's folder in Windows: Select the contents of the Path box, and copy it to the clipboard by pressing Ctrl+C. Press the Windows key, and paste the path by pressing Ctrl+V. Press Enter. The folder opens in a Windows folder window.
When you finish
To save changes to the Muse: Click OK.
To return to the Resource Console or to Project home without saving changes: Click Cancel.
