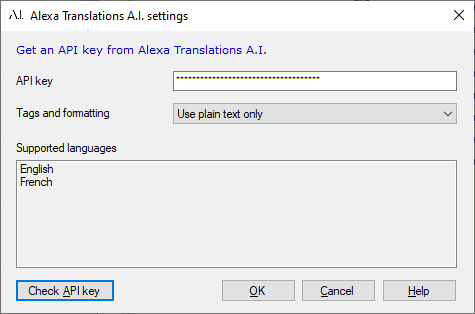
Alexa Translations A.I. settings
Alexa Translations provide a neural MT service specialized in the Canadian legal and finance sectors.
The plugin returns US English and Canadian French translations - even if the project has different sublanguages.
How to get here
-
At the top of the memoQ window, click the Resource console
 icon. The Resource console window opens.
 -
In the Server URL list, choose or type the server's address.
To see local resources only, choose My computer, and click the Select
 button.
 -
In the left-side pane, click the MT settings
 icon. The MT settings pane opens.
If you have projects with more than one target language, in the top-right corner, choose a language from the Target language dropdown.
If you want to use the same MT settings for all target languages, don't change the default value (All languages).
-
Select the MT settings resource and click Edit under the list.
-
On the Services tab, find the plugin and click its row.
-
If it's active, click its row to open the Alexa Translations A.I. settings window.
-
If it's grayed out, click its row once to turn it on, then click it again to open the settings.
-
What can you do?
-
Get access to the plugin
-
Set up the plugin
-
Copy and paste your API key into the API key field.
-
Click the Check API key button. Languages show up in the Supported languages list.
memoQ sends text to Alexa Translations A.I. without tags. When the translation comes back, it won’t include any tags. memoQ then adds all the tags to the end of the translated text.
-
The Username and Project ID fields are optional. Add them if you want to Alexa Translations A.I. settings.
-
Use the Tags and formatting dropdown to choose:
-
Use plain text only - For no formatting and no tags.
-
Use both formatting and tags - To use both formatting and tags.
-
-
-
Start using Adaptive Engines
The latest version of the Alexa Translation A.I. plugin includes Adaptive Translation Engines, allowing human-edited segments to be sent to the engine for continuous learning and improvement.
To start using this feature:
-
When setting up your plugin, paste the Adaptive Engine I.D. from Alexa Translations A.I. into the Project Id field.
The engine uses this ID to recognize the project you're working on.
-
In the Edit machine translation settings window, click the Settings tab.
-
From the Self-learning MT dropdown, select Alexa Translations A.I.
-
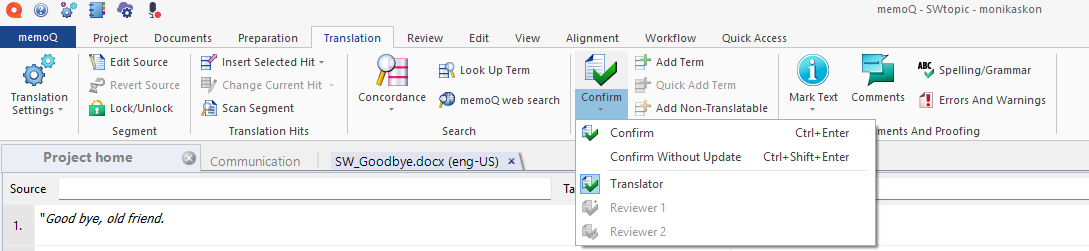
Start using Adaptive Engines in memoQ.
To do that, when you finish working on a segment, either click the Confirm icon and choose one of the options, or use a shortcut:
-
Click Confirm (or press Ctrl+ Enter) to send the segments to Alexa Translations A.I. They help train the Adaptive Engine for this project (Adaptive ID) and will also be added to your translation memories.
-
Click Confirm Without Update (or press Ctrl+ Shift +Enter) to send the segments to Alexa Translations A.I. They help train the Adaptive Engine for this project but won’t be added to your translation memories.
-
When you finish
To save the settings and return to the Default resources tab of the Options window (or to the Resource console): Click OK, then click OK again.
To return to the Default resources tab of the Options window (or to the Resource console), without saving the new settings: Click Cancel, then click Cancel again.
To use the MT output in the translation editor:
- Open a project with a supported language pair.
- On the left side of the Project home or memoQ online project screen, click Settings.
- In the top bar, click the MT settings icon.
- Choose the MT profile in the project, or one you want to add to the project. Below the list, click Edit.
- On the Services tab of the Edit machine translation settings window, check the plugin's checkbox on the left.
- On the Settings tab of the Edit machine translation settings window, in the Translation results area, choose a setting other than Off.
- Open a document for editing, and see the machine-translated suggestions.
To use the MT output in pre-translation:
- Open a project with a supported language pair.
- On the left side of the Project home or memoQ online project screen, click Settings.
- In the top bar, click the MT settings icon.
- Choose the MT settings resource in the project, or one you want to add to the project. Below the list, click Edit.
- On the Services tab of the Edit machine translation settings window, check the plugin's checkbox on the left.
- On the Settings tab of the Edit machine translation settings window, select the plugin from the Pre-translation dropdown.
- Run Pre-translate. In the Pre-translate and statistics window, select the Use machine translation if there is no TM match checkbox. (memoQ will remember this.)