Amazon Translate plugin settings
You have to sign up before using the plugin: On the Amazon Translate website, click the yellow Get started button. Sign in to your account, or create one. Follow the purchase flow to receive your access keys.
How to get here
-
At the top of the memoQ window, click the Resource console
 icon. The Resource console window opens.
 -
In the Server URL list, choose or type the server's address.
To see local resources only, choose My computer, and click the Select
 button.
 -
In the left-side pane, click the MT settings
 icon. The MT settings pane opens.
If you have projects with more than one target language, in the top-right corner, choose a language from the Target language dropdown.
If you want to use the same MT settings for all target languages, don't change the default value (All languages).
-
Select the MT settings resource and click Edit under the list.
-
On the Services tab, find the plugin and click its row.
-
If it's active, click its row to open the Amazon Translate plugin settings window.
-
If it's grayed out, click its row once to turn it on, then click it again to open the settings.
-
What can you do?
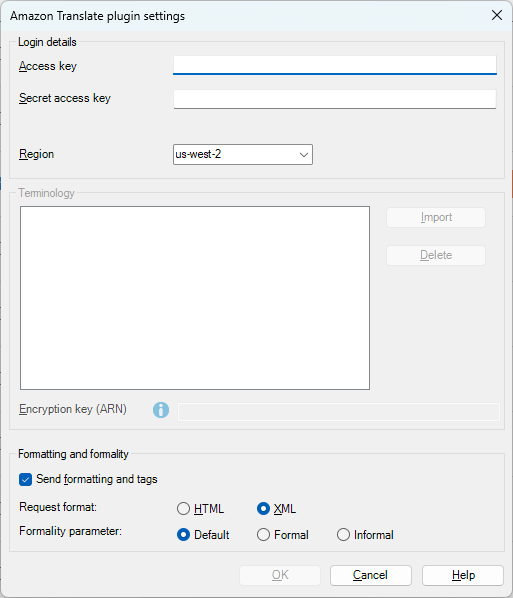
Sign in to the service
Copy and paste your Access key and Secret access key in the two text fields. Choose your region from the Region dropdown.
Manage your terminologies
In AWS, a terminology is a glossary file in CSV format that tells the MT service how to translate a set ofsource words or phrases into one or more target languages. The terminologies you upload belong to the selected region, and are stored in your AWS account (not on your computer). After you fill the Access key and Secret access key fields, and choose a Region, your terminologies appear in the Terminology list. Amazon Translate uses the terminologies that you enable.

Terminologies need to follow these rules:
- Every column must contain phrases for one language.
- The first column must contain the source language, and the following columns the target languages.
- There can be maximum 10 target languages in one terminology.
- The first row must contain the language codes (in the two-character ISO 639-1 format).
- The value separator character must be a comma.
- The file name must contain only letters from the English alphabet, hyphens (-) and underscores (_), and must not begin with an underscore.
- The file name must contain 1 to 256 characters.
To add a terminology: Click the Import button. Browse to the file that contains the terminology, select it, and click the Open button.
To enable or disable a terminology: Select or clear the checkbox of that terminology. memoQ saves the list of enabled terminologies into the MT settings resource you are editing.
To delete a terminology: Select the terminology, and click the Delete button.
Deleting a terminology happens instantly and is final: Think twice before you delete, because the Cancel button will not undo your changes.
To encrypt terminology files with your own, customer-managed encryption key: Enter the encryption key's Amazon Resource Name (ARN) into the text box.
memoQ will use this key to encrypt terminology files that you upload. This allows using stronger encryption than what Amazon provides.
Formatting and tags
Normally, when memoQ sends text to Amazon Translate, the tags are not sent. The translation you get back from Amazon Translate will not contain any tags. memoQ will insert all the tags at the end of the machine-translated text. To send formatting and tags to Amazon Translate: Check the Send formatting and tags box.
If you send tags to Amazon Translate, choose the format: XML or HTML. MT services sometimes have problems with tags. Try both options, and see which one works better for your language pairs.
Different settings work better for some language pairs? On the Resource Console, clone your MT settings, and in the cloned one, choose the other option from the Request format dropdown. You now have two MT settings resources, and can use the best one for each project.
Formality
Some languages have more and less formal ways to address people (for example, vous and tu in French), and these ways are grammatically different.
At the time of writing (Q1 2024), Amazon offers a formality option for these languages: Dutch, French, French (Canada), German, Hindi, Italian, Japanese, Korean, Portuguese (Portugal), Spanish, and Spanish (Mexico).
Click one of the Formality parameter radio buttons (Formal or Informal) as needed. To use the default tone that Amazon offers, leave the setting on Default.
When you finish
To save the settings and return to the Default resources tab of the Options window (or to the Resource console): Click OK, then click OK again.
To use the MT output in the translation editor:
- Open a project with a supported language pair.
- On the left side of the Project home or memoQ online project screen, click Settings.
- In the top bar, click the MT settings icon.
- Choose the MT profile in the project, or one you want to add to the project. Below the list, click Edit.
- On the Services tab of the Edit machine translation settings window, check the plugin's checkbox on the left.
- On the Settings tab of the Edit machine translation settings window, in the Translation results area, choose a setting other than Off.
- Open a document for editing, and see the machine-translated suggestions.
To use the MT output in pre-translation:
- Open a project with a supported language pair.
- On the left side of the Project home or memoQ online project screen, click Settings.
- In the top bar, click the MT settings icon.
- Choose the MT settings resource in the project, or one you want to add to the project. Below the list, click Edit.
- On the Services tab of the Edit machine translation settings window, check the plugin's checkbox on the left.
- On the Settings tab of the Edit machine translation settings window, select the plugin from the Pre-translation dropdown.
- Run Pre-translate. In the Pre-translate and statistics window, select the Use machine translation if there is no TM match checkbox. (memoQ will remember this.)