ModernMT settings
ModernMT is a self-learning machine translation service that improves from your corrections as you keep using it. Set up the ModernMT plugin to work with memoQ.
How to get here
-
At the top of the memoQ window, click the Resource console
 icon. The Resource console window opens.
 -
In the Server URL list, choose or type the server's address.
To see local resources only, choose My computer, and click the Select
 button.
 -
In the left-side pane, click the MT settings
 icon. The MT settings pane opens.
If you have projects with more than one target language, in the top-right corner, choose a language from the Target language dropdown.
If you want to use the same MT settings for all target languages, don't change the default value (All languages).
-
Select the MT settings resource and click Edit under the list.
-
On the Services tab, find the plugin and click its row.
-
If it's active, click its row to open the ModernMT settings window.
-
If it's grayed out, click its row once to turn it on, then click it again to open the settings.
-
What can you do?
Log in to the service
-
Get access: Under the Login button, click the Get a license here link.
-
Enter the license key into the text box, and click the Login button.

-
The list of available memories appears:
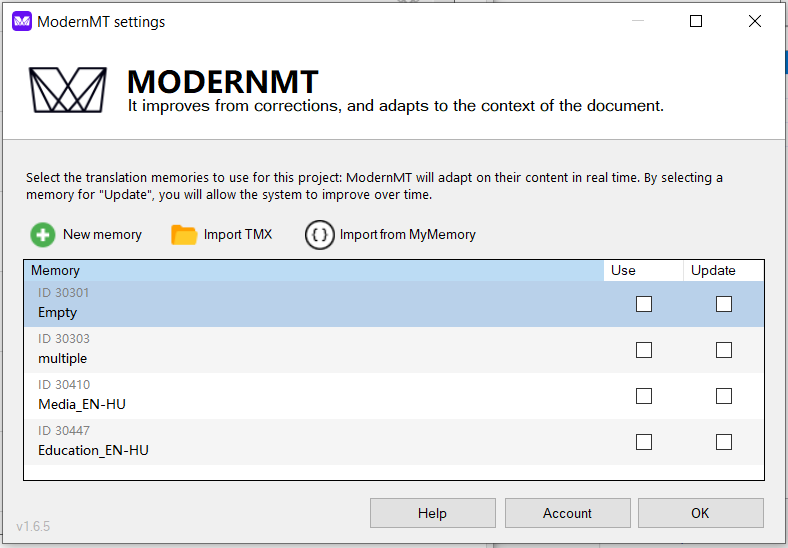
Manage memories
To use one or more memories in your projects: In the Memory list, check their Use checkboxes.
To improve a memory based on your corrections: Check its Update checkbox.
memoQ updates one memory at a time: You cannot select two or more memories for updating.
To create a new memory: Above the Memory list, click the New memory button. A new row appears at the bottom of the list. Enter a name for the new memory. To create it: Press Enter. To cancel: Press Esc.
To make sure your MyMemory TMs learn the most from your corrections, create separate memories for domains like medicine, legal, or engineering.
To import a TMX file into a new memory:
- Above the Memory list, click the Import TMX button, then in the menu, click Create memory.
- In the Import TMX window, select a TMX file, and click the Open button.
- The memory appears in the bottom of the Memory list.
To import a TMX file into an existing memory:
- In the list, right-click on the memory, then in the menu, click Import TMX.
- In the Import TMX window, select a TMX file, and click the Open button.
MyMemory TMs are multilingual: You can import TMX files with different language pairs into the same MyMemory TM.
To import a translation memory from the MyMemory service: Above the Memory list, click the Import from MyMemory button. In the Import from MyMemory window, enter the memory key into the text box, then click the OK button. (To return to the ModernMT settings window, click the Cancelbutton.) After downloading, the memory appears in the list.
To edit a memory's name: Click its row. Or, right-click the memory, and in the menu, click Edit. Change the memory's name, and press Enter. To cancel: Press Esc.
To delete a memory: Right-click it, and in the menu, click Delete. To confirm, click the OK button. To keep the memory: Click the Cancelbutton.
See account details. Log out of the service.
To see your ModernMT account details: At the bottom of the ModernMT settings window, click the Account button.
In the Account window, you can see the following information:
- your account name,
- your registered email address,
- the amount you need to pay in the current month,
- the last part of your license code.
To return to the ModernMT settings window: Click OK.
To log out: In the Account window, click the Logout from ModernMT link. In the Logout window, click the OK button. The login screen appears.
When you log out, and then log back in, all the Use and Update checkboxes in the memory list will be blank.
When you finish
To save the settings and return to the Default resources tab of the Options window (or to the Resource console): Click OK, then click OK again.
To return to the Default resources tab of the Options window (or to the Resource console), without saving the new settings: Click Cancel, then click Cancel again.
To use the MT output in the translation editor:
- Open a project with a supported language pair.
- On the left side of the Project home or memoQ online project screen, click Settings.
- In the top bar, click the MT settings icon.
- Choose the MT profile in the project, or one you want to add to the project. Below the list, click Edit.
- On the Services tab of the Edit machine translation settings window, check the plugin's checkbox on the left.
- On the Settings tab of the Edit machine translation settings window, in the Translation results area, choose a setting other than Off.
-
To improve the MT service by sending your translations to them: In the Self-learning MT dropdown, select the plugin.
Check your contracts first: Only do this if your data protection, confidentiality, or non-disclosure agreements allow it.
- Open a document for editing, and see the machine-translated suggestions.
To use the MT output in pre-translation:
- Open a project with a supported language pair.
- On the left side of the Project home or memoQ online project screen, click Settings.
- In the top bar, click the MT settings icon.
- Choose the MT settings resource in the project, or one you want to add to the project. Below the list, click Edit.
- On the Services tab of the Edit machine translation settings window, check the plugin's checkbox on the left.
- On the Settings tab of the Edit machine translation settings window, select the plugin from the Pre-translation dropdown.
- Run Pre-translate. In the Pre-translate and statistics window, select the Use machine translation if there is no TM match checkbox. (memoQ will remember this.)