What you need to start
Before you begin translating, make sure memoQ is properly installed and configured.
-
Install memoQ
-
Download the installer from our official site.
The newest memoQ version is listed at the top, and older versions appear below.
-
Find the version you want to download.
-
Click the arrow next to its name to expand the row.
-
Click the Download button below the text.
For more detailed instructions, see the memoQ installation and activation guide.
-
-
Follow the memoQ activation wizard.
-
-
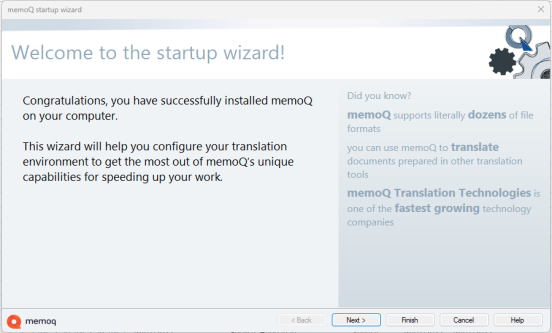
Check memoQ startup wizard
When memoQ runs for the first time, it displays the startup wizard that guides you through basic setup.
If you don't want to set your basic preferences right away, you can skip it, and revisit anytime later.
To do that:
-
In the upper left corner of the ribbon, click the memoQ tab.
-
On the Help page, click Startup Wizard.
The memoQ startup wizard opens. To start the process click Next.
-
-
Customize your interface
-
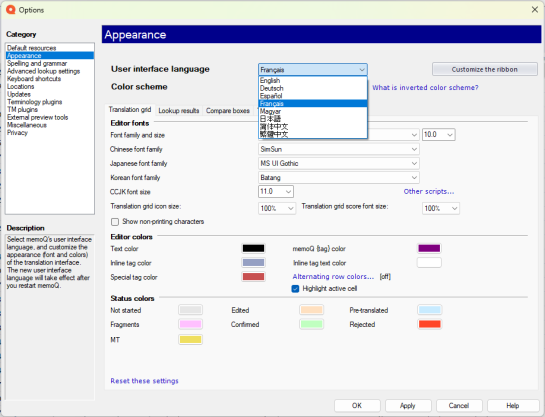
Set interface language
memoQ's default language is English. If you want to customize this feature:
-
Choose your color scheme
You can go with: default - light mode, or decide to switch to inverted color scheme.
The Inverted color scheme is a built-in feature of the memoQ desktop app designed to make the interface easier on your eyes, especially in low-light settings or during long work hours. It inverts and softens the colors of the interface for a more comfortable experience.
-
memoQ has several default ribbons: Project, Documents, Preparation, Translation, Review, Edit, View. There are many more that appear only when you're managing or editing resources, or you're editing alignment pairs.
See what else you can customize in the Appearance window.
-
Customize your keyboard shortcuts
In memoQ, you can set up your own keyboard shortcuts to work the way you like.
Shortcuts are grouped in categories, and you manage them in shortcut sets. You can create, edit, or switch between sets in the Keyboard shortcuts window.
See all the memoQ's default keyboard shortcuts.
-
-
Set up the spell check
Before you deliver your translation, you’ll probably want to check the spelling. In memoQ, you can choose between two spell checkers:
-
Microsoft Word spell checker (recommended for best quality)
Use this option if you:
-
Have Microsoft Word installed.
-
Need the best linguistic quality.
-
-
Hunspell spell checker
Use this option if you:
-
Don’t have Microsoft Word, or it doesn’t support your target language.
-
Need a free and open-source solution, also used in OpenOffice.
You need to set this up before you start translating.
-
How to choose your spell checker:
-
At the top of the memoQ window, click Options
 .
. -
Under Category, click Spelling and grammar.
At this point memoQ checks if Microsoft Word is installed.
The Spelling and grammar page appears.
-
Under the Language-dependent settings, pick your main target language.
Depending on the language you chose, memoQ picks Hunsell or Microsoft Word.
-
Click OK to save.
See what else you can customize in the Spelling and grammar window.
-
-
Check our privacy settings
When you start memoQ for the first time, the Help us make memoQ better window appears (up to three times).
Here, you can decide whether you want to share anonymous usage data with memoQ's designers and developers, and review related policies.
-
How to change your choice later (after startup)
-
Click the Options icon in the Quick Access toolbar.
-
Choose Privacy from the category list.
-
-
What you can do in the Privacy pane:
-
View memoQ’s privacy policy.
-
Learn about the Customer Insights Program.
-
Turn anonymous usage data sharing on or off.
-
See what else you can customize in the Privacy window.
-