First translation with memoQ
Ready to translate your first document in memoQ?
Here's how to get started:
-
 Ready, set, upload!(dashboard preparation)
When you start memoQ, you land on the Dashboard, your main control center.
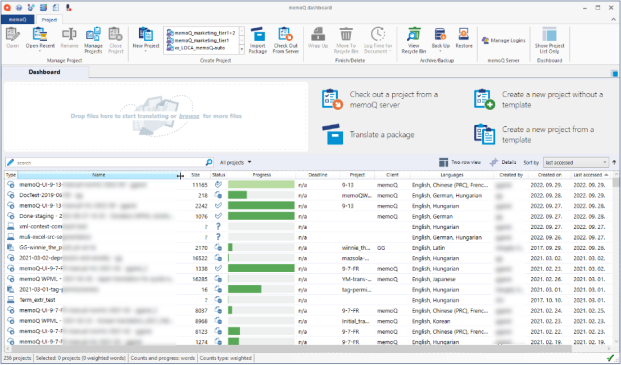
Depending on your role in the project your dashboard can look a bit different and offer different functionalities:
-
Project managers: Project overview, resource management, settings.
-
Translators: File list, TMs, TBs, and translation actions.
How to add your files:
-
Drag & drop files into the Dashboard, or click Start translating.
-
memoQ reads your files, detects the language, and prepares the project automatically.
Next step – project creation:
-
A Create Project from Template dialog opens.
-
Fill in:
-
Click Finish. memoQ prepares your project (you’ll see a Progress window). This may take a moment.
Under the hood:
memoQ separates text from formatting and stores both safely. Later, when you export your translation, your translated text is combined with the original layout—so your translated file looks just like the original.
-
-
Open your file and start translating
Welcome to Project home, specifically the Translations window where your files are listed. To open a document, double-click its name.
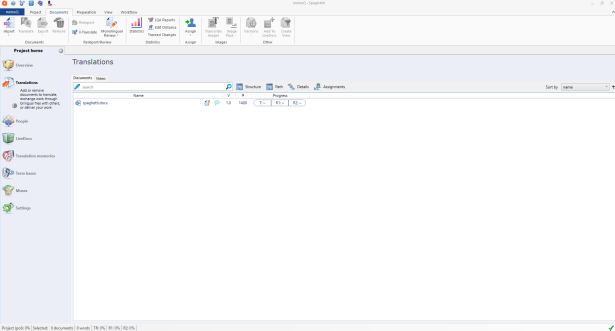
What you see next:
Your file opens in a tabbed window with two columns:
This setup is called the translation grid. Each segment (sentence or logical unit) appears in its own row.
Translate your first segment
Step-by-step:
-
Type your translation next to the corresponding source text.
-
Press Ctrl + Enter to confirm the segment and save it to your translation memory (TM) and move to the next segment automatically.
You’ve just confirmed your translation, watch for the green check mark and know you're good to go!
Editing confirmed segments:
-
-
Join and split segments
In memoQ, your text is split into small chunks called segments - this process is called segmentation.
memoQ doesn’t actually understand the sentences, it just makes a smart guess about where one sentence ends and the next begins. The basic rule it follows is simple: a sentence usually ends with a period, a space, and starts with a capital letter There are exceptions, of course, but this rule helps memoQ keep things clear and easy to manage.
Sometimes, the default segmentation doesn’t fit your needs.

In such case, memoQ allows you to join or split segments.
-
Join segments when two or more consecutive segments should be treated as one.
-
Select the segments you want to join.
-
Right-click them and from the menu choose Join segments, or use the ribbon button.
-
memoQ merges the text into a single segment.
You can also use a shortcut: Ctrl + J
After joining, confirm the segment (Ctrl + Enter) to save it in your TM.
-
-
Split segments when a single segment contains multiple logical units that should be separated.
-
Place the cursor at the split point within a segment.
-
Right-click them and from the menu choose Split Segment, or use the ribbon button.
-
memoQ creates two segments at the selected point.
You can also use a shortcut: Ctrl + Shift + Enter
Proper segmentation helps TM suggestions work better and keeps translations consistent.
-
-
-
Auto-saving and preview
memoQ autosaves every few seconds, so you don't have to remember about it. If you close a single file, the project, or memoQ entirely without saving manually, your work is safe.
At the bottom, the View pane previews your translation. Confirmed segments show up there live.
-
Returning to a project
Finished for the day? No worries - picking up where you left off in memoQ is easy.
When you’re done working, close memoQ, all your translations are saved automatically in the project, no extra steps needed.
When you open memoQ the next morning, your project is waiting for you on the Dashboard. To continue, double-click the project name.
Pick up exactly where you left off
memoQ remembers:
| Action | Shortcut |
| Confirm segment | Ctrl + Enter |
| Next segment | Down arrow |
| Previous segment | Up arrow |
| Join selected segments | Ctrl + J |
| Split segment at cursor | Ctrl + Shift + Enter |
Check other memoQ keyboard shortcuts.
Pro tips to remember
-
Uploading multiple files? You can always drop more before hitting Start translating.
-
Need project structure? Use meaningful names with client, subject, and date.
-
Formatting matters: Preserve layout by confirming bolds, italics, and tags manually.
-
No save button needed:memoQ automatically stores your work.
-
Preview to avoid surprises: Always glance down at the View pane to confirm formatting, layout, or untranslated lines.
Next read
Working smart not hard with translation memories and term bases