customer portal admin
Wenn Sie das Kundenportal nutzen, um Übersetzungsarbeiten direkt von Ihren Kunden zu erhalten, müssen Sie memoQweb (legacy) über diese Kunden informieren.
Each customer appoints contact people. These people will log in to the customer portal, and send in translation requests, or check on their status.
For each customer, there can be three types of contact people:
- Anfordernde Person: This is more or less a project manager on the customer's end. A requester can upload files for translation, get a quote, accept the quote (that is, start the project), check progress, and download exported documents. A requester can view statistics for projects they started.
- Beobachter: An observer can view requests that requesters sent in, check progress of projects, view statistics, and download translations. In the customers' organization, this is a higher-level person who needs information about the work of a team, but is not involved in the operative work.
- Manager: A manager can do everything a Anfordernde Person and an Beobachter can do. In addition, they can edit or delete the customer's other contacts, change their roles, and reassign work from one contact to another.
As the administrator of the customer portal, you can also add, edit, or delete contacts, for each organization, on the customer portal admin page.
If it is allowed on the memoQ TMS, contacts can also register at the customer portal. Normally, these registrations must be approved on the customer portal admin page.
Navigation
- Open memoQweb (legacy) in a Web browser. Log in as an administrator.
- Click the Administration tab, then click the customer portal admin tab.
- Die Seite customer portal admin wird angezeigt.

Möglichkeiten
First, the Kontakte section on the customer portal admin page shows only unapproved customer contacts.
- Approve a contact registration: In the contact's row, in the Vorg column, click the Bestätigungsrechte
 icon.
icon. - See all contacts: Aktivieren Sie das Kontrollkästchen Alle Kontakte anzeigen. A different list appears:

- Add a new contact: Klicken Sie oben rechts auf Neuer Kontakt. Die Seite New customer portal contact wird geöffnet.
You must add any new contacts to existing customer: Before you add a new contact, make sure that their organization is already in the system as a customer. To add a new customer, open the customer portal customers page.
- Find a contact: Type a part of the contact's name or email in the Suchen box above the list. Drücken Sie Eingabetaste.
- Modify details of a contact: In the contact's row, in the Vorg column, click the Bearbeiten
 icon. Die Seite Edit customer portal contact wird geöffnet. On that page, you can change the privileges of the contact (Anfordernde Person, Beobachter, Manager), or adjust the workflows they can request. You can edit the details of unapproved contact registrations, too.
 - Delete a contact: In the contact's row, in the Vorg column, click the Löschen
 icon.
icon.Achtung: When you delete a contact, they will not be able to send in work anymore. In addition, the requests this contact sent in must be reassigned to another contact from the same customer. You will be able to choose a different contact here.
Do not delete the last contact: If a customer has ongoing projects, there must be at least one active contact for them. If you delete the last one, the projects will become orphaned, and the customer may become unable to retrieve the translations.
Whenever a contact signs in to customer portal, they use up a license for the day. You can you can create login reports in the customer portal admin page's Lizenzverwendung section.
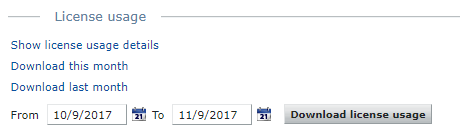
To download usage reports in CSV format for the current or the previous month: click Für diesen Monat herunterladen or Für letzten Monat herunterladen.
To specify a custom period: Enter the Von and An dates, or click the calendar ![]() icons and choose the dates. Klicken Sie auf Lizenzverwendung herunterladen.
icons and choose the dates. Klicken Sie auf Lizenzverwendung herunterladen.
To see monthly reports online: click Details zur Lizenzverwendung anzeigen. Die Seite Lizenzverwendungsverlauf wird geöffnet.
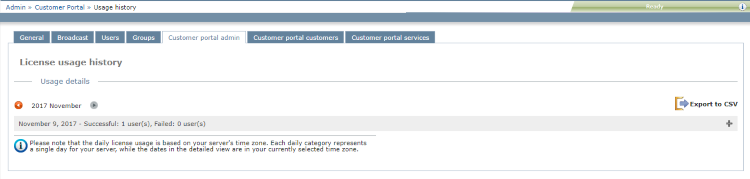
To show details about one day: in the day's row: Click the plus ![]() icon on the right.
icon on the right.
To hide details about one day: in the day's row: Click the minus ![]() icon on the right.
icon on the right.
To download data for the displayed month: Click Als CSV exportieren on the right.
To return to the customer portal admin page: Click the Back button of your browser.
In the Branding section of the customer portal admin page, you can set the colors and logos displayed on customer portal. You can also set a signature for the emails that customer portal sends to customers.
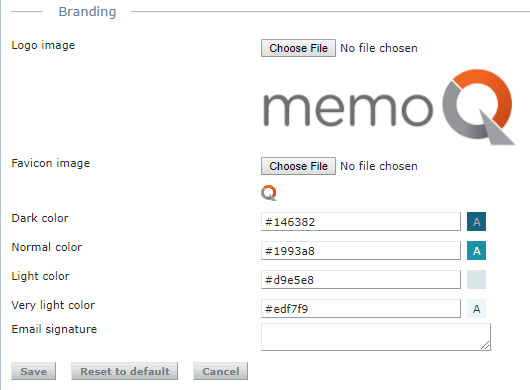
- Logo-Bild is the logo that will be displayed on the customer portal sign-in page.
- Favicon-Bild is the icon that will appear in the address bar of your browser window when you are viewing a customer portal page.
- Die Farben können mittels hexadezimalen RGB-Farbwerten eingestellt werden. Um eine Farbe zu wählen oder den zugehörigen Code zu erfahren, besuchen Sie diese Seite.
- Schreiben Sie die Signatur in das Textfeld. Verwenden Sie nur Unicode-Zeichen. Die Signatur muss kürzer als 1024 Zeichen sein.
To save your changes in branding: Klicken Sie auf Save.
To discard your changes, and switch back to the default: Klicken Sie auf Auf Standard zurücksetzen.
To discard your changes, and keep the existing values: Klicken Sie auf Abbrechen.
Abschließende Schritte
Send instructions to the customer that they can log in to the customer portal, and they can start sending in requests. Or, make changes to customers or services.