Project - Translations
This is where you can import and manage documents: for example, assign users to them, or set deadlines.
Navigation
- Melden Sie sich bei memoQweb als Administrator oder Projektmanager an.
- Klicken Sie in der Liste Aktive Projekte auf ein Projekt.
-
At the top of the screen, click the Übersetzungen tab.
Möglichkeiten
Erklärung der Details zur Dokumentenliste
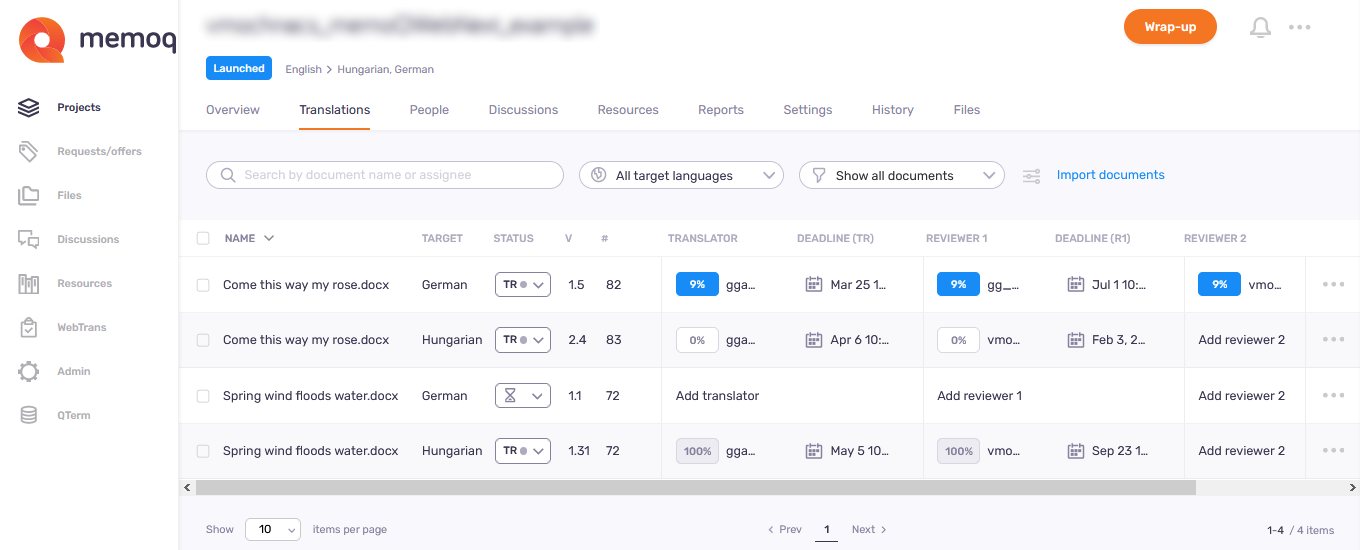
The document list shows these details about each document:
- Name: The document's name. You can choose to show the full document paths.
To show the document path: open the Ansicht anpassen pane.
- Zieltext: The document's target language.
- Status: The document's current workflow status.
 : No user is assigned.
  : Translation not started.
 : Translation in progress.
 : Review not started.
  : Review in progress.
  : Review 2 not started.
  : Review 2 in progress.
  : Document is completed.
- Version: The current version of each document.
- #: The number of segments, words, or characters in each document (you choose). Normally, memoQweb counts words.
Choose segments, words, or characters on the Ansicht anpassen pane.
- Übersetzer: A percentage progress indicator and the translator's memoQ TMS username for each document. memoQ computes the progress from the number of segments, words, or characters.
- Liefertermin (ÜS): Translation deadline for the document. You can see the exact date and time. If the deadline is overdue, the date turns red.
- Überprüfer 1: A percentage progress indicator and the 1st reviewer's memoQ TMS username (optional).
- Liefertermin (ÜP1): Deadline for the document's 1st review (optional).
- Überprüfer 2: A percentage progress indicator and the 2nd reviewer memoQ TMS username (optional).
- Liefertermin (ÜP2): Deadline for the document's 2nd review (optional).
Advanced assignment modes show their info in the Übersetzer, Überprüfer 1, and Überprüfer 2 columns:
- If nobody accepted a FirstAccept task, the assignee column shows FirstAccept ausstehend, and the tooltip shows the Antwort bis deadline. If the deadline passes, and nobody accepted the task, it shows FirstAccept abgelaufen.
- For GroupSourcing tasks, the assignee column shows the number of assigned users, and the tooltip shows their names.
Nach einem Dokument suchen. Die Liste filtern oder sortieren.
So durchsuchen Sie die Liste: Geben Sie etwas in die Suchleiste oberhalb der Liste ein. Drücken Sie Eingabetaste.
So filtern Sie die Liste: Klicken Sie auf das Filter![]() -Symbol in der Dropdown-Liste mit dem Text Alle anzeigen. Wählen Sie einen Status aus der Liste aus:
-Symbol in der Dropdown-Liste mit dem Text Alle anzeigen. Wählen Sie einen Status aus der Liste aus:
![]()
Die Liste zeigt jetzt nur noch die Dokumente mit diesem Status an.
Ändern des Erscheinungsbildes dieser Seite
Klicken Sie im oberen Bereich des Bildschirms neben der Filter-Dropdown-Liste auf Ansicht anpassen![]() . Der Bereich Ansicht anpassen wird geöffnet.
. Der Bereich Ansicht anpassen wird geöffnet.
Damit der Dokumentenpfad vor den Dateinamen angezeigt wird, aktivieren Sie das Kontrollkästchen Dokumentpfade anzeigen.
So lassen Sie sich Projekte in einer einfachen Liste anzeigen: Deaktivieren Sie das Kontrollkästchen Nach Projekten gruppieren.
So wählen Sie die Einheit für die
So blenden Sie Spalten in der Dokumentenliste ein bzw. aus: Aktivieren oder deaktivieren Sie die Kontrollkästchen Zahl, Name, Zielsprache,
Dokumente importieren
To import one or more documents: Klicken Sie oberhalb der Liste auf den Link Dokumente importieren. Die Seite Als neu importieren wird geöffnet.
Open a document
To open a document in the webtrans translation editor: Click its name. A new browser tab opens. Schließen Sie nach Abschluss Ihrer Aufgabe diese Browser-Registerkarte.
Change document status
- To change the status of one document: In the list, click its status icon. Choose the new status.
- To change the status of two or more documents: On the left of the list, check their check boxes. (To select all documents in the project, check the check box above the list.) In the list, click the status icon in a selected row. Choose the new status for all selected documents.
To save your changes: Klicken Sie auf die Schaltfläche Status ändern. To discard your changes: Klicken Sie auf den Link Abbrechen.
See the list of status icons in the Learn details about the document list section.
Assign documents
For more possibilities, use advanced assignment: For one document: In the document's row, click the Weitere Optionen ![]() icon. In the menu, click Erweitert zuweisen
icon. In the menu, click Erweitert zuweisen ![]() . For two or more documents: Markieren Sie die Dokumente. Klicken Sie oberhalb der Liste auf den Link Erweitert zuweisen. Die Seite Erweiterte Zuweisung wird geöffnet.
. For two or more documents: Markieren Sie die Dokumente. Klicken Sie oberhalb der Liste auf den Link Erweitert zuweisen. Die Seite Erweiterte Zuweisung wird geöffnet.
- To assign a user to one document: In the document's row, click the Übersetzer hinzufügen, Überprüfer 1 hinzufügen , or Überprüfer 2 hinzufügen area. (To change the assignment, click the translator's or reviewer's username.)
- To assign a user to two or more documents: On the left of the list, check their check boxes. (To select all documents in the project, check the check box above the list.) In the list, click the Übersetzer hinzufügen, Überprüfer 1 hinzufügen , or Überprüfer 2 hinzufügen area in a selected row. (To change the assignments, click a translator's or reviewer's username.)
On the Übersetzer zuweisen (or Überprüfer 1 zuweisen, or Überprüfer 2 zuweisen) pane, choose a user from the dropdown. The list shows suggested users first, then users in the project, then other server users. To clear an assignment: Wählen Sie Nicht zugewiesen aus der Dropdown-Liste.
To save your changes: Klicken Sie auf die Schaltfläche Zuweisen. To discard your changes: Klicken Sie auf den Link Abbrechen.
If you assign an in-country reviewer: Das Fenster In-Country Review konfigurieren wird angezeigt. Choose settings as needed, and click the Anwenden button. An in-country reviewer can only have one role on a document, and it must be R1 or R2. Also, you can assign only one in-country reviewer to a document.
To copy the URL for an in-country review task: At the end of the document's row, click Weitere Optionen ![]() . Then, in the In-Country Review section, click URL in Zwischenablage kopieren
. Then, in the In-Country Review section, click URL in Zwischenablage kopieren ![]() . You can now send the URL to an in-country reviewer who does not have the related email from your memoQ TMS.
. You can now send the URL to an in-country reviewer who does not have the related email from your memoQ TMS.
To open an in-country review task in read-only mode in the ICR tool: At the end of the document's row, click Weitere Optionen ![]() . Then, in the In-Country Review section, click Im Nur-Lesen-Modus öffnen
. Then, in the In-Country Review section, click Im Nur-Lesen-Modus öffnen ![]() . The In-Country Review tool opens, showing the assigned document
. The In-Country Review tool opens, showing the assigned document
To clear all the assignments on one or more documents: Check their check boxes, and above the list, click the Zuweisungen löschen link.
The same user can be translator and reviewer on a document: For example, a translator can be reviewer 2, too. Then they can override the changes and comments of reviewer 1. (As stated above, in-country reviewers are exceptions.)
If the project is already launched: You need to confirm your changes at the bottom of the page. Click the Änderungen speichern button or the Abbrechen link as needed.
Pre-translate documents
- To pre-translate one document: In the document's row, click the Weitere Optionen
 icon. In the menu, click the Vorübersetzen
  button. Or, check its check box, and above the list, click the Vorübersetzen link. To pre-translate two or more documents: Check their check boxes, and above the list, click the Vorübersetzen link. Die Seite Vorübersetzen wird geöffnet.
Set deadlines
Normally, memoQ sets a 24-hour deadline for every translation or review assignment. To set a new deadline: In the document's row, click the date.
Select the date from the calendar. To change months, click the arrows on the top of the pane. To choose a time: Klicken Sie auf die Dropdown-Liste Zeitpunkt angeben.
You can set deadlines for: one document, all documents with that target language, or for all documents in the project.
To save your changes: Klicken Sie auf die Schaltfläche Frist festlegen. To discard your changes: Click the Abbrechen link.
Reimport one or more documents
- At the end of the document's row, click the Weitere Optionen icon.
- On the pane, click Neu-Import
 .
. - Ziehen Sie auf der Seite Neu-Import die benötigten Dokumente auf die mit dem Symbol
 markierte Fläche.
 - Im Fenster Als neu importieren wird in der Spalte Aktion und Sprache die Angabe Neu-Import angezeigt.
- Klicken Sie oberhalb der Liste auf die Schaltfläche Alle importieren.
Dokumente exportieren
To export one document:
- At the end of the document's row, click the Weitere Optionen icon. You can find the export options under the Dokument exportieren als section. Or, check its check box, and above the list, click the Exportieren link.
- Under the Dokument exportieren als section, choose a format: a translated document (in its original format), a bilingual memoQ XLIFF document, or a table RTF document.
- Klicken Sie auf die Schaltfläche Dokument exportieren.
- If you chose the original format, memoQweb saves the document in a ZIP file. Else, the Dokument exportieren page opens.
To export two or more documents:
- Check their check boxes, and above the list, click the Exportieren link.
- In the Dokumente exportieren als pane, choose a format: translated documents (in their original format), bilingual memoQ XLIFF documents, or table RTF documents.
- Klicken Sie auf die Schaltfläche Dokumente exportieren.
- If you chose the original format, memoQweb saves the documents in a ZIP file. Else, the Dokumente exportieren page opens.
Delete documents
- To remove one document: At the end of the document's row, click the Weitere Optionen icon. On the pane, click the Löschen
 icon. Or, check its check box, and above the list, click the Remove link. To confirm deleting: Klicken Sie auf die Schaltfläche Dokument entfernen. To keep the file: Klicken Sie auf den Link Abbrechen.
 - To remove two or more documents: Check their check boxes, and above the list, click the Remove link. To confirm deleting: Klicken Sie auf die Schaltfläche Dokument entfernen. To keep the files: Klicken Sie auf den Link Abbrechen.
So gelangen Sie zu diesen Aktionen: In the top right corner, click the Weitere Optionen ![]() menu.
menu.
- So laden Sie abgeschlossene Dokumente aus dem Projekt herunter: Klicken Sie auf Projekt exportieren. Your browser saves the files in a ZIP package into its regular "Downloads" folder.
-
So verknüpfen Sie das Projekt mit einer customer portal-Anfrage: Klicken Sie auf Mit Kundenanfrage verknüpfen. Wählen Sie im Fenster Mit Kundenanfrage verknüpfen in der Dropdown-Liste die Anfrage aus.
So fahren Sie fort: Klicken Sie auf die Schaltfläche Projekt verknüpfen. Um Ihre Änderungen zu verwerfen: Klicken Sie auf den Link Abbrechen.
Works only if there are requests not linked to projects on the memoQ TMS. Andernfalls ist die Dropdown-Liste leer. Hier erfahren Sie mehr über Anfragen.
-
To archive a project and move it into the Archivierte Projekte page: Klicken Sie auf Archive. Um ein archiviertes Projekt zu öffnen, müssen Sie es aus dem Archiv wiederherstellen.
Legen Sie im Fenster Projekt archivieren die Vorlage für den Dateinamen fest. So fügen Sie einen Platzhalter ein: Klicken Sie auf den Link Einfügen und wählen Sie einen Platzhalter aus der Liste aus.
So fahren Sie fort: Klicken Sie auf die Schaltfläche Projekt archivieren. Um Ihre Änderungen zu verwerfen: Klicken Sie auf den Link Abbrechen.
-
To remove the project and move it to the Projekte im Papierkorb page: Klicken Sie auf In den Papierkorb verschieben. Dort können Sie das Projekt wiederherstellen oder dauerhaft löschen.
Es gibt kein Bestätigungsfenster: Wenn Sie auf In den Papierkorb verschieben klicken, wird das Projekt entfernt und Sie kehren zur Liste Aktive Projekte zurück.
-
So öffnen Sie das Projekt in der memoQ Desktop-App: Klicken Sie auf In memoQ fortfahren.
To create a local copy of the project for working with its content: Klicken Sie auf die Schaltfläche Projekt auschecken. In memoQ öffnet sich die Registerkarte Projektzentrale – Übersetzungen.
So öffnen Sie das Online-Projekt zur Verwaltung: Klicken Sie auf die Schaltfläche Projekt verwalten. Die Registerkarte memoQ-Online-Projekt - Übersetzungen wird geöffnet.
Wenn Sie ein Online-Projekt starten, starten Sie seine Benachrichtigungskette: Über memoQ TMS wird an alle Teilnehmer eine erste E-Mail gesendet. Die E-Mail enthält Angaben zum Zugriff auf das Online-Projekt. Wenn sich der Workflow-Status eines Dokuments später ändert, werden über den memoQ TMS weitere E-Mails an die Teilnehmer und den Projekt-Manager gesendet.
So starten Sie ein Projekt: Klicken Sie in der oberen rechten Ecke auf die Schaltfläche Starten. Das Wort Gestartet erscheint auf blauem Hintergrund unter dem Projektnamen. Sie können den Start eines Projekts nicht rückgängig machen.
Ein Projekt wird abgeschlossen, wenn keine weitere Arbeit daran erwartet wird. Wenn Sie Projektvorlagen verwenden, können Sie automatische Aktionen einrichten, die beim Abschließen des Projekts ausgeführt werden.
Set up templates in the memoQ desktop app. Sie können dann Projekte mit diesen Vorlagen in memoQweb erstellen. Weitere Informationen finden Sie im Thema zum Bearbeiten von Projektvorlagen.
So schließen Sie ein gestartetes Projekt ab: Klicken Sie in der oberen rechten Ecke auf die Schaltfläche Projekt abschließen. So fahren Sie fort: Klicken Sie auf die Schaltfläche Projekt abschließen. So schließen Sie das Bestätigungsfenster, ohne das Projekt abzuschließen: Klicken Sie auf den Link Abbrechen. Sie können den Abschluss eines Projekts nicht rückgängig machen.
To see project-related notifications and communication: In the top right corner, click the bell icon (![]() ). Im Bereich Benachrichtigungen können Sie Benachrichtigungen über verpasste Liefertermine, fehlgeschlagene automatische Aktionen, eine verlorene Anbindung an eine Textquelle usw. sehen.
). Im Bereich Benachrichtigungen können Sie Benachrichtigungen über verpasste Liefertermine, fehlgeschlagene automatische Aktionen, eine verlorene Anbindung an eine Textquelle usw. sehen.
So entfernen Sie eine Benachrichtigung aus der Liste: Klicken Sie darunter auf den Link Verwerfen. So entfernen Sie alle Benachrichtigungen: Klicken Sie oberhalb der Liste auf den Link Alle verwerfen.
Um den Bereich zu schließen, klicken Sie auf das Symbol X.