Project - Translations
This is where you can import and manage documents: for example, assign users to them, or set deadlines.
How to get here
-
Log in to memoQweb as an administrator or a project manager.
-
On the Active projects list, click a project.
-
At the top of the screen, click the Translations tab.
What can you do?
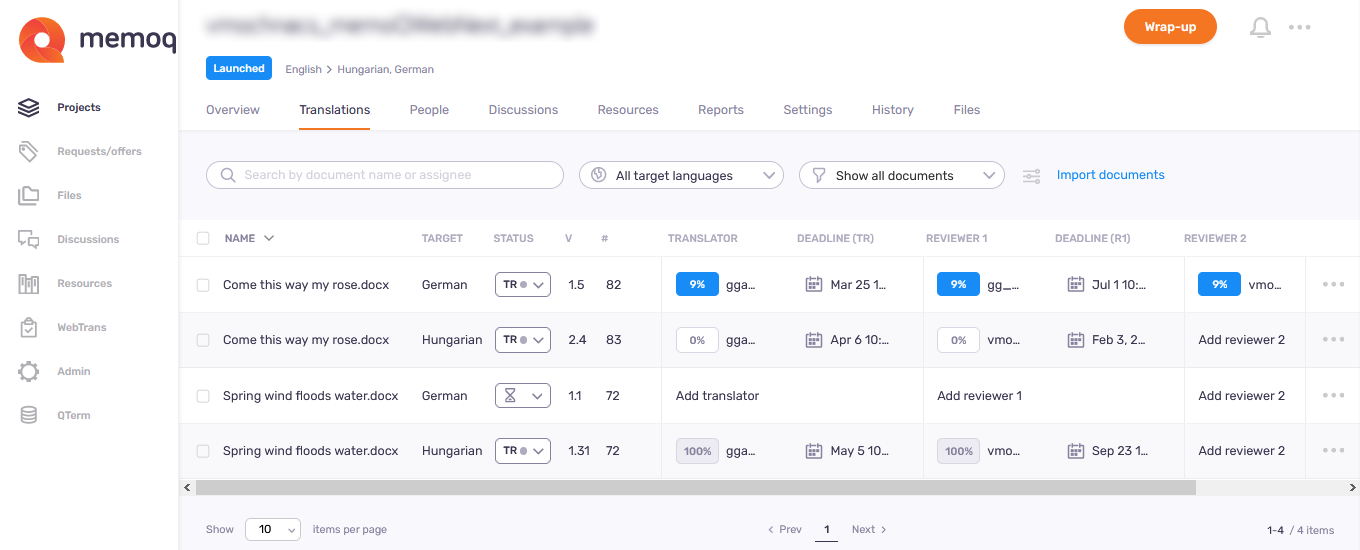
The document list shows these details about each document:
-
Name: The document's name. You can choose to show the full document paths.
-
Status: The document's current workflow status.
-
 : No user is assigned.
 -
 : Translation not started.
 -
 : Translation in progress.
 -
 : Review not started.
 -
 : Review in progress.
 -
 : Review 2 not started.
 -
 : Review 2 in progress.
 -
 : Document is completed.
-
-
Version: The current version of each document.
-
#: The number of segments, words, or characters in each document (you choose). Normally, memoQweb counts words.
Choose segments, words, or characters on the Customize view pane.
-
Translator: A percentage progress indicator and the translator's memoQ TMS username for each document. memoQ computes the progress from the number of segments, words, or characters.
-
Deadline (TR): Translation deadline for the document. You can see the exact date and time. If the deadline is overdue, the date turns red.
-
Reviewer 1: A percentage progress indicator and the 1st reviewer's memoQ TMS username (optional).
-
Deadline (R1): Deadline for the document's 1st review (optional).
-
Reviewer 2: A percentage progress indicator and the 2nd reviewer memoQ TMS username (optional).
-
Deadline (R2): Deadline for the document's 2nd review (optional).
Advanced assignment modes show their info in the Translator, Reviewer 1, and Reviewer 2 columns:
- If nobody accepted a FirstAccept task, the assignee column shows FirstAccept pending, and the tooltip shows the Respond until deadline. If the deadline passes, and nobody accepted the task, it shows FirstAccept expired.
- For GroupSourcing tasks, the assignee column shows the number of assigned users, and the tooltip shows their names.
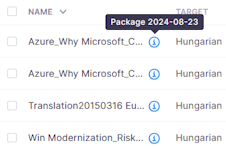
If a document has an Info ![]() icon after its name, it comes from a memoQ or Trados Studio package. To see the package name, hover your mouse over the icon.:
icon after its name, it comes from a memoQ or Trados Studio package. To see the package name, hover your mouse over the icon.:
To search the list: Type something into the search bar above the list. Press Enter. If the text you typed can be found in some documents' or assigned user's name, the list will only show those. To see the whole list again, click the X icon at the end of the search bar.
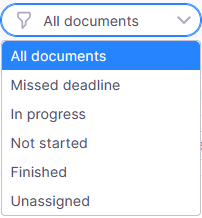
First, click the Filter translations ![]() icon.
icon.
-
To see only documents with a specific target language, click the Target language dropdown, then choose a language.
-
To see only documents with a specific status, click the Status dropdown, then choose a status.
-
To see only documents with a deadline between specific dates: Click Deadline for translator, Deadline for translator, or Deadline for translator, and choose a start date and an end date.To apply the filters, click Done.To discard your changes and close this pane: Click Reset filters, or the X icon in the top right corner.
When one or more filters are in use, the Active filters row above the document list shows them. To turn off one, click the gray X on its right. To turn off all filters, click the Clear all link at the end of the row.
To sort the list: Click a column header (Name, Target, Status, Version, #, Translator, Deadline (TR), Reviewer 1, Deadline (R1), Reviewer 2, Deadline (R2)). To reverse the sorting order, click the same column header again.
At the top of the screen, click the Customize view ![]() icon next to the filter dropdown. The Customize view pane opens.
icon next to the filter dropdown. The Customize view pane opens.
To see the documents' path before the file names, select the Show document paths checkbox.
To choose the unit of document size: Under Unit, choose segment, word, or character.
To show or hide columns in the document list: Select or clear the Name, Target language, Status, Version, Size, Translator, Reviewer 1, Reviewer 2 checkboxes as needed.
To save your changes: Click the Apply button.
To close the Customize view pane and not save your changes: Click the X icon in the top right corner.
To reset all settings: Click the Reset to default link.
To import one or more documents: Above the list, click the Import documents link. The Import as new page opens.
To open a document in the webtrans translation editor: Click its name. A new browser tab opens. After finishing your task, close that browser tab.
- To change the status of one document: In the list, click its status icon. Choose the new status.
- To change the status of two or more documents: On the left of the list, select their checkboxes. (To select all documents in the project, select the checkbox above the list.) In the list, click the status icon in a selected row. Choose the new status for all selected documents.
To save your changes: Click the Change status button. To discard your changes: Click the Cancel link.
See the list of status icons in the Learn details about the document list section.
For more possibilities, use advanced assignment: For one document: In the document's row, click the More options ![]() icon. In the menu, click Advanced assign
icon. In the menu, click Advanced assign ![]() . For two or more documents: Select the documents. Above the list, click the Advanced assign link. The Advanced assignment page opens.
. For two or more documents: Select the documents. Above the list, click the Advanced assign link. The Advanced assignment page opens.
- To assign a user to one document: In the document's row, click the Add translator, Add reviewer 1 , or Add reviewer 2 area. (To change the assignment, click the translator's or reviewer's username.)
- To assign a user to two or more documents: On the left of the list, select their checkboxes. (To select all documents in the project, select the checkbox above the list.) In the list, click the Add translator, Add reviewer 1 , or Add reviewer 2 area in a selected row. (To change the assignments, click a translator's or reviewer's username.)
On the Assign translator (or Assign reviewer 1, or Assign reviewer 2) pane, choose a user from the dropdown. The list shows suggested users first, then users in the project, then other server users. To clear an assignment: Choose Unassigned from the dropdown.
To save your changes: Click the Assign button. To discard your changes: Click the Cancel link.
If you assign an in-country reviewer: The Configure in-country review window opens. Choose settings as needed, and click the Apply button. An in-country reviewer can only have one role on a document, and it must be R1 or R2.
To copy the URL for an in-country review task: At the end of the document's row, click More options ![]() . Then, in the In-country review section, click Copy URL to clipboard
. Then, in the In-country review section, click Copy URL to clipboard ![]() . You can now send the URL to an in-country reviewer who does not have the related email from your memoQ TMS.
. You can now send the URL to an in-country reviewer who does not have the related email from your memoQ TMS.
To open an in-country review task in read-only mode in the ICR tool: At the end of the document's row, click More options ![]() . Then, in the In-country review section, click Open in read-only mode
. Then, in the In-country review section, click Open in read-only mode ![]() .The In-country review tool opens, showing the assigned document
.The In-country review tool opens, showing the assigned document
To clear all the assignments on one or more documents: Select their checkboxes, and above the list, click the Clear assignments link.
The same user can be translator and reviewer on a document: For example, a translator can be reviewer 2, too. Then they can override the changes and comments of reviewer 1. (As stated above, in-country reviewers are exceptions.)
If the project is already launched: You need to confirm your changes at the bottom of the page. Click the Save changes button or the Cancel link as needed.
You can create Analysis, LQA statistics, and LQA error lists reports this way. These are the reports that can also be meaningful for files, not just the whole project.
-
To analyze one document: In the document's row, click the More options
 icon. In the menu, click the Create report
  button. Or, check its checkbox, and above the list, click the Create report link.
 -
To analyze two or more documents: Select their checkboxes, and above the list, click the Create report link.
The Create report page opens. You can choose only the Analysis report type from the dropdown.
-
To pre-translate one document: In the document's row, click the More options
 icon. In the menu, click the Pre-translate
  button. Or, check its checkbox, and above the list, click the Pre-translate link.
 -
To pre-translate two or more documents: Select their checkboxes, and above the list, click the Pre-translate link. The Pre-translate page opens.
You can use memoQ AGT to translate your documents during your memoQ TMS trial period, or if the memoQ AGT plugin is active in the project's MT settings.
-
To translate one document: In the document's row, click the More options
icon. In the menu, click the Translate with AGT  button. Or, check its checkbox, and above the list, click the Translate with AGT link.
 -
To translate two or more documents: Select their checkboxes, and above the list, click the Translate with AGT link. The Translate with AGT page opens.
Normally, memoQ sets a 24-hour deadline for every translation or review assignment. To set a new deadline: In the document's row, click the date.
Select the date from the calendar. To change months, click the arrows on the top of the pane. To choose a time: Click the Set specific time dropdown.
You can set deadlines for: one document, all documents with that target language, or for all documents in the project.
To save your changes: Click the Set deadline button. To discard your changes: Click the Cancel link.
-
At the end of the document's row, click the More options
icon. -
On the pane, click Reimport
 .
. -
On the Reimport page, drag the documents you need to the area marked with the
 icon.
icon. -
In the Reimport window, the Action and language column will say Reimport.
-
Above the list, click the Import all button.
-
To export one document:
-
At the end of the document's row, click the More options
icon. In the menu, click Export  .
.Or, check its checkbox, and above the list, click the Export link.
-
The Export page opens. Choose the export format and settings as needed.
-
-
To export two or more documents:
-
Select their checkboxes, and above the list, click the Export link.
-
The Export page opens. Choose the export format and settings as needed.
-
-
To remove one document: At the end of the document's row, click the More options
icon. On the pane, click the Delete  icon. Or, check its checkbox, and above the list, click the Remove link. To confirm deleting: Click the Remove document button. To keep the file: Click the Cancel link.
 -
To remove two or more documents: Select their checkboxes, and above the list, click the Remove link. To confirm deleting: Click the Remove document button. To keep the files: Click the Cancel link.
Documents imported from one package are removed together: If you try removing one, a message warns you that all the other documents from the same package will also be removed.
To reach these actions: In the top right corner, click the More options ![]() menu.
menu.
- To download completed documents from the project: Click Export project. Your browser saves the files in a ZIP package into its regular "Downloads" folder.
-
To connect the project with a customer portal request: Click Link to customer request. In the Link to customer request window, choose the request from the dropdown.
To continue: Click the Link project button. To discard your changes: Click the Cancel link.
Works only if there are requests not linked to projects on the memoQ TMS. Else, the dropdown is empty. Learn more about requests here.
-
To archive a project and move it into the Archived projects page: Click Archive. To open an archived project, you need to restore it from the archive.
On the Archive project window, set the file name template. To insert a placeholder: Click the Insert link, and choose a placeholder from the list.
To continue: Click the Archive project button. To discard your changes: Click the Cancel link.
-
To remove the project and move it to the Projects in trash page: Click Move to Trash. There, you can restore or permanently delete the project.
There is no confirmation window: When you click Move to Trash, the project is removed, and you return to the Active projects list.
-
To open the project in the memoQ desktop app: Click Continue in memoQ.
To create a local copy of the project for working with its content: Click the Check out project button. In memoQ, the Project home - Translations tab opens.
To open the online project for management: Click the Manage project button. The memoQ online project - Translations tab opens.
When you launch an online project, you start its notification chain: memoQ TMS sends an initial e-mail to all participants. The e-mail contains details about accessing the online project. Later, when there is a change in the workflow status of a document, memoQ TMS sends further e-mails to the participants and the project manager.
To launch a project: In the top right corner, click the Launch button. The word Launched with a blue background will appear under the project's name. You cannot undo launching a project.
You wrap up a project if you do not expect any more work on it. If you use project templates, you can set up automatic actions that happen when you wrap up the project.
Set up templates in the memoQ desktop app. Then, you can create projects using those templates in memoQweb. To learn more, see the topic about editing project templates.
To wrap up a launched project: In the top right corner, click the Wrap up button. To continue: Click the Wrap up project button. To close the confirmation window without wrapping up the project: Click the Cancel link. You cannot undo wrapping up a project.
To see project-related notifications and communication: In the top right corner, click the bell icon (![]() ). In the Notifications pane, you can see notifications about missed deadlines, failed automatic actions, lost content connection, etc.
). In the Notifications pane, you can see notifications about missed deadlines, failed automatic actions, lost content connection, etc.
To remove a notification from the list: Click the Dismiss link under it. To remove all notifications: Above the list, click the Dismiss all link.
To close the pane, click the X icon.