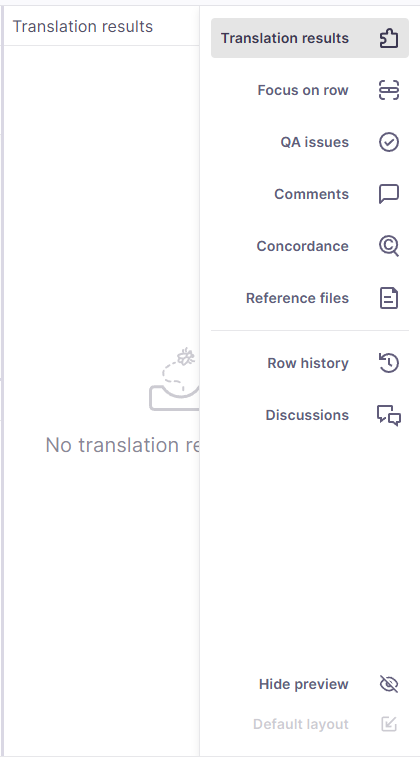
Side panel in memoQ editor
The side panel gives you everything you need to review and refine your work without leaving the editor.
To open it, click an icon in the sidebar. Each icon shows different information about the currently selected row in the translation grid.
The side panel includes:
-
Translation results - Pulls suggestions from translation memories, LiveDocs corpora, term bases, fragment matches, and auto-translation rules.
-
Focus on row – Highlights and isolates the active segment so you can concentrate on the exact content you’re working on.
-
QA issues – Lists any quality assurance warnings or errors detected for the selected row.
-
Comments – Shows comments related to the segment, allowing you to review feedback or add your own notes.
-
Concordance – Lets you search for words or phrases across the project to ensure consistency.
-
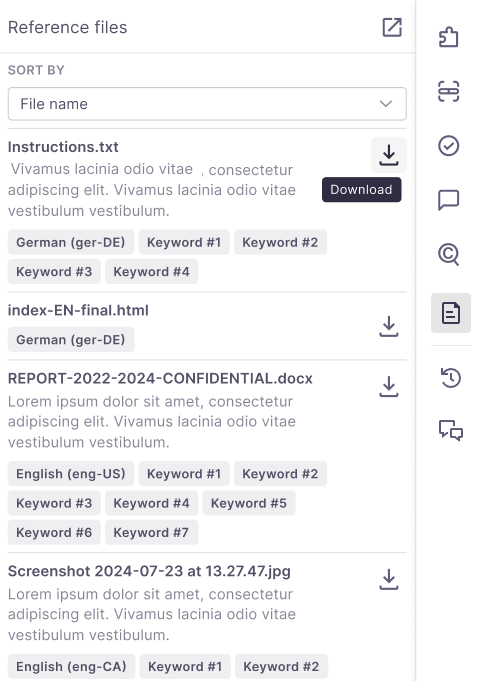
Reference files – Provides access to supporting materials attached to the project.
-
Row history – Currently under development.
You can switch between icons anytime to see the details you need, or even pop out a section for a more comfortable view.
How to get here
- Open an online project.
- Open a document for editing.
- Click any icon on the sidebar on the right-hand side of the screen.
What can you do?
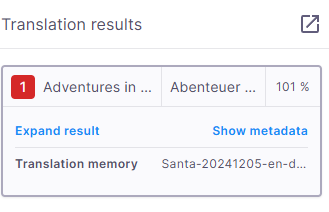
![]() icon on the right-side panel.Translation results are all the results from local and online translation resources attached to the project, including translation memories, LiveDocs, term bases, fragment searching, auto-translation rules, etc. Whenever you work on a document, the translation results list is always active.When looking up suggestions in TMs, TBs, or LiveDocs corpora, memoQ editor respects sublanguage settings. For example: en-US and en-GB can be treated as separate languages. This affects suggestions in the Translation results pane, Pre-translate, and more. The setting can be changed by a project manager in general settings.The Compare selected result option is visible by default, but you can minimize it if needed. To do so, click the arrow
icon on the right-side panel.Translation results are all the results from local and online translation resources attached to the project, including translation memories, LiveDocs, term bases, fragment searching, auto-translation rules, etc. Whenever you work on a document, the translation results list is always active.When looking up suggestions in TMs, TBs, or LiveDocs corpora, memoQ editor respects sublanguage settings. For example: en-US and en-GB can be treated as separate languages. This affects suggestions in the Translation results pane, Pre-translate, and more. The setting can be changed by a project manager in general settings.The Compare selected result option is visible by default, but you can minimize it if needed. To do so, click the arrow ![]() next to the box name.
next to the box name.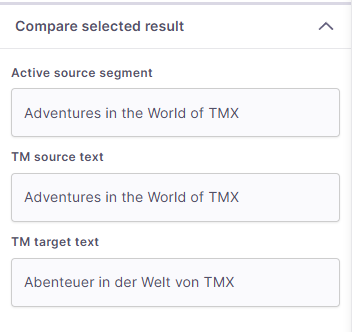 This section may look different depending on the translation result you choose to check.
To get all the relevant information for the row being translated, click the Focus on row ![]() icon on the right-side panel.
icon on the right-side panel.
Here you can check:
-
Translation results - all the suggestions for this specific row.
These come from translation memories, term bases, and non-translatable lists in the project.
Understand hits in the Translation results list
In the Translation results list, memoQ editor can display:
-
Term base - marked with a blue number and highlighted in light blue .
-
Forbidden terms - marked with a black number and crossed out in the list. You can't use or insert them like regular terms.
-
Non-translatables - marked with a gray number and highlighted in light gray in the translation editor.
-
LiveDocs - marked with dark red.
-
Concordance - marked with yellow.
Depending on the type of result you select, the Translation results list can look different.
Display formatting and tags
In addition to hit types, memoQ shows the true formatting and tags in hits, which helps you better understand match rates:
-
Hits display the same formatting as stored in the TM or LiveDocs.
-
Tags appear in the empty format under Translation results.
-
Both short and expanded result views use the same display for formatting and tags.
This helps you see how formatting and tags affect match rates, even when compare boxes aren’t available in the Focus on row panel.
View details and insert terms
If you need more details about the selected suggestion, click Expand result. To check the important metadata, click Show metadata (this works only for TM hits).
To insert a term into the segment, you can:
-
Press Ctrl and the number of the term you want to use (from 1 to 9), for example, Ctrl+8. You don’t have to select a specific word or phrase.
-
Double-click the term's row.
-
Select text in both the source and target segments of the same row.
-
On the menu, click Tools and select Add terms now, or press Ctrl + Q.
This option works only when you select text in both source and target, the document’s languages match the term base languages, and a working term base is assigned.
-
Creates a new entry in the term base for new terms, using the source and target text you selected.
-
Fills in the project metadata and applies the term base’s defaults for new terms.
-
Reloads the term base hits for that row (so you can immediately see the new entry), if the Translation results or Focus on row panels are visible.
-
Highlights terms in light blue in the translation grid.
-
Comments - the list shows all the comments added to this row. In the translation editor, the commented text is highlighted in green.
There are three types of comment icons you can see in the memoQ editor:
 - no comments added yet
 - comments added by other users
 - your comments
Here, you can:
-
Add a comment about a whole row - click its Add/view comment
icon. -
Add comments to rows that already have comments. The comments list shows how many comments you and others added to each row.
You can also click the Add/view comment
icon.The memoQ editor opens the comments for the row you're reviewing, and the number next to the icon shows the total count of comments for that row.
-
To edit or delete a comment, click the falafel menu
 icon in the top-right corner of the comment. You can only edit or delete your own comments.
To check all the comments, you can also click the Comments
icon on the right-side panel.
-
Add a new term pair quickly
You can quickly add a new term pair to your working term base with the Add terms now option. This adds the term immediately, without opening any additional dialog. You can update the term later if needed.
To do this:
What happens after you add terms?
memoQ:
-
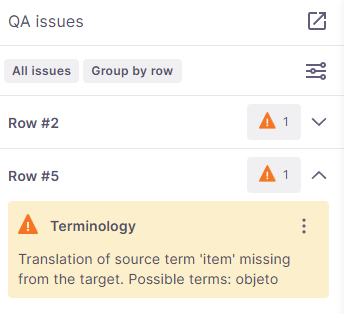
Issues - the QA warnings and errors mentioned for the selected row.
Here you can check:
QA issues help you catch errors or inconsistencies in your translations. memoQ editor gives you flexible tools to filter, review, and manage warnings so you can focus only on what matters. Any segment with potential issues (e.g., missing punctuation, terminology mismatches) is marked with a warning ![]() .
.
To start your review, click QA issues ![]() in the right sidebar.
in the right sidebar.
Here you can:
-
See Active filters, which show your current view settings, at the top of the QA issues sidebar.
To make your review easier, click Change under the current settings list and decide how you want to filter and group your QA issues.
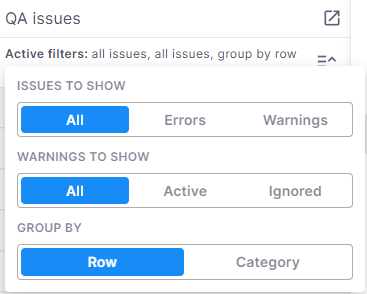
Use the toggles to adjust what memoQ should show you:
-
Issues to show - All issues, only Errors, or only Warnings.
-
Warnings to show → All, Active, or Ignored (only available if you’re showing All issues or Warnings).
-
Group them by:
-
Row - display all issues identified for a specific row in one card. This option is set as default.
-
Category - display dropdowns with identified issues like consistency, numbers, or punctuation and whitespace.
To save your new settings, click anywhere outside the panel.
-
-
-
Work with selected issues
When you select one or more issues, a new row appears under Active filters showing 3 new options: Ignore selected, Restore selected, and Remove selection.

Depending on what issues you selected, the Ignore selected, Restore selected, or both options can be active.
It is possible that during your work you'll see:
-
Active warnings marked in yellow

If you decide to group your warnings by Row, in the top-left corner of the card, memoQ editor shows you the row number, then the issue type and its description.
If you decide to group your warnings by Category, in the top-left corner of the card, memoQ editor shows you the identified issue type, then the row number, and its description.
To ignore a single warning, click the Ignore
 icon on its card.
To ignore all warnings of the same type, click Ignore this warning type
 . A dialog opens where you choose how you want to ignore them (options depend on the warning type).
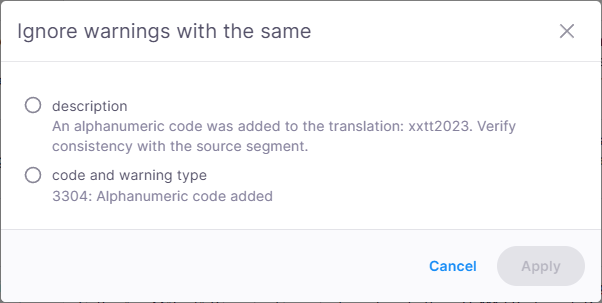
-
Ignored warnings marked in gray

If you decide to group your warnings by Row, in the top-left corner of the card, memoQ editor shows you the row number, then the issue type and its description.
If you decide to group your warnings by Category, in the top-left corner of the card, memoQ editor shows you the identified issue type, then the row number, and its description.
To make your warning active again and take it into consideration, click Restore
 . The icon will change color back to yellow, and the field will be marked as an active warning.
 -
Errors marked in red

Errors can't be ignored.
If you decide to group your errors by Row, in the top-left corner of the card, memoQ editor shows you the row number, then the issue type and its description.
If you decide to group your errors by Category, in the top-left corner of the card, memoQ editor shows you the identified issue type, then the row number, and its description.
Click the card of the error or warning you want to check and memoQ editor redirects you straight to the place in the translation grid.
The Comments panel ![]() allows you to add feedback, collaborate with others, and manage comments efficiently within your project.
allows you to add feedback, collaborate with others, and manage comments efficiently within your project.
What's good to know:
-
Comments are organized by rows for better readability.
-
You can choose how many rows to display per page: 10 (default), 20, or 50.
This setting controls the number of rows shown per page, not individual comments. Your preference is saved locally for future sessions.
-
Document-level comments (not linked to a specific row) appear above the first row.
-
If a comment needs to be highlighted (for example, via search or by selecting a row) but isn’t visible on the current page, the system automatically displays it in the Focus on row panel.
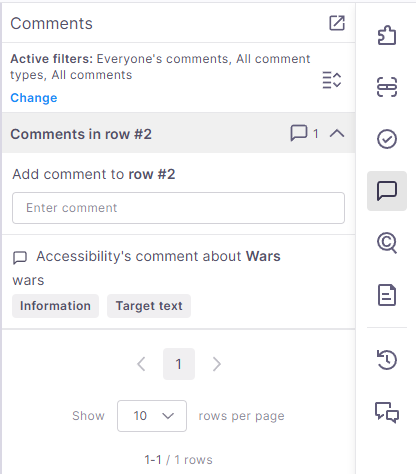
When in the Comments panel, you can:
-
Check the comments added to a particular row. If you want to check all the comments at the same time you can expand the comments list
 .
. -
Filter comments
Filtering helps you quickly find the comments you need.
To do that:
-
Click Change under the Active filters list.
-
memoQ editor displays a pop-up window with filtering options:
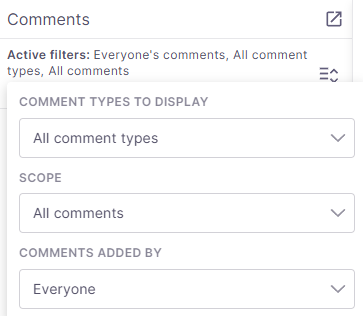
Here you can filter by:
-
Comment type: All comment types, Information, Warning, Error, Other
-
Scope: All comments, Entire row, Source (entire segment), Target(entire segment), Source text, Target text
-
Comment's author: Everyone, Me, Others
Filtering makes it easy to review feedback from specific users or focus on certain types of comments.
-
-
Add comments
You can add comments to an entire row, the source or target segment, and a specific part of a segment (by highlighting the text first).
To do that:
-
Select the text or area in the editor.
-
Click the comment
icon. -
memoQ editor displays a comment window:
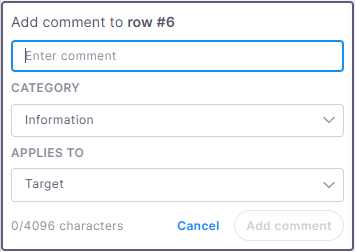
Here you can:
-
Enter your comment
-
Choose a category: Information, Warning, Error, Other
You can modify the category and scope later using the dropdown menus.
-
Define the scope under Applies to: Target, Source, or Entire row
-
You can only edit your own comments.
-