Create new online project (from template)
To do a job in memoQ, you set up a project. To begin, you open the documents you need to translate.
But a project is more than that. memoQ needs to know how to deal with the documents, and how to help you with the translation.
While you write your translation, memoQ offers you help - earlier translations - from translation memories and LiveDocs. For parts of the text, memoQ offers suggestions from term bases, auto-translation rules, automatic concordancing, and many other sources. You can even use machine translation if you need to.
memoQ needs the project so that it knows what translation memories, LiveDocs corpora, term bases, and other resources it must use to help you best.
In an online project, memoQ can automatically add translators and reviewers to the project. In some cases, the documents are assigned to them automatically, too.
Normally, memoQ chooses these settings automatically, based on the details of your job. But later on, you can make changes to the project, down to the tiniest detail if you need to.
When you start a project, it's created from a template. memoQ comes with several built-in templates.
- One TM and one TB per language pair: For each language pair, memoQ creates one translation memory and one term base. When you start working with a new language pair, memoQ adds a new translation memory and a new term base.
- One TM per client template: If you work for several clients, you may want to keep their translations separate. If you use this template, memoQ will start a new translation memory for each client. But when you start the second project for a client, memoQ uses the existing translation memory.
- content connector: Use this template if memoQ TMS will take the source documents from a content source (such as a file folder that is automatically updated by another system)
- Default CMS workflow: Use this template if memoQ TMS will receive the translation jobs from a content management system (CMS) such as a WordPress web site.
Make your own templates: If this is not good enough, you can set up and edit your own templates.
Changing the template doesn't change existing projects: You can edit project templates in memoQ. When you do that, the changes will appear in new projects you start afterwards. Existing projects won't change.
Want a local project instead? If you need to start a local project, see the topic about creating a local project.
Project manager edition only: You can't manage online projects from memoQ translator pro.
How to get here
On the main memoQ window - the Dashboard -, connect to a memoQ TMS: At the top of the Dashboard, type the address of the server in the text box. Or, choose a server from the drop-down list.
Type name and password if this is the first time: If you haven't used that server before, the Log in to server window appears. Type your user name and password. On the server, you must have Project Manager or Administrator privileges at least.
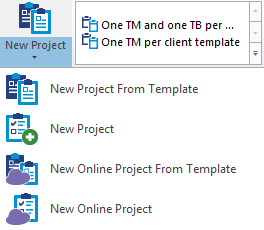
On the Project ribbon, click New Project, and from the menu, choose New Online Project From Template. The Create new project from template - servername window appears.
What can you do?
You can get the source documents from your computer, or from a content source. By default, memoQ offers to import local documents:
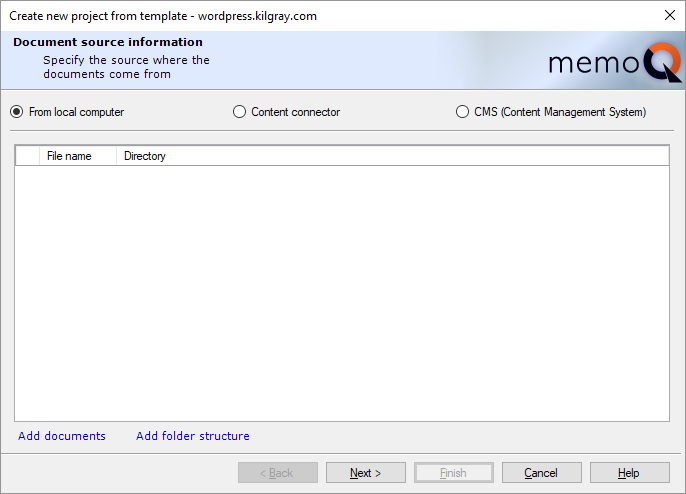
Click Add documents to pick up the documents you need to translate. If you need to work with an entire folder and its subfolders, click Add folder structure instead, then find the folder.
Once this is done, click Next.
memoQ will read the files, and detect their language: that will be the default source language of the project. memoQ will also indicate if it cannot read a document or another.
Can't customize document import here: memoQ imports documents with the settings that are in the project template. If a document was not imported correctly, you can reimport it after the project is created. When you reimport a document, you can change the import settings. On the other hand, you can customize the document import settings in a template, but you need to do it before you start creating the project.
To connect your project to a content source, click the content connector radio button first. The wizard page will change as follows:
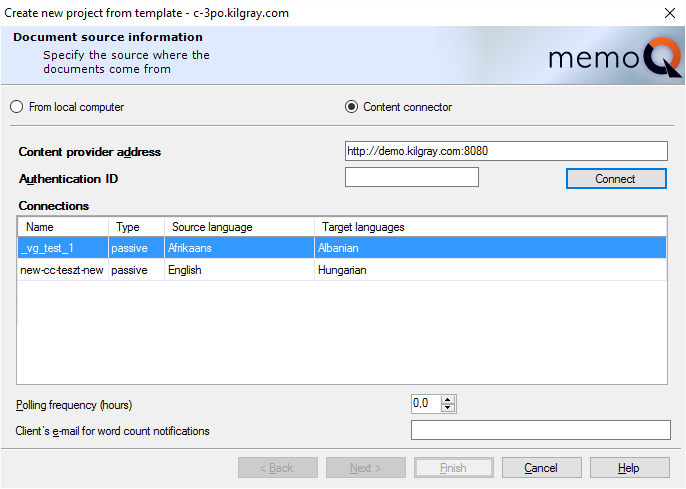
Type the address of the content source in the Content provider address box, and if the content source requires an authentication ID (practically, a password), type or paste it in the Authentication ID box. Then click Connect.
memoQ will list the available content sources in the Connections list. Click the content source you wish to use, and click Next.
memoQ will fetch the documents from the content source, and detect their language.
content connector languages are stronger than template languages: When you create a template-based project using a connection, memoQ will use the source and target languages in the connection, and not the ones in the template. When you create a content-connected project from a template, memoQ will ignore the source and target languages that were set up in the template.
Template filter configurations are stronger than content connector filter configurations: When you use this template to create a content-connected project, memoQ will use the filter configurations in the template, and not the ones in the content source. When you create a content-connected project from a template, memoQ will ignore the filter configurations that were set up in the content connector.
If memoQ TMS is connected to a content management system (CMS), the CMS can send translation jobs. When there is a new job, memoQ TMS needs to create a new online project from it. You can create an online project from a CMS translation job here.
Creating an online project can be automatic: If the CMS dashboard has a workflow for the same connection and the language combination of the job, memoQ TMS will create the project automatically. You need to create the project manually only if there is no such workflow.
To create a project from a CMS translation job, click the CMS (Content Management System) radio button. The Connections list appears:
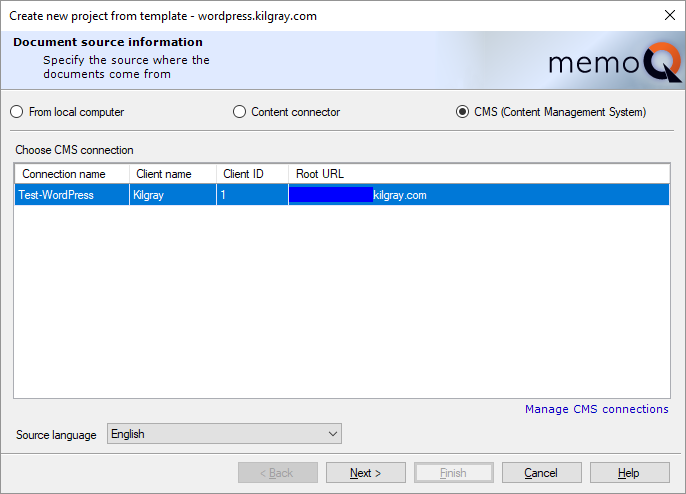
If you do not see the connection you need: Click Manage CMS connections. The Server Administrator opens, with the CMS Connections page. To learn more, see Help about the CMS Connections page of Server Administrator.
Select the connection that sends the translation job. Click Next.
The Select CMS Jobs page appears:
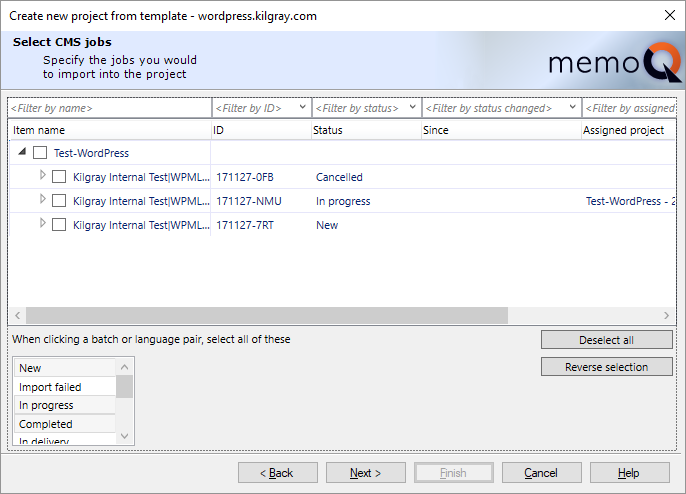
Find the job where the status is New, and check its checkbox. You can process part of the job. To do that, click the arrowhead at the beginning of the row, expanding the items inside. memoQ will expand the items, first the language pairs, then the documents for each language pair:

Normally, you would select the checkbox for the entire job (at the top), but you can pick and choose by checking the checkboxes for individual language pairs or documents.
After you make your selection, click Next. The Project template information page appears. (Continue reading from the next section.)
On the second page, select the project template.
Note: If you started this wizard by clicking a template name on the ribbon, the template will already be filled in.
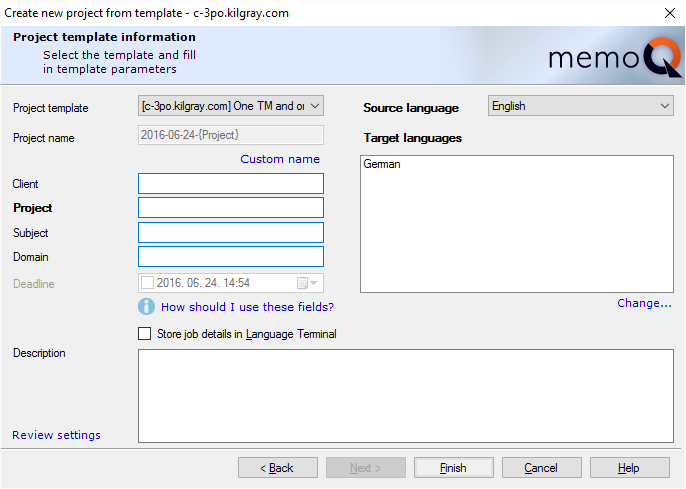
Choose a project template from the Project template drop-down list. The Project name box is automatically filled in. The name is created from the project details, using a format specified in the template. If you wish to use a different name, click the Custom name link to type another name in the Project name box.
If they are defined in the template, memoQ will also fill in the Client, Project, Subject and Domain boxes. If the template contains predefined values for one or more of these fields, you can choose the details from drop-down lists. If there is a drop-down list, you can't type free text.
The Source language box is already filled in. (memoQ recognizes the language of the documents.) You can choose a different language, though.
Below the Target languages list, click Change, and in the Select target languages window, select all the target languages you wish to work with.
In addition to the details above, you can set a deadline for the entire project, and you can also type a sentence or two in the Description box. The Description will appear among the details of the project (on the Dashboard), and if this is an online project, memoQ will display it for those users who check out the project on their computers.
To review all the project settings, including those that come from the template: Click Review settings. The Template overview window appears.
Click Finish: memoQ creates the project.
When you finish
To create the online project: Click Finish.
memoQ online project opens: memoQ opens the new project in a new memoQ online project window. The project will be on autopilot.
To return to memoQ's Dashboard, and not create a project: Click Cancel.
If you need to check the documents (for example, check if the segmentation or pre-translation is correct): Check out a local copy, and do whatever you have to do in the translation editor. The rest happens in the memoQ online project window.
-
Add translators and reviewers to the project. To do this, use the People pane of the memoQ online project window.
-
Still on the People pane of the memoQ online project window, use the Languages and roles tab to tell memoQ about the role and language pair of each participant.
-
On the Translations pane, assign or auto-assign translators and reviewers to each document.
-
Finally, launch the project: On the Online Project ribbon, click Launch Project. All participants will receive an e-mail about the work they need to do, and memoQ TMS will start tracking the status of each document.