Ribbons - Documents
The Documents ribbon appears when you are working on a local project or a local copy of an online project in Project home.
To learn more: See Help about the Translations pane of Project home. Click here for the project manager's version.

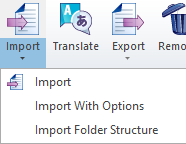
Import: If you click the icon, starts importing a document with the default settings. For more options, click the Import label below the icon. A menu appears:
-
Import: Imports one or more documents, and adds them to the current project. The documents do not have to be of the same type. Uses the default settings. Brings up an Open window where you can find and select the documents. Use this command to update the project from bilingual documents (MQXLZ, Trados DOC/RTF, or table RTF).
-
Import With Options: Imports one or more documents, and adds them to the current project. You can customize settings. First, brings up an Open window where you can find and select the documents. The documents do not have to be of the same type. After you click Open, the Document import options window opens. You can choose a different filter configuration for each document (or for all of them at once), or set up new filter configurations.
-
Import Folder Structure: Imports documents from an entire folder and from its subfolders. Opens the Add folder structure window. There you can choose a folder to import, and configure the file types, including the filter configurations.
Translate: Opens the selected document in the translation editor. First, select a document in the Translations pane of Project home. To open a document for translation, you can also double-click its name. Or, right-click the name and, from the menu, choose Open For Translation. If it is an image you right-click, the command will be
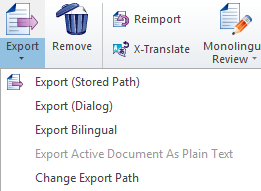
Export: Exports the selected documents with the default settings (to the stored export folder). If some documents are not finished yet, the Export unfinished document window may open. For more options, click the Export label below the icon. A menu appears:
-
Export (Stored Path): Exports the translation of the selected documents to the stored folder (on the Translations list, look at the Export path column). If the documents are unfinished or contain errors, the Export unfinished document window may open.
-
Export (Choose Path): Exports the translation for the selected document or documents. For each document, opens a Save as window where you can choose a folder and a name for each document. If the documents are unfinished or contain errors, the Export unfinished document window may open.
-
Export Bilingual: Exports the selected documents in bilingual files. It will be one of the formats that memoQ supports: memoQ XLIFF, standard XLIFF, Trados DOC/RTF, or table RTF. Opens the Bilingual export wizard.
-
Export Active Document As Plain Text: Works only if you are working on a document in the translation editor. Exports this document in a plain-text file, with no formatting.
-
Change Export Path: For the selected documents, changes the stored path where the translated documents are exported. Use this if you imported the project from another computer. Opens the Change export path window. Does not change the export path rules memoQ uses for the project. If you plan to import new documents into the project with the new export path, change the export path rules, too. To learn more, see Help about the Export path rules tab on the Settings pane of Project home.
Deliver/Return: You see this icon when you are working on the checkout of an online project - or on a project imported from a memoQ package. memoQ notifies the memoQ TMS that the document is finished - or, if the project comes from a package, memoQ saves a delivery package. Before you click this, select documents on the Translations pane of Project home.
![]()
Remove: Removes the selected documents from the project. The document will be deleted from the project only. memoQ will not delete the document from its original location.
Reimport: Imports the selected documents again. If the original document is still in the same folder, memoQ will import that document (but ask you before doing that). Reimport always happens with options: The Document import options window will open. When you reimport a document, memoQ will create a new major version of it. To get the translations from the previous version, use the X-Translate command. To view the version history of the document, use the History/Reports command.
X-Translate: Copies translations from the previous major version of the selected document. Opens the X-Translate window. Does not work if the document has no version history. (Do not create projects without document versioning.)
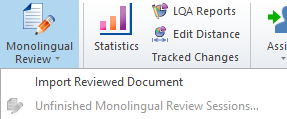
Monolingual Review: Imports a reviewed version of the translation of the selected document. After importing reviewed translations for documents, you can open each document in the alignment editor, and process the edits. This icon opens a menu:
-
Import Reviewed Document: Imports a document that contains the reviewed translation of the selected document. Displays an Open window. Then opens the alignment editor where you can compare the translation in memoQ to the reviewed translation you just imported.
-
Unfinished Monolingual Review Sessions: If you did not get to the end of looking trhough the edits of a document, you can return to the alignment editor with this command.
Statistics: Counts segments, words, characters in the project or in the selected documents, and analyzes them against the translation memories and the LiveDocs corpora in the project. Opens the Statistics window.
LQA Reports: Creates a report about the Linguistic Quality Assurance (LQA) feedback in the project or in the selected documents. Opens the LQA reports window. Works only if the selected documents have an associated LQA model. To set up LQA models, use the LQA models tab on the Settings pane of Project home.
Edit Distance: Compares the edits of a translator to the matches that were inserted from translation memories - or, compares the edits of a reviewer over the work of a translator. Opens the Edit distance statistics window.
Tracked changes: Works if the source document contains tracked changes. Analyzes the document for so-called TC matches, which are exact or context matches from translation memories and LiveDocs corpora - for the source text with all changes rejected. Opens the Tracked changes analysis report window.
Requires memoQ project manager: This section appears only if you work in the project manager edition of memoQ.
Managing an online project? Look for the Assign command on the Statistics/Preparation ribbon in the memoQ online project window.
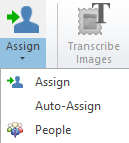
Assign: Opens the Assign selected documents to users window where you can manually assign translators and reviewers to the selected documents. For more options, click the Assign label below the icon. A menu appears:
-
Assign: Assign the selected documents manually to your users.
-
Auto-Assign: If memoQ knows the target language and the role of each user in the project, it can automatically assign translators and reviewers to documents. Opens the Auto-assign documents window. Before you auto-assign, use the People pane of Project home to add users and specify their roles and target languages.
-
People: Opens the People of Project home, so that you can add users to your project.
Users and assignments are copied when you publish the project: If you publish a local project to a memoQ TMS, you can match the users in the project to the users of memoQ TMS. Then memoQ can copy the participants and the assignments to the online project.
memoQ can import embedded images along with documents. You can transcribe the text in the images, and then translate the transcriptions.
Icons in this section work only if the project contains imported images.
Transcribe Images: Opens the Image transcriptions tab where you can type the transcription for each image, and add instructions for the translator. Then these transcriptions can be translated.
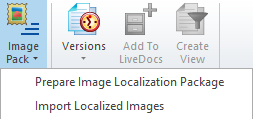
Image Pack: After the transcriptions are translated, memoQ can replace the images themselves with their localized versions. You can save an image localization pack that you send to a graphic artist - or to your client - to redesign with the translated text. They will have to save the localized image files in the package (in a folder for the target language), and zip it up again. You can import the updated package in memoQ - then memoQ will replace the images in the exported translation. The Image Pack icon opens a menu:
-
Prepare Image Localization Pack: Creates an image localization pack from the selected images. Opens a Save As window where you can choose a folder and a name for the package. It will be a ZIP file that contains the image files themselves, an Excel spreadsheet with the transcriptions (with one line per image), an empty folder for the localized images, and an instructions document.
-
Import Localized Images: Import a localized image pack, where the target language folder contains the localized images. memoQ will update the images in the project, and insert the localized images in the exported document.
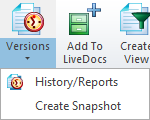
Versions: Shows the version history of the selected document. Opens the History/Reports window. For more options, click the Versions label below the icon. A menu appears:
-
History/Reports: Shows the version history of the selected document. Opens the History/Reports window.
-
Create Snapshot: Creates a new snapshot - a new minor version - of the selected document. Opens the Create document snapshot window.
Add to LiveDocs corpus: Copies the selected documents to a LiveDocs corpus in the project. Opens the Add documents to corpus window. Before you click this, add at least one LiveDocs corpus to the project.
Create View: Creates a view from the selected documents. Opens the Create view window. A view contains some or all segments of the original documents, through filtering and sorting. For example, you can have a view of repeated segments or of segments that have a fuzzy match inserted. The views appear on the Views tab of the Translations pane of Project home.
Appears only when you work on the local copy of an online project.

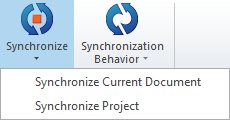
Synchronize: Opens a menu where you can choose to synchronize the current document or the entire project manually. Use this when the project manager notifies you of changes on the server. The changes you make are automatically synchronized to the server. Synchronization may result in conflicts that you need to resolve.
In memoQ 11.6 and newer, project managers can turn off checking out online projects. If you checked out a project earlier, and a project manager disabled checkout since then, memoQ shows an error message when you first try to synchronize your local copy. If you are using Manual synchronization, this can mean you need to manually copy some of your work to memoQweb.
-
Synchronize Current Document: Works on the open document only. Sends local changes, downloads online changes. Does not download changes in project resources or settings.
-
Synchronize Project: Sends local changes in all documents. Downloads all document changes from the server. Downloads changes in project resources, settings, and assignments. May remove documents from the project if they were assigned away from you. May add new documents to the project if they were assigned to you.
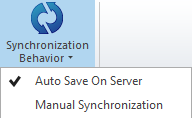
Synchronization Behavior: Turns automatic synchronization on and off. Normally, it's on: memoQ will automatically synchronize the project when you open or close your local copy, and synchronize the document when you make a change. Opens a menu with two options:
