Discover memoQ 8 Adriatic
These are the most important new features of the memoQ 8 Adriatic release.
The translator's work, enhanced
When you receive an updated document, you will need to update its translation, too. When you do that, you usually pre-translate the new document from your translation memories or LiveDocs corpora.
You will receive a lot of fuzzy matches - with various match rates. Different match rates may need different treatment. For example, a match of 95% to 99% is almost an exact match: the text is the same, the difference is in the numbers, tags, punctuation marks, capitalization, and spaces. On the other hand, a match with a rate of 75% and below may require a lot of work - that match rate usually means a difference of more than two words in the source text.
You may want to go over the difficult matches first, and then go on to the easier ones - or the other way round. With memoQ Adriatic, this is easy because you can filter your documents for specific match rates - more precisely, for a range of match rates.
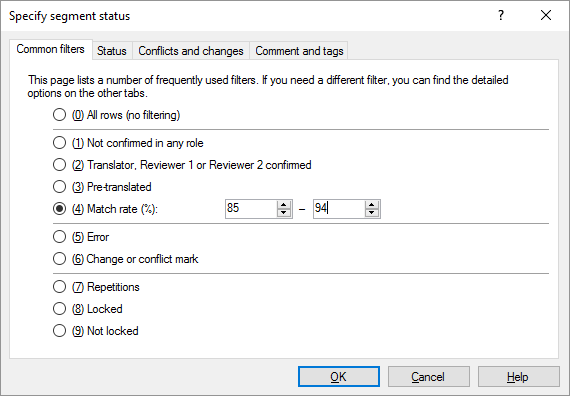
Previously, you could only search for unconfirmed fuzzy matches - or exact or context matches, and that was it. In memoQ Adriatic, you can say the match rate. You can look for or filter for segments with a match rate from 85% to 94%.
To filter the document in the translation editor:
- Open a project, and open a document for editing.
- At the top, click the funnel
 icon. The Specify segment status window opens.
 - Click the Match rate radio button. In the two boxes, enter 85 and 94.
- Click OK.
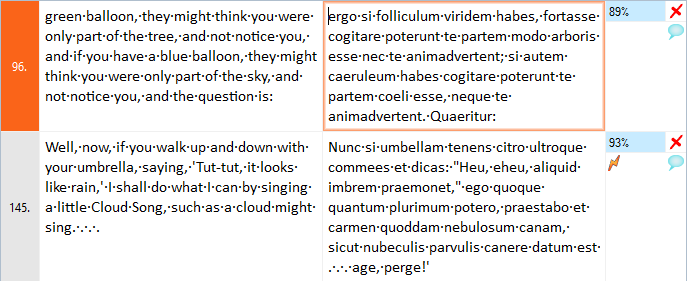
The translation editor gets filtered like this:
To jump to the next segment:
- Open a project, and open a document for editing.
- Press Ctrl+Shift+G. The Go to next segment window opens.
- Click the Match rate radio button. In the two boxes, enter 85 and 94.
- Click OK.
- Open a project. In Project home, choose Translations.
- Select the documents to get the segments from.
- On the Documents ribbon, click Create View.
- The Create view window opens. At the bottom, click Advanced options. The Create view (filtering and sorting) window opens.
- Under Filter by segment status, click the Match rate radio button. In the two boxes, enter 85 and 94.
- Click OK. memoQ creates the view.
See also:
If you receive work from a company that uses Language Terminal, they will give you a user name and a password that you can use to log in to Language Terminal.
If you do not use Language Terminal as an individual: You may save this user name and password in memoQ. Use the Language Terminal account wizard to do this.
You can check out projects from this company's memoQ server in the usual way. To learn more about that: See Help about the Check out online project window.
To ensure proper billing and that you do not receive work with unrealistic deadlines: You can set your availability on a calendar, and you can also log the hours - if you do work that is billed by the hour. You can do this in Language Terminal, not memoQ. Here is how:
- Log in to Language Terminal with the user name and password that the company gave you.
If you are also using Language Terminal as an individual: Open the web browser with an incognito window.
- Visit the Calendar page.
- To set availability for a day: Point the mouse to a day that is in the future. Click the Settings
 icon. The Set capacity window appears. You can set the number of hours you can work, or take away hours for weekly events, or indicate a holiday, or indicate a recurring overtime. Make your choice, and click Save.
 - To log hours for a day: Point the mouse to a day that is in the past. Click the Log time
 icon. The Record time window appears, with a list of assignments that you worked on that day. Choose an assignment, and enter the number of hours. Click Log time.
You may have translated a Microsoft Word document in the past. When this document gets edited, you can easily translate the new, edited version.
To do this:
- Create or open a project. In Project home, choose Translations.
- Import the edited version of the document. Use Import with options. In the Document import settings window, click Track changes. Click the Import changes as such radio button.
- Open the document for editing. The tracked changes will appear in the source segments:

- In the translation editor, watch the Translation results list for translation memory matches. If you are using the same translation memory that you used for the previous version, you will get so-called TC (tracked-changes) matches:
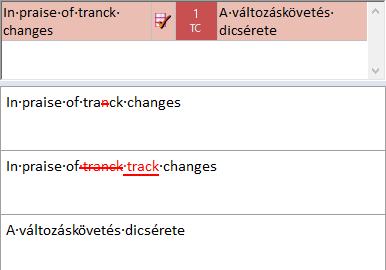
A TC match is an exact match or a context match for the unedited version of the source segment. memoQ looks up the segment as if all changes were rejected - practically, this means matches for the previous version of the document. Because you have already translated that version, you will get exact matches here.
- When you insert a TC match in the translation editor, it will show a match rate for the edited version. That is, memoQ compares the edited version of the segment with the unedited version, and use the similarity as the match rate. This is to give you an idea of how much you need to work on the edited segment.

To learn more: See Help about the Grid.
You can get analysis about the matches for change-tracked segments: To learn more, see Help about the Tracked changes analysis report window.
You can change the colors of tracked changes: Open the Customize appearance window, and click the Tracked changes tab.
Working as a reviewer in the translation editor, you can track your changes in memoQ, and you do not have to create a new document version for that.
To turn on tracking changes: On the Review ribbon, click Track changes.
When you edit the document, memoQ will show insertions, changes, and deletions, more or less in the same way as Microsoft Word.

When you turn on tracking changes, memoQ will show the markup. However, you can view the final version only. On the Review ribbon, click Show changes. From the menu, choose Final version.
To turn off tracking changes: On the Review ribbon, click Track changes again.
memoQ will save the changes in the documents. Each change is marked with the name of the user who made the change, and the time when the change was made. To see the details of a change, point the mouse at it:

Markup is exported in certain formats only: In most document formats, memoQ cannot export the markup. But if the document is Microsoft Word, you can export the tracked changes. You can also export them in SDLXLIFF documents, and into multi-column RTF documents, too.
You may not be able to track changes in online projects: The project manager can set up the project so that tracking changes is not allowed. If you work on the checkout of an online project, and the Track changes button is not active - and you think it should be -, ask your project manager if this is intentional.
When you export the document in a multi-column RTF file - it is a bilingual document format -, memoQ will export the tracked changes in the source and in the target text. If you open the document in Microsoft Word, these will show up as tracked changes in Word, too.

To learn more: See Help about the Grid.
You can change the colors of tracked changes: Open the Customize appearance window, and click the Tracked changes tab.
Some documents are very tightly regulated. They are written with strict version control, with every bit of change clearly marked up. When you translate these documents, you need to translate the unedited version, plus every tracked change as it is.
In memoQ, the way to do this is the following:
- Import the documents without the tracked changes - as if all changes were rejected. You can do this with Word documents, and you need to import them with options.
- Translate the document, and confirm every segment in a translation memory.
- Import the document again, this time with the tracked changes. Again, you can do this with Word documents, and you need to import them with options.
- Use the TC matches from the previous translation, and insert the changes one by one (sorry, there is no simpler way to do this). Usually, you need to copy the name of the author along with the change.
- Before you do it, skim through the document, and get a list of authors who inserted changes - list at least those who inserted a lot of changes. To get the author of a change, point the mouse at the change.
- Work on the changes inserted by one author at a time. Return to Project home, and choose Settings (do not close the translation editor). Click the General tab. In the User name box, enter the name of the first author.
- Return to the document, and translate the changes of this author. When you finish, go back to Project home, and enter the name of the second author. Translate the changes of that author as well.
- Repeat this until all changes are translated. Finally, change the User name box back to your own name.
This works in local projects only: When you work on the checkout of an online project, you cannot change your name. Your changes will always be marked with the user name you use to log in to memoQ server.
There is a QA check for this kind of job: When you need to add tracked changes to the translation, create a separate QA option set. Edit it, and turn on the Check insertion and deletion consistency check. (It is on the Consistency tab.)
You can change the colors of tracked changes: Open the Customize appearance window, and click the Tracked changes tab.
Ribbons are taking over in memoQ. Commands that used to be links in the Find and replace list, on the Resolve Errors and Warnings tab, and in Manage Projects - are on ribbons now.
- In the Find and replace list, use new buttons on the Edit ribbon.
- On the Resolve Errors and Warnings tab, use new buttons on the Review ribbon.
- In the Manage projects window, you can see the entire Project ribbon.
Next up, sometime soon: Resource console.
In the translation editor (in the Grid), you could always change the capitalization of text - by pressing Shift+F3.
In memoQ 8 Adriatic, when you select text, and press Shift+F3, a menu appears, where you can choose the capitalization you need:

You no longer have to step through every option - and there is no chance to run over and having to start again. So, it is a maximum of 3 or 4 keystrokes.
The translation editor has new compare boxes for fuzzy matches. This makes it easier to spot editor's changes where the wording may be different but the translation does not need to change.
For example, when the editor changes 'the user's role' into 'the role of the user' (or vice versa), you will get a fuzzy match, most likely with a match rate below 80%. The compare boxes will highlight this for you in one place, so that you can immediately recognize that you do not have to touch the translation.
The trick is that the colors that used to mark the differences were replaced with - track changes markup; the same kind that appears when there are tracked changes in the translation editor. in the Translation results pane, when you select a fuzzy match (from a translation memory or from a LiveDocs corpus), these three boxes appear:
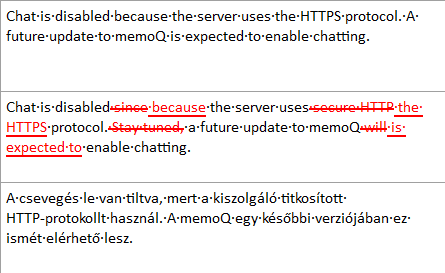
These compare boxes show:
- first, the current source segment;
- second, the source text from the selected suggestion;
- third, the target text from the selected suggestion.
The differences between the two source segments appear as tracked changes - the same way as tracked changes appear in the text.
The changes are highlighted in the second box only, as if the translation memory match were corrected into the current source segment. This means the following:
- New parts that are there in the current source segment appear as inserted;
- Old parts that appear in the match (only) appear as deleted.
To change the color of the markup: Open the Customize appearance window, click the Tracked changes tab, and change the colors for the 1st author.
The memoQ pseudo-translation plugin works like a machine-translation plugin, but it does not translate text. It simulates translation.
Pseudo-translation is useful in software localization. You can create "translation" that is visibly different from the source text. This makes it easier to spot those source strings that were not imported for translation.
Pseudo-translation is also useful for checking if the translation will fit the available space. You can add more characters to the output, or double some characters. This helps you simulate a situation when the translation becomes longer than the source text.
Pseudo-translation can also be helpful if you want to test if your document exports. You may have used a complicated filter to import your document, and in order to simulate the export of the fully translated document, you can use the pseudo-translation plugin. This prevents you from trouble of not being able to export your final files.
In memoQ 8, you can have several different pseudo-translation configurations - practically, you can have one for each language pair.
In addition, memoQ can now change the length of the segments in a controlled way - you specify how much.
Pseudo-translation works when you turn on the memoQ pseudo-translation plugin under Machine translation (in Options), and you turn on Machine translation when you pre-translate documents.
This can be automatic, too: In a project template, when you use the automated Pre-translate action, you can turn on Machine translation in the settings.
To learn more: See Help about setting up pseudo-translation, about pre-translation, and about the automated actions in project templates.
Project management novelties and improvements
In memoQ project manager, you can open several online projects for management.
When you open an online project for management, it will open in a new window.
From a memoQ online project window, you can switch back to the Dashboard - or to Project home -, and deal with a local project, or open another online project for management.
To switch between the online projects and the main memoQ window: Press and hold down Alt, and press Tab several times until you get to the window you want. Or, on the Windows taskbar, click the memoQ icon, then click the window you want to switch to.
Still only one local project at a time: You still cannot open two or more local projects - new windows are there for online projects only.
See also:
memoQ 8 works with several windows. When you open the Resource console, Server administrator, Manage projects, or Options, they can all stay open. You can return to the memoQ main window, and switch back to these when you need them. (The memoQ main window shows either the Dashboard or Project home.)
To switch between memoQ windows: Press and hold down Alt, then press Tab several times until you get to the window you need. Or, on the Windows taskbar, click the memoQ icon. Then click the window you need.
If you run memoQ project manager, and you manage online projects: When you open an online project for management, the memoQ online project windows stay open the same way.
See also:
With memoQ 8, organizations can have their profiles on Language Terminal. (Before the Adriatic release, it was available to individual translators only.)
In a Language Terminal profile, organizations can do the following:
- Keep a record of the members of the organization. You can list administrators, project managers, internal vendors (translators and reviewers), and external translators.
- Keep a record of online projects. More specifically, you can track the cost and the progress of each project, and have cumulative reports about them (from Language Terminal).
- See the availability of translators and reviewers: When you assign work to translators and reviewers, you can check how busy they are - so that you have an idea if they can make the deadline you are about to impose on them.
To do this, you need to prepare organization's Language Terminal account as well as your memoQ server. Here is how:
- Convert your Language Terminal profile into an organizational view, if you have not done so yet.
- Connect your copy of memoQ to this profile. At first, use an administrator's account. You will need the project manager edition of memoQ. Use the Language Terminal account wizard.
- In Server administrator, connect your memoQ server to this same Language Terminal profile. In Server administrator, choose Language Terminal to do that.
- Synchronize the users on memoQ server with the logins and vendors in the organization's Language Terminal profile. Use the Merge users window. At the end of the process, you will have the same users in Language Terminal and on memoQ server.
- In Language Terminal, set up the list of languages and subject fields of your organization. To set up the list of subject fields, visit the Subject fields page on Language Terminal. To set up the languages, edit the organization's profile.
- Still in Language Terminal, set up your pricing strategies for the costs. In the organization's profile, you need to make a list of different prices that you pay translators and reviewers. Use the Prices page in Language Terminal.
When this is done, you can create online projects:
- where memoQ knows about the costs of the project;
- where you take translators and reviewers from the organization's Language Terminal profile; and
- where you can see the availability of translators and reviewers.
To do this, you need to log on to memoQ server with a Language Terminal user name that belongs to the organization's profile, and has administrator's or project manager's privileges. (To check or change the Language Terminal user in memoQ, use the Language Terminal account wizard.)
- When you create an online project, check the Store job details in Language Terminal check box. You will get some extra options: for example, how word counts are computed for billing, or how time is reported if some work is billed by the hour.
- In the People pane of the memoQ online project window, make sure you send work to internal vendors (translators and reviewers). Language Terminal can calculate the costs and track the availability of internal vendors. To learn more, see Help about the Add users to project window.
- The memoQ online project window will have a new pane: Finances. This is where you can see and update the costs of translation and reviewing. To learn more, see Help about the Finances pane.
If you receive work from a company that uses Language Terminal, they will give you a user name and a password that you can use to log in to Language Terminal.
If you do not use Language Terminal as an individual: You may save this user name and password in memoQ. Use the Language Terminal account wizard to do this.
You can check out projects from this company's memoQ server in the usual way. To learn more about that: See Help about the Check out online project window.
To ensure proper billing and that you do not receive work with unrealistic deadlines: You can set your availability on a calendar, and you can also log the hours - if you do work that is billed by the hour. You can do this in Language Terminal, not memoQ. Here is how:
- Log in to Language Terminal with the user name and password that the company gave you.
If you are also using Language Terminal as an individual: Open the web browser with an incognito window.
- Visit the Calendar page.
- To set availability for a day: Point the mouse to a day that is in the future. Click the Settings
 icon. The Set capacity window appears. You can set the number of hours you can work, or take away hours for weekly events, or indicate a holiday, or indicate a recurring overtime. Make your choice, and click Save.
 - To log hours for a day: Point the mouse to a day that is in the past. Click the Log time
 icon. The Record time window appears, with a list of assignments that you worked on that day. Choose an assignment, and enter the number of hours. Click Log time.
You can now archive online projects one by one from a memoQ server. Previously, you could back up local projects only (you still can), and you could back up an entire memoQ server.
When you archive an online project, memoQ server will create a copy of the project in a single archive file. The extension of the file is .mqarch.
- Normally, the archive file is saved on the memoQ server itself, in a pre-set folder. (The server's administrator can set this folder in the Deployment tool.)
- The archived project is removed from the list of projects.
- You can view the archived projects, and restore the online projects from them if necessary.
- You can also save the archived copy to your own computer.
Automatic archives: memoQ server can archive projects automatically after they are wrapped up, or after all work is done on them. To set this up, open Server administrator, and choose Archiving.
The archive contains everything - documents, resources (translation memories etc.), user and assignment information, settings. These are all restored when you restore an archive on the server. This helps you rebuild the project and the resources if the server was reinstalled, or when you need to move to a new server.
memoQ will not do one thing: When restoring an online project, the record on Language Terminal will not be created again, and the connection will not be restored even if the Language Terminal record is still there.
Do not mix this with backups: You back up local projects - you archive online projects. In addition, the administrator can make a backup of the entire memoQ server from the Deployment tool - but again, that is not the same as archiving projects.
To archive an online project or two:
- On the Dashboard, connect to the memoQ server where the online projects are. You may need to log in to the server.
Or: Open the Manage projects window. At the top, choose the server. Everything else will be the same as in the Dashboard.
- Select one project or a few projects.
- On the Project ribbon, click Archive. From the menu, choose Archive Selected Projects.
- The memoQ archive projects wizard starts.
- Choose where the archive is saved (normally, to the server itself), and what its name should be. If the project was connected to Language Terminal, choose what happens to the record on Language Terminal. Click OK.
To learn more: See Help about the memoQ archive projects wizard and the project manager's Dashboard.
To view the list of archived projects, and restore a project from there:
- On the Dashboard, connect to the memoQ server where the projects are. You may need to log in to the server.
- On the Project ribbon, click Archive. From the menu, choose View Project Archive.
- The list of archived projects appears on the Dashboard.
- To restore the online project from an archive: Right-click the name of the archive. From the menu, choose Restore From Archive.
- memoQ will ask if you really want to do this. Click Yes.
- The restore will happen in the background. The Task tracker opens automatically: you can follow the process there.
- To return to the list of online projects: Switch back to the Dashboard. On the Project ribbon, click Archive. From the menu, choose View Project Archive.
To restore an archive that was not saved to the server but to your computer:
- In Windows - in a File Explorer window - open the folder where the archive is.
- Double-click the name of the archive file. memoQ asks where to restore the project.
- In the Server URL drop-down box, choose a server that you used to connect to. Or, type or paste a new server address. Click the Select
 icon.
icon.You may need to specify a new server address if the server was reinstalled or moved. You may need to log in to the server.
- Click OK. memoQ will restore the project to the server in the background. You can follow the process in the Task tracker window.
To learn more: See Help about the project manager's Dashboard.
You can also make memoQ server archive projects automatically - after they are wrapped up or when they meet certain conditions. To do that, open the Server administrator, and choose Archiving.
When you start a lengthier operation on a resource (a translation memory, for example), or on an online project, a special type of progress window opens:
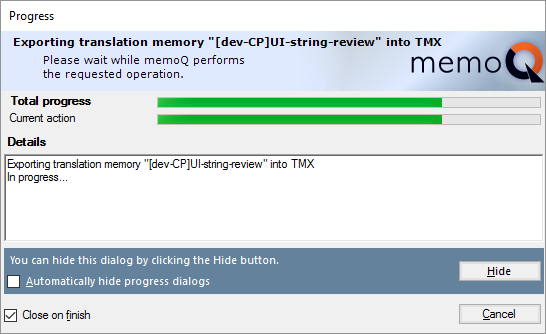
This is true for the following operations in online projects:
- Import (document)
- Import with options
- Import folder structure
- Pre-translation
- X-translation
- Statistics
- Create any reports from the Reports pane of an online project
- Export (stored path)
- Export (dialog)
- Export bilingual
- Confirm and update rows
- Archiving and restoring online projects
Exporting and importing large resources (mostly translation memories and term bases) also open this kind of progress window, even in memoQ translator pro.
You can hide these.
If you want to know what is going on, open the Task tracker window (from the memoQ menu):
![]()
To learn more: See Help about the new progress windows and about the Task tracker.
The memoQ pseudo-translation plugin works like a machine-translation plugin, but it does not translate text. It simulates translation.
Pseudo-translation is useful in software localization. You can create "translation" that is visibly different from the source text. This makes it easier to spot those source strings that were not imported for translation.
Pseudo-translation is also useful for checking if the translation will fit the available space. You can add more characters to the output, or double some characters. This helps you simulate a situation when the translation becomes longer than the source text.
Pseudo-translation can also be helpful if you want to test if your document exports. You may have used a complicated filter to import your document, and in order to simulate the export of the fully translated document, you can use the pseudo-translation plugin. This prevents you from trouble of not being able to export your final files.
In memoQ 8, you can have several different pseudo-translation configurations - practically, you can have one for each language pair.
In addition, memoQ can now change the length of the segments in a controlled way - you specify how much.
Pseudo-translation works when you turn on the memoQ pseudo-translation plugin under Machine translation (in Options), and you turn on Machine translation when you pre-translate documents.
This can be automatic, too: In a project template, when you use the automated Pre-translate action, you can turn on Machine translation in the settings.
To learn more: See Help about setting up pseudo-translation, about pre-translation, and about the automated actions in project templates.
The Customer Portal and the Reporting Platform
With memoQ server, organizations can invite their customers to send in translations directly. This happens through the Customer Portal - a web page operated by your memoQ server that your customers can connect to.
You will find the Customer Portal useful
- if your organization is an enterprise where the translation department accepts jobs from other teams such as marketing, legal, technical, financial, and many more - or
- if your organization is a translation company that is setting up a standardized business process for trusted and verified customers.
To use the Customer Portal:
- Install memoQweb and the Customer Portal on your memoQ server.
- In memoQweb, set up services that you offer to your customers, and organizations that you accept as customers.
- Assign project managers - users from your memoQ server - to each organization.
- Have the representatives of your customers register at the Customer Portal. Approve their registrations.
- Each project manager will monitor the requests sent in by customers, and process them: Create quotes and manage translation.
In memoQ project manager, all you can do is open these projects for management and take care of the translation process. Quoting and the management of customers always happens in memoQweb.
On the Dashboard for project managers, use the Customer Portal projects and the Customer Portal projects in quoting phase filters to view these projects.
With the new project management functionality in Language Terminal and in the Customer Portal, you have access to new types of reports.
Through Language Terminal, you can report on the volume of projects by customer, domain, subject, project line, or by target languages, over specific amounts of time.
New types of reports will be released continuously.
Everything else
memoQ 8 works with several windows. If you close one of the windows, the others stay open. You can even close the memoQ main window - memoQ will keep running, and the other windows will all remain open.
To exit memoQ:
- On the Windows taskbar, right-click the memoQ icon:
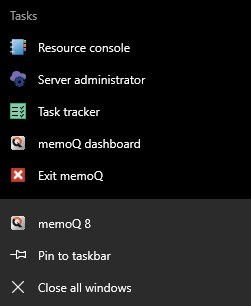
- In this menu, click Exit memoQ.
If you accidentally close the memoQ main window, and you want to get it back: On the Windows taskbar, right-click the memoQ icon. In the menu, click memoQ dashboard.
memoQ Adriatic adds 37 new languages or sublanguages.
For the complete list: See Help about Supported languages.
Akan
Albanian (Albania) [Tosk, Gheg,
Albanian (Kosovo)
Albanian (Macedonia)
Albanian (Montenegro)
Aragonese
Aranese
Asturian
Bangala
Breton
Cebuano
Cherokee (Latin)
Choctaw
Chuukese
Fanti
French (Africa)
French (Morocco)
Fulah
Greenlandic
Guarani
Hawaiian
Hiligaynon
Ilocano
Kabuverdianu
Maay
Meänkieli
Navajo
Occitan
Oromo
Pennsylvania German
Pohnpeian
Quechua
Rakhine
Spanish (Latin America)
Tatar
Twi
Wolof